If you’ve ever found yourself trying to get comfortable on a long flight, road trip, or train ride, you already know the value of a good travel pillow. Now imagine having one that’s soft, customizable, and handmade by you. In this guide, you’ll learn how to crochet a super easy travel pillow using a beginner-friendly crochet pattern that’s both functional and stylish.
This project is perfect for crochet lovers who want to make something practical, cozy, and giftable. Whether you’re creating it for yourself or as a thoughtful present for a fellow traveler, this crochet travel pillow pattern combines simplicity with creativity. The best part? It only takes a few hours to complete and uses basic materials, making it ideal for both beginners and experienced crafters.
Before diving into the step-by-step instructions, we’ll go over the best yarn to use, recommended hook sizes, and the ideal measurements for comfort and convenience. By the end of this article, you’ll have everything you need to stitch up your very own travel pillow—lightweight, portable, and 100% handmade with love.
Materials, Tools, and Measurements
-
Yarn Type and Texture
For the perfect crochet travel pillow, choose a soft, machine-washable yarn like worsted weight cotton or acrylic. These yarns are gentle on the skin and hold their shape well, even with frequent use. Cotton is ideal for warm climates, while acrylic offers extra cushion.
-
Hook Size Recommendations
Use a 5.0 mm (H-8) crochet hook for medium tension and comfortable stitch definition. If you’re a tight crocheter, size up to a 5.5 mm hook. Always do a quick gauge swatch to ensure your fabric won’t be too stiff or too loose.
-
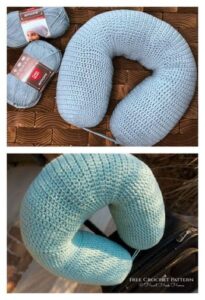
Standard Pillow Dimensions
The ideal size for a U-shaped travel pillow is approximately 12″ x 11″ (30.5 cm x 28 cm). If you’re making a square or rectangular pillow, aim for 12″ x 12″ or 12″ x 14″. Be sure to adjust your crochet pattern to match your preferred shape.
-
Cutting and Stuffing Materials
You’ll need polyester fiberfill (or scrap yarn pieces) to stuff the pillow evenly. Cut a fabric lining—optional but helpful—in a matching size to help contain the stuffing and reinforce the pillow’s shape.
-
Optional Notions
Add a zipper, button, or hook to attach the pillow to your bag. You can also include a small loop for hanging on travel hooks or backpacks. These extras make your crochet project even more travel-friendly.
-
Tools Checklist
Gather your scissors, yarn needle, stitch markers, measuring tape, and your chosen crochet pattern to begin. Having all tools ready will make the process smooth and enjoyable.
Step-by-Step: How to Crochet the Travel Pillow
-
Starting with the Base Chain
Begin by chaining 41 stitches using your worsted weight yarn. This will form the width of your rectangular pillow. If you’re making a U-shape, chain 80 stitches and slip stitch to join in the round, being careful not to twist.
-
Working the First Rows
Row 1: Single crochet (sc) in the second chain from the hook and across. (40 stitches)
Row 2: Chain 1, turn, single crochet across again. Continue this for 30 rows to create a 12” tall rectangle. For U-shape, work in rounds using half double crochets (hdc) or double crochets (dc) for faster coverage. -
Shaping the Edges
Once you’ve reached the desired height, you can begin shaping the pillow. For rectangles, leave it as is. For a U-shaped pillow, add increases and decreases evenly spaced to form the curve. Use stitch markers to help guide your shaping.
-
Finishing the Back Panel
To make the back panel, repeat the same number of chains and rows as the front. If you prefer, you can use a contrasting color or a fun stitch pattern like moss stitch or waffle stitch to add texture.
-
Seaming the Pieces
Place both pieces together, wrong sides facing. Slip stitch or whip stitch around the edges, leaving a 3” opening for stuffing. Make sure your stitches are tight and secure to prevent gaps.
-
Stuffing and Closing
Insert your polyester fiberfill through the opening, distributing evenly. Do not overstuff—the pillow should be firm but squeezable. Once satisfied, close the seam with a slip stitch and weave in all loose ends securely.
Customization Tips for Your Crochet Pattern
-
Add a Pocket
Want to store earbuds, lip balm, or a boarding pass? Add a small square pocket to the front using the same crochet technique. Chain 10, work 10 rows of single crochet, and sew it on before assembling the pillow.
-
Use Variegated or Color Block Yarn
Create a playful design using variegated yarn or switching colors every 10 rows. This gives your pillow a modern, travel-ready vibe that also hides wear and tear over time.
-
Try Decorative Edging
Once seamed, add a scalloped or shell stitch border around your pillow for a fancy touch. This elevates a basic project and adds charm to the final product.
-
Personalize with Initials
Use surface slip stitches or chain embroidery to add your initials or a short travel quote like “Wander Often.” This makes your pillow easy to identify and uniquely yours.
-
Add Elastic or Strap
If you want to attach the pillow to your luggage, add a band or Velcro strap across the back. Just crochet a 2” wide band and stitch it across both corners.
-
Make a Removable Cover
Crochet the pillow cover separately with a hidden zipper or button closure. This makes cleaning easy and allows you to change styles for different seasons or travel moods.
Benefits of Making a Handmade Travel Pillow
-
Saves Money
Store-bought travel pillows can be expensive and made from synthetic materials. Making your own using a free crochet pattern saves money and lets you control quality.
-
Tailored Comfort
Adjust the size, firmness, and shape based on your needs. Whether you want neck support or a back cushion, your DIY crochet travel pillow can be personalized exactly how you like.
-
Sustainable Choice
Handmade pillows are more sustainable. You can use leftover yarn, upcycle fabric for stuffing, and avoid synthetic covers that end up in landfills.
-
Gift-Worthy Creation
This travel pillow is the perfect handmade gift. Pair it with a matching eye mask, sleep spray, or travel blanket for a thoughtful set your friends and family will love.
-
Quick and Portable Project
This crochet pattern is compact enough to work on during a flight, long commute, or weekend trip. Bring it in your project bag and stitch while you wait.
-
Beginner-Friendly Learning
You’ll learn foundational skills like single crochet, shaping, and seaming—all while making something functional. It’s a rewarding experience from start to finish.
Final Thoughts and Travel Inspiration
Making your own crochet travel pillow is more than just a craft—it’s a way to combine comfort, creativity, and personal flair into something you’ll use time and time again. Whether you’re headed on a summer vacation, business trip, or simply love having cozy support on hand, this crochet pattern will serve you well.
With minimal materials and just a few hours of your time, you can create a beautiful, durable pillow that reflects your style and meets your needs. Don’t forget to pack it in your carry-on—you’ll be glad you did when the seat reclines and the lights dim.
Happy crocheting and safe travels!


