Learning how to crochet a triangle bag with an amazing technique is a rewarding and fun project that combines creativity and functionality. The crochet triangle bag is not only stylish but also incredibly practical for daily use. In this tutorial, you will discover a unique and stylish crochet pattern that is perfect for beginners and experienced crafters alike. Using simple stitches and precise measurements, you can create a stunning bag that will impress everyone.
The beauty of this project lies in its versatility. Whether you want to craft a small handbag, a large shoulder bag, or a chic accessory for special occasions, the crochet triangle bag pattern can be easily adapted to meet your needs. The crochet patterns used in this tutorial are carefully explained, making it simple for anyone to follow. This step-by-step guide will walk you through all the essential steps, from choosing the yarn to assembling your triangle bag.
By using the right crochet patterns and focusing on detailed instructions, you can achieve a professional finish. Whether you are crafting for yourself, creating gifts, or even considering selling your handmade bags, this tutorial will set you up for success. Let’s dive into this amazing crochet adventure!
Materials and Fabric Measurementsn
Yarn Selection
Choosing the correct yarn is crucial when starting your crochet triangle bag. A medium-weight cotton yarn is highly recommended for its durability and smooth texture. Cotton holds its shape well and is easy to work with, especially for beginners.
Ensure you purchase approximately 200-250 grams of yarn for this project. Cotton yarns in solid or multi-color tones work beautifully for this design. Neutral shades such as beige, white, or black offer timeless elegance, while vibrant colors add a playful touch.
Make sure your yarn matches the hook size for the best results. This will ensure consistent tension throughout the project, which is essential for the bag’s structure. Cotton yarn is also easy to clean and maintain.
If you prefer a softer or more flexible bag, acrylic yarn can also be used. However, keep in mind that acrylic does not offer the same sturdiness as cotton, which is typically preferred for bags.
You may also want to select a complementary lining fabric to add extra durability and a finished interior. The fabric lining should be cut to the same triangular measurements as the bag panels.
Finally, consider adding a strap, zipper, or button for a secure closure. These finishing touches will elevate the final look and functionality of your crochet triangle bag.
Crochet Hook and Tools
Selecting the right crochet hook is essential to achieving the perfect tension and stitch definition. For this project, a 4.0 mm (G-6) crochet hook is ideal for most medium-weight cotton yarns.
Using a slightly smaller hook than recommended can provide a tighter weave, which is beneficial for bags. A tight weave ensures the bag holds its shape and securely carries items without sagging.
In addition to your crochet hook, you will need a tapestry needle for weaving in ends and sewing the bag pieces together. Stitch markers are also useful to keep track of your rounds or rows, especially when forming the triangle shapes.
Sharp fabric scissors are necessary for cutting yarn and any fabric lining you choose to include. Measuring tape will help ensure that all pieces are cut and crocheted to the correct dimensions.
It is also recommended to have a blocking mat and pins to shape the triangles before assembly. Blocking helps maintain the structure and gives a professional finish to the bag.
Lastly, have your closure accessories such as a zipper, button, or magnetic snap on hand to complete your unique and stylish crochet triangle bag.
Step-by-Step Crochet Instructions
Creating the Triangles
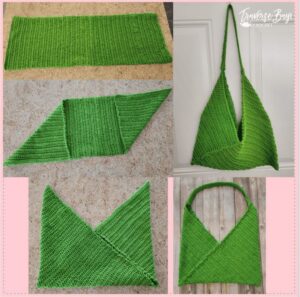
To start your crochet triangle bag, begin by crocheting three identical triangles. Chain 2 to start the first triangle and work single crochets into the second chain from the hook.
Increase one stitch at the beginning and end of each row to gradually form the triangle shape. Continue this process until the triangle reaches approximately 8 inches on each side.
Repeat this process to create two more triangles of the same size. Make sure your stitches are even and tight to maintain a solid structure.
Once all three triangles are complete, block them using a blocking mat and pins to ensure they are perfectly shaped and ready for assembly.
If desired, you can create color variations for each triangle or use a consistent color throughout for a uniform look.
Set the triangles aside and prepare for the assembly step, which is where the magic of this crochet pattern comes together.
Joining the Triangles
Lay the three triangles flat, forming the outline of the bag. The base of each triangle will meet to form the bottom of the bag.
Use a whip stitch or slip stitch to join the triangles together along their edges. Make sure the seams are tight and neat, as they will form the bag’s structure.
When stitching the last seam, leave the top edges open to form the bag opening. Check all connections to ensure the bag is securely joined.
You may choose to line the inside of the bag with fabric at this stage. Cut the fabric to match the triangular panels and sew it into place using a sewing needle.
After joining, the bag will start to take its unique and stylish triangular shape. Double-check for loose ends and weave them in securely using your tapestry needle.
Test the bag’s sturdiness by gently pulling the seams. If the bag holds its shape well, you are ready to add the strap and finishing touches.
Adding the Strap
The strap for your crochet triangle bag can be customized to your preferred length and style. You can crochet a long strap using single crochet stitches or use a pre-made leather strap.
For a crochet strap, chain to your desired length and work rows of single crochet stitches until you reach the preferred width. This provides a sturdy and comfortable strap for carrying.
Attach the strap to the upper corners of the bag securely using your tapestry needle and matching yarn. Reinforce the seams for added strength.
If you are using a fabric or leather strap, ensure it is sewn on securely with reinforced stitching. You may also add metal rings or hooks for a detachable strap option.
You can add decorative details such as tassels, beads, or small charms to personalize the strap and match your unique style.
Ensure the strap is comfortable to wear and that it complements the size and shape of your crochet triangle bag.
Finishing Touches
Finish your crochet triangle bag by adding a closure. A zipper, magnetic snap, or button can be used to secure the bag’s opening.
Sew the closure carefully to ensure it is aligned and functional. A zipper offers the most security, while a button gives a more classic touch.
Weave in all remaining yarn ends neatly using your tapestry needle. Trim any excess yarn carefully to avoid unraveling.
Give the entire bag a gentle steam or block to help it settle into its final shape. This step enhances the overall look and feel of the bag.
Consider adding an optional lining for extra durability and a polished interior. Choose a lightweight fabric that matches or complements the bag’s color.
Once all finishing touches are complete, your crochet triangle bag is ready to use or gift. Enjoy your new, unique, and stylish accessory!
Final Thoughts on Crochet Patterns for Bags
Why Crochet Patterns Are Perfect for Bags
Crochet patterns are ideal for making bags because they offer durability, versatility, and endless creative options. The texture and flexibility of crochet make it possible to create structured yet soft bags.
Using crochet patterns allows you to personalize every aspect of your bag, from the size to the color and strap length. This customization makes crochet bags highly desirable for both personal use and as gifts.
The crochet triangle bag is an excellent example of how creative patterns can produce stylish and functional accessories. It’s a project that is rewarding and easy to complete with the right guidance.
Learning how to make bags with crochet patterns also opens doors to more complex designs in the future. Once you master the basics, you can experiment with intricate stitches and detailed embellishments.
Crochet bags are eco-friendly alternatives to store-bought accessories. By making your own, you can control the materials and avoid waste.
Completing a project like the crochet triangle bag provides a sense of accomplishment and a unique item you can proudly show off or gift to others.
Crochet Patterns: The Gateway to Creativity
Working with crochet patterns allows you to bring your creativity to life. Whether you follow a simple pattern or add your own twist, each project reflects your style.
The crochet triangle bag pattern offers a great foundation for beginners to build confidence. Its straightforward structure makes it manageable yet stylish.
Advanced crocheters can use this pattern as a base and incorporate more complex stitches or patterns, such as shells, bobbles, or lace designs.
Exploring different crochet patterns expands your skills and helps you discover new techniques, like the amazing joining method used in this bag tutorial.
Don’t be afraid to experiment with yarn types, colors, and decorative details. Each variation will result in a one-of-a-kind bag.
The possibilities are truly endless when it comes to crochet. Starting with a unique and stylish project like the crochet triangle bag is the perfect way to dive into this wonderful craft.


