If you’re looking for a fun and functional craft idea, learning how to crochet a frog shaped finger protection ring 🐸 is a perfect project to try. Whether you’re a seasoned crocheter or just beginning, this project blends whimsy and practicality beautifully. It’s not only adorable but also serves a real purpose — protecting your finger while sewing, quilting, or crafting.
These rings are designed to be worn around the fingertip, especially helpful when hand sewing, doing embroidery, or working with needles and pins. The playful frog design adds personality and charm, making crafting safer and more enjoyable.
In this article, we’ll guide you step-by-step through creating your very own frog finger protector using a simple crochet pattern. We’ll also share tips for customizing your ring with colors, embroidery, and additional features. So grab your hook, and let’s bring this cute little frog to life!
Materials Needed and Basic Measurements
Before you begin working on this crochet pattern, gather all your supplies. One of the best things about this project is that it requires only small amounts of materials, making it a great way to use up your yarn scraps.
-
Yarn Choice and Colors
Use cotton yarn for durability and comfort. You’ll need:-
Green for the frog body.
-
White for the eyes.
-
Black embroidery thread or yarn for pupils and mouth.
Optional: a bit of pink or red for cheeks or tongue.
-
-
Hook Size
A 2.5mm or 3mm crochet hook is ideal. This creates tight stitches, which are better for small and structured pieces like rings or amigurumi. -
Notions & Extras
-
Scissors
-
Yarn needle
-
Stitch marker (optional)
-
Hot glue or fabric glue (for attaching small parts if needed)
-
Small piece of felt or soft fabric for lining (optional for comfort)
-
-
Finger Ring Measurements
Measure around the top part of your finger (above the knuckle). Most adult fingers are around 5 to 6 cm (2.0 to 2.5 inches) in circumference. Adjust your base chain accordingly for a snug fit. -
Crochet Terms (US)
-
ch = chain
-
sc = single crochet
-
sl st = slip stitch
-
inc = increase (2 sc in one stitch)
-
dec = decrease (sc two stitches together)
-
st/sts = stitch/stitches
This entire crochet pattern is beginner-friendly and uses only basic stitches.
-
-
Pattern Gauge
Gauge isn’t critical for this small piece, but tight stitches are important so that the ring holds its shape and fits securely on your finger.
Creating the Frog Ring Base
Now that you have your materials ready, let’s start creating the base ring. This part will wrap around your finger, serving as both the structure and the base for the frog’s face.
-
Start the Ring
Begin with green yarn.
Chain 16–20 stitches, depending on your finger size.
Sl st into the first chain to form a ring. Be careful not to twist. -
Work the Base Rounds
Round 1: Sc in each stitch around. (16–20 sc)
Round 2: Repeat. Continue until your ring is 1.5–2 cm (0.6–0.8 inches) wide.
This usually takes 4–5 rounds. -
Shaping the Edge (Optional)
For a rounded edge, sl st around the top on the final row. This gives a cleaner finish and added durability. -
Fit Test
Try the ring on. It should feel snug but not tight. Adjust by increasing or decreasing chains in your starting round if needed. -
Fasten Off
Cut the yarn and weave in the tail using a yarn needle. Your base ring is now complete and ready for the cute frog features! -
Optional Lining
Cut a soft fabric strip or small circle and glue it inside the ring for added comfort. This is especially helpful if you plan to wear it for long periods.
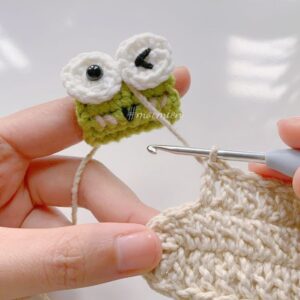
Crocheting the Frog’s Eyes and Attaching Features
Now comes the most fun and creative part — adding the frog’s face. We’ll create small crochet circles for the eyes and embroider or stitch the facial features for maximum charm.
-
Making the Eyes (Make 2)
With white yarn:
Rnd 1: Magic ring, 6 sc in ring. (6)
Rnd 2: Inc in each st around (12)
Fasten off and leave a long tail for sewing. -
Pupils
With black yarn or embroidery thread:-
Embroider a French knot or small stitch in the center of each white circle.
-
Alternatively, glue on mini black safety eyes or beads.
-
-
Attaching the Eyes
Position both eyes slightly above the top edge of the ring base.
Sew them securely to the ring, using the long tails you left earlier. -
Crocheting Small Eyelids (Optional)
For extra cuteness, crochet a small green crescent:
Ch 4, sc across, turn, dec, sc, finish off.
Attach just above each white eye for a sleepy or sassy look. -
Facial Features
With black thread, embroider a simple smile or “uwu” mouth between the eyes. Add two pink stitches on the cheeks for blush if desired. -
Secure All Parts
Double-check all parts are well attached. If giving this as a gift or using frequently, add a tiny dab of fabric glue to secure.
Customizing and Finishing Touches
What makes this crochet pattern extra special is how customizable it is. You can add personality and detail to your frog, making each one unique and expressive.
-
Adding a Bow or Hat
Use contrasting yarn to crochet a mini bow tie or flower to add character.
Bow pattern: Ch 6, sc across, roll tightly and stitch in center. Attach below mouth. -
Tiny Legs or Arms
For a full frog look, crochet mini tubes for limbs:
Ch 5, sc across for 3 rows. Fold and attach to side or bottom. -
Making It a Keychain
Add a loop at the back of the ring:
Ch 10, sl st to form a loop. Attach keyring and you’re ready to go! -
Alternative Colors
Try using pastel yarns for a baby frog, or dark green for a realistic look. Mix and match with multicolor yarns for fun effects. -
Glow-in-the-Dark Yarn
For a night-time surprise, use glow-in-the-dark yarn for the eyes or pupils. It adds charm and function. -
Gift and Packaging Idea
Present your frog ring in a small jewelry box with a hand-written tag that says: “Toad-ally love you” or “Hoppy crafting!”
Why You Should Try This Crochet Pattern 🐸
Creating your own crochet frog finger protection ring is more than just a fun craft project — it’s a satisfying, useful, and creative expression. It’s quick to make, perfect for gifting, and can be customized endlessly.
-
Beginner-Friendly
This crochet pattern uses only basic stitches, making it perfect for beginners wanting to explore small-scale projects. -
Quick and Portable
Finish this in under an hour. It’s small enough to take on-the-go and work on during travel or breaks. -
Functional and Cute
Protects your finger during crafting, while also adding a playful touch to your hand! -
Great for Gifts and Craft Fairs
These little frog rings make excellent gifts or items to sell at local markets or Etsy. -
A Great Scrap-Busting Project
Uses very little yarn, which makes it an eco-friendly way to use up leftover materials. -
Adorable and Trendy
With frog-themed crafts trending in crochet communities, this design is both fun and stylish!
Final Thoughts
Now that you know how to crochet a frog shaped finger protection ring 🐸, it’s time to pick up your hook and bring your new friend to life. With this adorable and functional project, you’re not only enhancing your crochet skills but also adding something handmade and useful to your crafting kit.
So next time you feel a prick from a pin or needle, just smile — because your little frog is on guard.
Happy crocheting! 🧶


