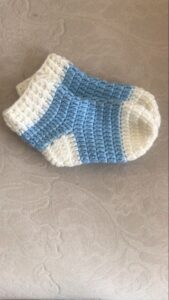
Learning how to crochet perfect shaped baby socks is a heartwarming and rewarding project for both beginners and seasoned crafters. Handmade baby socks are not only adorable but also practical gifts that bring comfort and style to little ones. In this easy tutorial, we will guide you step-by-step through the process, using accessible crochet patterns to ensure your success. The beauty of this craft is that with just a hook and some yarn, you can create a soft, warm, and perfectly fitted pair of baby socks.
Crocheting baby socks requires some basic knowledge of crochet stitches, but even if you are a beginner, this guide is designed to walk you through each step. Whether you want to make a thoughtful baby shower gift or add a handmade touch to your baby’s wardrobe, this tutorial will help you create something special. Following a precise crochet pattern will allow you to achieve the perfect shape, ensuring the socks are not too tight or too loose.
One of the most satisfying aspects of creating crochet baby socks is the creative freedom you have. You can choose colors that match the baby’s outfits, play with different yarn textures, and add cute embellishments. By following this easy tutorial, you will be able to crochet baby socks that not only look professional but also provide the comfort and flexibility a baby needs. Now, let’s dive into this detailed guide on how to crochet perfect shaped baby socks step by step.
Materials Needed for Crocheting Baby Socks
Before starting the process of how to crochet perfect shaped baby socks, it is essential to gather the right materials. Having everything prepared will make your crocheting experience more enjoyable and efficient.
- First, choose a soft, baby-friendly yarn. Cotton or acrylic yarns are highly recommended for their comfort and washability. Select colors that you love or that suit the baby’s wardrobe.
- Second, you will need a crochet hook that matches the yarn weight. Typically, a 3.5 mm to 4 mm crochet hook is perfect for creating baby socks with the right tension and flexibility.
- Third, gather basic tools such as scissors, a yarn needle for weaving in ends, and stitch markers to help you track your rounds and decreases accurately.
- Fourth, it is crucial to have a crochet pattern on hand. For this tutorial, we provide a free and easy-to-follow crochet pattern specifically designed for baby socks.
- Fifth, prepare a measuring tape to ensure the socks will have the perfect size. Baby socks typically measure around 3-4 inches in length for newborns.
- Lastly, make sure you are working in a well-lit and comfortable space. Crocheting delicate items like baby socks requires attention to detail and a cozy environment to keep you focused and relaxed.
Step 1: Creating the Toe Section
The first step in how to crochet perfect shaped baby socks is starting from the toe. The toe section forms the base of the sock and is essential for ensuring a good fit.
- Begin by making a magic ring. This technique helps create a tightly closed starting point, which is perfect for baby socks.
- Into the magic ring, crochet six single crochet (sc) stitches. Pull the ring tight to close the circle and join with a slip stitch to form the first round.
- For the second round, make two single crochet stitches into each stitch around, increasing the total stitch count to 12. This creates a rounded shape for the toe.
- In the third round, crochet one single crochet into the next stitch, then two single crochets into the following stitch. Repeat this sequence around to gradually increase the size.
- Continue increasing in this pattern until the toe circle reaches the desired width, typically around 2 inches in diameter for newborns.
- Finish the toe section by crocheting a few rounds without increases to give the toe area some depth and structure, preparing it for the foot section.
Step 2: Building the Foot Length
Now that the toe section is complete, it’s time to build the foot length in the process of how to crochet perfect shaped baby socks. This step ensures the sock will comfortably fit the baby’s foot.
- Start by crocheting single crochet stitches around the circumference of the toe section without any increases. This will start shaping the foot.
- Continue crocheting in rounds until the foot measures approximately 3 inches from the tip of the toe. This is the standard length for newborn socks.
- Use stitch markers to track your rounds, ensuring even stitching and consistent tension throughout the foot section.
- Adjust the number of rounds if you are making socks for older babies. For example, increase the foot length to 4 inches for 3-6 month-olds.
- Try to maintain a smooth and consistent stitch pattern to create a professional and neat appearance.
- Check the fit periodically by comparing the sock to a baby shoe or a size guide to ensure accuracy.
Step 3: Shaping the Heel
One of the most important parts of how to crochet perfect shaped baby socks is shaping the heel properly. A well-formed heel ensures that the sock stays securely on the baby’s foot.
- To shape the heel, begin by crocheting back and forth in rows instead of rounds. This creates a flat, curved section that will hug the heel.
- Typically, you will work on about half the total stitches to form the heel section. For example, if you have 24 stitches, work on 12 stitches.
- Crochet several rows of single crochet stitches, turning your work at the end of each row. This will start to build the heel cup.
- Once the heel cup reaches the desired height, usually about 1 inch, you will decrease stitches to close the heel and form the back of the sock.
- Use a slip stitch to join the sides of the heel cup and resume crocheting in rounds to start building the sock’s ankle.
- This heel-shaping method is one of the easiest crochet patterns for beginners while still providing a well-fitted and comfortable sock.
Step 4: Crocheting the Ankle and Cuff
The final step in how to crochet perfect shaped baby socks involves creating the ankle and cuff. This part adds both functionality and style to the socks.
- Start crocheting in rounds again, working evenly around the top of the heel and the foot. This will form the ankle portion of the sock.
- Continue crocheting until the ankle section reaches your desired height. Typically, 1 to 1.5 inches is a good length for newborn socks.
- For the cuff, switch to a ribbed crochet stitch, such as front post and back post double crochet stitches, to create a stretchy and snug fit.
- Work the ribbed cuff for about 1 inch, or longer if you prefer a fold-over style.
- Finish the sock by weaving in all loose ends using a yarn needle. Ensure that the seams are smooth and secure.
- Optionally, you can add decorative elements such as tiny bows, buttons, or contrasting yarn colors to make the socks even more adorable.
Conclusion
Learning how to crochet perfect shaped baby socks is an enjoyable and fulfilling experience. By following this easy tutorial and using the provided crochet patterns, you can create beautiful, soft, and well-fitted socks for babies of all ages. The process is simple and adaptable, allowing you to adjust sizes and colors to match your preferences.
Remember that the key to perfect baby socks lies in careful measurement, consistent stitching, and thoughtful shaping. Whether you are a beginner or an experienced crocheter, this project is a great way to develop your skills and create something truly special.
With your materials prepared and your understanding of the steps outlined, you are now ready to begin your crocheting journey. Enjoy crafting these perfect shaped baby socks and sharing your handmade creations with friends, family, and loved ones.


