
How to Crochet Snowflakes is a delightful and creative way to bring a touch of winter charm into your handmade projects. Learning how to crochet snowflakes allows you to create delicate, decorative pieces that can be used for home décor, gifts, or even holiday ornaments.
Crocheted snowflakes are loved for their intricate designs and versatility. You can make them simple or detailed, depending on your skill level, and customize them with different yarns, colors, and finishes. The beauty of how to crochet snowflakes lies in the endless creative possibilities that come with each pattern.
In this complete guide, you will discover everything you need to know about how to crochet snowflakes, including materials, step-by-step instructions, creative variations, and expert tips. By the end, you will feel confident creating your own beautiful snowflake designs for any occasion.
Before diving into the process, it’s important to understand that crocheting snowflakes is not just about following a pattern—it’s about developing rhythm, patience, and attention to detail. Each stitch contributes to the final design, and even small adjustments can create unique variations. When learning how to crochet snowflakes, taking your time and enjoying the process is key to achieving the best results.
Another important aspect is choosing the right tools and materials. The quality of your yarn and hook will significantly impact the final appearance of your snowflakes. A well-made crochet snowflake should have clean edges, balanced symmetry, and a lightweight structure that holds its shape beautifully.
Lastly, practice plays a huge role. Your first few attempts may not look perfect, but with each project, your technique will improve. Mastering how to crochet snowflakes is a gradual journey, and every finished piece is a step forward in your crochet skills.
Essential Materials for How to Crochet Snowflakes
To successfully learn how to crochet snowflakes, you need to start with the right materials. Choosing appropriate supplies ensures that your snowflakes turn out neat, detailed, and visually appealing.
The most commonly used yarn for snowflakes is cotton thread. It provides a crisp finish and holds its shape well after blocking. When working on how to crochet snowflakes, thinner yarns usually create more delicate and intricate designs.
A suitable crochet hook is equally important. Most snowflake patterns use small hook sizes, typically between 1.5 mm and 3 mm. Using the correct hook size helps maintain tension and ensures your stitches are consistent.
You will also need a pair of sharp scissors to trim excess yarn cleanly. Keeping your edges neat is essential when creating decorative pieces like crocheted snowflakes.
A yarn needle is necessary for weaving in ends. This step gives your snowflake a polished and professional look, which is an important part of mastering how to crochet snowflakes.
Blocking tools, such as pins and a foam board, are highly recommended. Blocking helps shape your snowflakes and enhances their intricate patterns, making them look more refined.
Finally, fabric stiffener or a simple homemade solution can be used to give your snowflakes structure. This step is optional but highly beneficial for decorative uses.
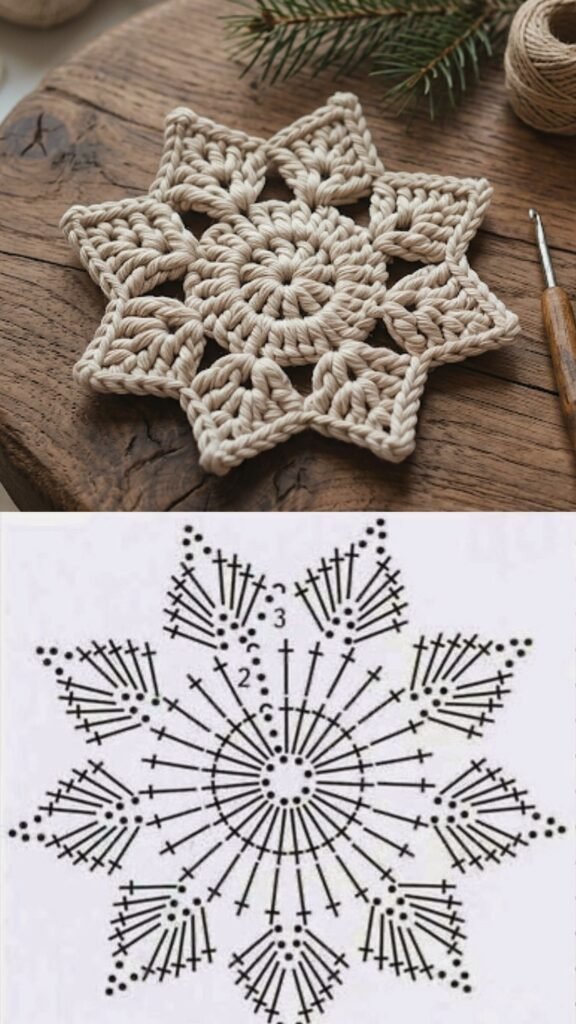
Step-by-Step Guide on How to Crochet Snowflakes
Understanding the basic process is essential when learning how to crochet snowflakes. Breaking it down into manageable steps makes it easier to follow and achieve consistent results.
Start by creating a magic ring or a chain loop. This forms the center of your snowflake and provides a foundation for the rest of the stitches.
Next, work your first round of stitches into the ring. This usually involves basic stitches such as single crochet, double crochet, or chains. These stitches form the base structure of your crochet snowflake.
In the following rounds, you will begin shaping the snowflake. This often includes creating chains and slip stitches to form the characteristic points or “arms” of the snowflake.
Pay close attention to stitch counts and spacing. Symmetry is crucial when learning how to crochet snowflakes, as it ensures that all sides of the snowflake are balanced.
Continue building the pattern by adding decorative elements such as picots or extended chains. These details give your snowflake its unique and intricate appearance.
Once the final round is complete, fasten off the yarn and weave in the ends. This completes the crocheting process and prepares your snowflake for finishing.
Creative Variations for How to Crochet Snowflakes
One of the most exciting aspects of how to crochet snowflakes is the ability to experiment with different styles and designs. Each variation offers a new opportunity to express creativity.
You can start by trying different yarn colors. While white is traditional, using metallic threads or pastel shades can give your snowflakes a modern twist.
Adding beads is another creative option. Beads can be incorporated into your stitches to create a sparkling effect, making your crochet snowflakes even more eye-catching.
Experimenting with different stitch patterns can also change the look dramatically. Combining basic stitches with decorative elements creates unique and personalized designs.
You can vary the size of your snowflakes by adjusting the yarn thickness or hook size. Larger snowflakes make great wall decorations, while smaller ones are perfect for ornaments.
Layering multiple snowflakes together can create a dimensional effect. This technique adds depth and makes your designs stand out even more.
Finally, consider using your snowflakes in different projects. They can be turned into garlands, coasters, or even appliqués for clothing and accessories.
Tips and Finishing Techniques for Perfect Crochet Snowflakes
Perfecting how to crochet snowflakes involves more than just following a pattern. Finishing techniques and small details make a big difference in the final result.
Blocking is one of the most important steps. By pinning your snowflake into shape and allowing it to dry, you enhance its symmetry and definition.
Using a stiffening solution helps maintain the shape over time. This is especially useful if your snowflakes are used as decorations.
Maintaining consistent tension throughout your work ensures that your stitches are even. This is a key factor in achieving professional-looking results when learning how to crochet snowflakes.
Take your time with each stitch. Rushing can lead to mistakes and uneven patterns, which can affect the overall appearance.
Practicing regularly will help you improve your technique and confidence. Each new snowflake you create will be better than the last.
Lastly, don’t be afraid to try new patterns and ideas. Creativity is at the heart of crochet, and experimenting is part of the learning process.
FAQ About How to Crochet Snowflakes
What is the best yarn for crocheting snowflakes
Cotton thread is the best choice for how to crochet snowflakes, as it provides structure and a clean finish.
Are crochet snowflakes suitable for beginners
Yes, beginners can start with simple patterns and gradually move to more complex designs as they gain confidence.
How do I make my snowflakes stiff
You can use fabric stiffener, glue solution, or sugar water to give your snowflakes a firm structure.
Can I use crochet snowflakes as decorations
Absolutely. They are perfect for holiday décor, gifts, and home decorations.
How long does it take to crochet a snowflake
Depending on the complexity, a snowflake can take anywhere from 20 minutes to a few hours.
Do I need to block every snowflake
Blocking is highly recommended, as it improves the shape and overall appearance of your snowflakes.
Conclusion
Learning how to crochet snowflakes is a fun and rewarding experience that allows you to create beautiful and versatile handmade pieces. Throughout this guide, you explored the essential materials, step-by-step instructions, creative variations, and expert tips needed to master this craft.
With practice and patience, you can develop your skills and create stunning snowflake designs that reflect your personal style. Each project is an opportunity to grow and experiment with new techniques.

