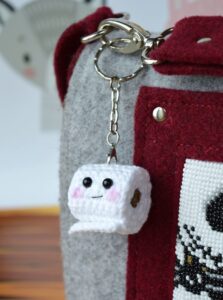
If you’re looking for a fun, quirky, and practical craft idea, learning how to knit a toilet roll bag charm is a delightful place to start. This mini project brings humor and functionality together, making it a great conversation starter and a perfect handmade gift. Whether you attach it to your purse, backpack, or keys, this charming little toilet roll is sure to bring a smile to everyone’s face.
Though the title suggests knitting, we’ll actually be using crochet for this project—especially because the shaping is much easier and cleaner with crochet patterns. This easy tutorial will walk you through each step, from the base to the loop, and even a tiny cardboard insert to make it look like a real roll of toilet paper—only mini and adorable!
This craft is beginner-friendly, requires minimal materials, and can be completed in under an hour. It’s also an excellent stash buster if you have leftover white yarn and keychain hardware. Let’s jump into the materials list and dive into this unique crochet pattern for a toilet roll bag charm!
Materials and Yarn Cuts for the Toilet Roll Charm
Before getting started with your crochet project, make sure you have all the necessary tools and materials on hand. Preparation is key to a smooth and enjoyable crafting session.
-
Yarn Type and Color
For this project, you’ll need worsted weight white cotton yarn for the main roll. Cotton holds its shape better and gives a clean, crisp finish. A small amount of brown or beige yarn is needed for the cardboard center. You’ll also need a small scrap of gray or black yarn for the hanging loop. -
Hook Size
Use a 3.5mm or 4mm crochet hook. A smaller hook ensures tight stitches so the stuffing doesn’t show through. This is important for small amigurumi-like projects such as this charm. -
Cutting Fabric or Inserts
Optional but recommended: cut a 1-inch strip of stiff felt or use a toilet paper roll (cut down to 1 inch width) to insert into the center and give the charm structure. You’ll also need a small circle (about 1” diameter) for the top and bottom stabilizers. -
Additional Materials
-
Scissors
-
Yarn needle
-
Polyfill stuffing
-
Keychain ring or lobster clasp
-
Stitch markers (optional)
-
-
Measurements of Final Project
The completed toilet roll charm will measure approximately 2.5 inches tall by 2 inches wide, including the rolled end and hanging loop. -
Stitch Abbreviations (US Terms)
-
ch = chain
-
sc = single crochet
-
sl st = slip stitch
-
inc = increase
-
dec = decrease
-
st/sts = stitch/stitches
-
Crochet Pattern: Creating the Toilet Roll Body
This is where your crochet pattern truly begins. You’ll start by forming a cylinder that will serve as the body of the toilet paper roll. This will be closed on one end and left open on the other to insert stuffing and the “cardboard” insert.
-
Starting the Cylinder
With white yarn, ch 21.
Row 1: Sc in second ch from hook and across (20 sc).
Row 2–10: Ch 1, turn, sc in each st across.
This creates a rectangular panel that will be rolled into a cylinder. -
Joining the Panel
Fold the rectangle so the short sides touch. Sl st them together to form a tube. This will become your roll’s outer layer. Fasten off and weave in the end. -
Crocheting the Top and Bottom Circles
Top and bottom circles are made separately using continuous rounds:
Rnd 1: Make a magic ring, 6 sc in ring (6)
Rnd 2: Inc in each st (12)
Rnd 3: Sc in next st, inc around (18)
Rnd 4: Sc in next 2 sts, inc around (24)
Make two of these. Use one to close the bottom of the roll. -
Attaching the Bottom Circle
With the cylinder upright, attach the circle to the bottom with sc all the way around (match 24 sts). Fasten off. -
Stuffing and Reinforcement
Lightly stuff the roll with polyfill. Insert the stiff felt or cardboard tube into the center to help keep shape. -
Closing the Top
Use the second circle for the top but don’t fully close it—leave about 1/4 open so you can insert the end of your “toilet paper strip” in the next step.
Creating the Toilet Paper Strip and Rolled End
Now that the main roll is shaped, we can make the little strip that dangles to give it that funny yet realistic look. This part adds character and makes it clear what the charm is meant to resemble.
-
Crocheting the Paper Strip
With white yarn, ch 16.
Row 1: Sc in second ch from hook and across (15)
Row 2–6: Ch 1, turn, sc across (15)
This makes a rectangular piece of toilet paper. You can make it longer if you want a more dramatic dangle. -
Optional Edge Detail
To simulate torn paper, sc around the edge with irregular slip stitches or picots. This gives a jagged, more realistic appearance. -
Attaching the Paper Strip
Roll the strip slightly and tuck one end into the open space in the top of the roll. Sew it in place securely. Use a yarn needle to tidy the seam. -
Adding the Cardboard Core (Optional)
If not already inserted, place your cardboard or felt tube inside and sew the top opening mostly closed, leaving just enough room for the strip. -
Closing the Top Completely
Whipstitch the final part of the top circle in place. Make sure everything is snug and round. -
Final Touches on the Roll
Shape with your hands. Flatten slightly if desired. This helps the charm look balanced when hanging.
Attaching the Loop and Keychain Hardware
The last part of this crochet pattern is making the hanging loop and attaching the keychain ring. This part makes your toilet roll bag charm truly portable and giftable!
-
Making the Loop
With gray or black yarn, ch 18.
Row 1: Sc in second ch from hook and across. Fasten off.
Fold the strip in half to form a loop and stitch both ends to the top center of the roll. -
Securing the Keychain Ring
Slide your metal keyring or clasp through the loop and secure it by double stitching around the base if needed. -
Reinforcing the Attachment
To make it durable, use matching thread and go over the loop 2–3 times with a sewing needle. -
Test the Strength
Tug gently to test. You don’t want your charm to fall apart when hanging on your bag. -
Decorative Additions
You can embroider small emojis or initials using black yarn. Add beads, or even a miniature bow to the roll for added cuteness. -
Gift Packaging Idea
Wrap the finished charm in tissue paper and place it in a small box with a label: “For emergencies only!”—a fun way to gift this handmade treasure.
Why You’ll Love This Toilet Roll Bag Charm
This tiny crochet masterpiece is fun, simple, and gives you a great sense of accomplishment. It’s a humorous conversation starter, a perfect stocking stuffer, or a thoughtful handmade gift for someone with a good sense of humor.
-
Quick to Make
You can finish this charm in under an hour, making it ideal for last-minute gifts or craft fairs. -
Beginner Friendly
The entire project uses only basic crochet stitches like single crochet and slip stitch, which are perfect for beginners. -
Creative Expression
Personalize each charm with colors, embroidery, or even tiny eyes to make it look animated. -
Low-Cost Project
Since it uses only small amounts of yarn, it’s a great way to use up scraps and experiment with new color combinations. -
Teaches Small-Scale Construction
Great for those learning amigurumi or small-scale 3D shaping in crochet patterns. -
Highly Giftable and Sellable
These make great novelty gifts and are excellent sellers at craft fairs or online stores like Etsy.
Final Thoughts
Creating a toilet roll bag charm is not only fun, but it also taps into the playful and joyful side of the crochet community. It’s an excellent way to explore your creativity, learn shaping skills, and make a useful little charm that brightens someone’s day.
So grab your hook, some leftover yarn, and start crafting this whimsical charm today. Whether for yourself or someone special, this unique crochet pattern is guaranteed to be a hit.


