
How to make a crocheted hat with a cow print is a fun, stylish, and creative project that allows you to combine basic crochet skills with a bold and eye-catching design. From the very beginning, learning how to make a crocheted hat with a cow print gives you the opportunity to create something unique that stands out from traditional crochet hats.
Crochet hats are one of the most popular projects among crafters because they are relatively quick to make and highly customizable. When you explore how to make a crocheted hat with a cow print, you go beyond simple designs and enter a world of creativity where color changes and irregular shapes play a major role.
Another reason why so many people are interested in how to make a crocheted hat with a cow print is its versatility. You can create hats for different age groups, adjust sizes easily, and even add fun details like ears or horns. Whether you want a cute accessory for a child or a fashionable statement piece for yourself, this pattern can be adapted to suit your needs.
Understanding how to make a crocheted hat with a cow print
To successfully learn how to make a crocheted hat with a cow print, it is important to understand the structure of a crochet hat. Most crochet hats are made in three main sections: the crown, the body, and the brim. Each section plays a key role in shaping the final piece.
The crown is typically worked first when crocheting from the top down. It begins with a magic ring and gradually increases in stitches to form a flat circle. This part determines the size of the hat and must be done carefully to ensure a proper fit when learning how to make a crocheted hat with a cow print.
Once the crown reaches the desired diameter, you stop increasing stitches and begin working in rounds. This forms the body of the hat. Maintaining even tension during this stage is essential for achieving a smooth and professional look.
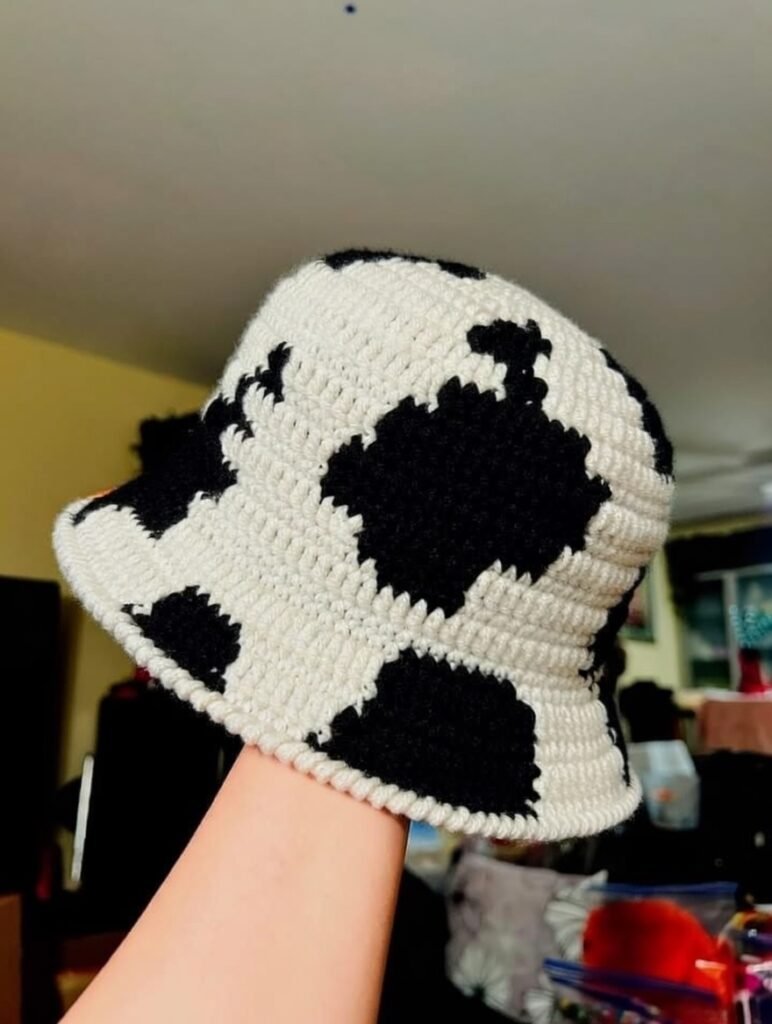
The cow print design is created during the body section. This involves changing yarn colors to form irregular patches that resemble a cow’s natural markings. Understanding how to switch colors cleanly is a key skill when mastering how to make a crocheted hat with a cow print.
Unlike structured patterns, cow print designs are intentionally irregular. This means you don’t need perfect shapes—randomness actually enhances the final result. This makes the project more forgiving and enjoyable.
Finally, the brim is added to finish the hat. This can be a simple edge or a textured ribbing that provides stretch and comfort. The brim completes the structure and adds a polished touch.
Materials and tools needed
Selecting the right materials is crucial when learning how to make a crocheted hat with a cow print. The yarn you choose will affect not only the appearance but also the comfort and durability of your hat.
Soft acrylic yarn is one of the most popular choices because it is affordable, easy to work with, and available in many colors. Wool yarn is another excellent option, especially if you want a warmer hat for colder weather.
You will need at least two colors of yarn to create the cow print effect. The base color is usually white or cream, while the spots are made with black or brown yarn. These contrasting colors are essential for achieving the classic look when learning how to make a crocheted hat with a cow print.
A crochet hook that matches your yarn is necessary. However, using a slightly smaller hook can help create tighter stitches, which improves the structure and durability of your hat.
Other essential tools include scissors, a yarn needle for weaving in ends, and stitch markers to keep track of your rounds. Stitch markers are especially helpful when working in continuous spirals.
Optional materials can add extra charm to your hat. For example, you can use stuffing for small decorative elements like ears, or even add buttons for additional detail.
Having all your materials ready before starting will make the process smoother and more enjoyable. Preparation is an important step in mastering how to make a crocheted hat with a cow print.
Step-by-step guide to making the hat
The first step in how to make a crocheted hat with a cow print is creating the crown. Begin with a magic ring and crochet a set number of stitches into it. Continue increasing evenly in each round until the circle matches the size needed for your head.
Once the crown is complete, stop increasing and begin working in rounds. This forms the body of the hat. Keep your stitches even and consistent to ensure a smooth finish.
Now comes the most creative part—adding the cow print. To do this, switch colors at different points in your rounds to create irregular patches. These patches should vary in size and shape to mimic natural cow markings.
When changing colors, pull the new color through the last yarn-over of the previous stitch. This creates a clean transition and helps maintain the overall look of your hat. Practicing this technique is essential when learning how to make a crocheted hat with a cow print.
You can carry the unused yarn along the inside of your work or cut and rejoin as needed. Carrying yarn saves time, but cutting and rejoining can create a neater finish if done carefully.
Continue working until the hat reaches your desired length. It’s a good idea to try it on occasionally to ensure the fit is correct.
Finish the hat by adding a brim. A ribbed brim can be created using back loop stitches or front and back post stitches. This adds elasticity and makes the hat more comfortable to wear.
Finally, weave in all loose ends securely. This step ensures that your hat is durable and ready for use.
Creative ideas and customization
One of the best parts of learning how to make a crocheted hat with a cow print is the ability to customize your design. You can experiment with different colors, textures, and details to create something truly unique.
Instead of traditional black and white, you can try brown and beige tones for a softer look. You can even use pastel colors for a playful and modern variation.
Adding ears is a popular option. Small crocheted ears attached to the top of the hat can give it a fun and whimsical appearance, especially for children.
You can also add small horns using tightly crocheted shapes. These details can transform your hat into a full animal-themed accessory.
Another idea is to experiment with different yarn textures. Chunky yarn creates a bold and cozy look, while thinner yarn results in a more refined design.
You can also adjust the size and style of the hat. A slouchy hat provides a relaxed and trendy look, while a fitted beanie offers a more classic style.
Personalization is another great option. Adding initials or small decorative elements can make your hat feel more special and unique.
Exploring these variations will help you fully understand how to make a crocheted hat with a cow print and develop your own creative style.
FAQ about crocheted cow print hats
Is this project beginner-friendly?
Yes, learning how to make a crocheted hat with a cow print is suitable for beginners who are familiar with basic stitches.
How long does it take to complete?
It typically takes between 3 to 6 hours depending on your experience and the complexity of the design.
What yarn works best?
Soft acrylic or wool yarn is ideal for comfort, warmth, and durability.
How do I create realistic cow spots?
Use irregular shapes and vary the size of each patch for a natural look.
Can I wash the hat?
Yes, most crochet hats can be hand-washed and air-dried.
Can I sell handmade hats?
Yes, in most cases you can sell them, but always check any pattern licensing rules.
Conclusion
Learning how to make a crocheted hat with a cow print is a fun and rewarding experience that allows you to combine creativity with practical skills. This project is perfect for expressing your personal style while creating something useful and fashionable.
From understanding the structure of the hat to experimenting with colors and textures, every step helps you improve your crochet abilities. The cow print design adds a playful and modern twist that makes your hat truly unique.

