Crocheting is a beloved craft that has been enjoyed for generations. It’s a versatile hobby that allows crafters to create everything from cozy blankets to intricate lacework.
However, one of the biggest challenges for beginners and even some experienced crocheters is understanding crochet patterns. This tutorial will guide you through the process of reading and interpreting crochet patterns, making it easier for you to bring your crochet projects to life.
We’ll cover everything from the basic symbols to more complex pattern instructions. Let’s dive in!
Introduction to Crochet Patterns
Crochet patterns are essentially the blueprints for your crochet projects. They provide a step-by-step guide on how to create specific designs using various stitches and techniques. Understanding crochet patterns is crucial for any crocheter who wants to expand their skills and create more complex pieces.
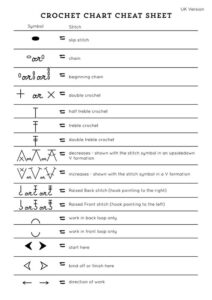
The first step in understanding crochet patterns is familiarizing yourself with the common terms and symbols used. Most crochet patterns will include a key or legend that explains what each symbol and abbreviation means. For instance, “ch” stands for chain, “sc” stands for single crochet, and “dc” stands for double crochet. By learning these basic abbreviations, you can start to decipher the instructions given in the pattern.
Another important aspect of crochet patterns is the stitch diagram. These diagrams use symbols to represent each stitch and show how they should be placed in relation to each other. Stitch diagrams can be especially helpful for visual learners, as they provide a clear picture of how the final piece should look. Make sure to refer to the legend provided in the pattern to understand what each symbol represents.
Basic Crochet Symbols and Abbreviations
Understanding the symbols and abbreviations used in crochet patterns is essential for following along accurately. Here are some of the most common ones you’ll encounter:
- Chain (ch): This is the foundation of most crochet projects. It’s the starting point from which other stitches are built. Patterns will often start with a series of chains, referred to as a “chain foundation.”
- Single Crochet (sc): This is one of the most basic crochet stitches. It’s a small, tight stitch that’s often used to create a dense fabric. To make a single crochet, insert the hook into the next stitch, yarn over, pull through, yarn over again, and pull through both loops on the hook.
- Double Crochet (dc): This stitch is taller than a single crochet and creates a more open fabric. To make a double crochet, yarn over, insert the hook into the next stitch, yarn over, pull through, yarn over again, pull through two loops, yarn over once more, and pull through the remaining two loops on the hook.
Other common abbreviations include “hdc” for half double crochet, “tr” for treble crochet, and “sl st” for slip stitch. Each of these stitches has a unique symbol in stitch diagrams, so make sure to learn and recognize them.
Reading Crochet Patterns
Reading crochet patterns can seem daunting at first, but with a little practice, it becomes much easier. Patterns are typically written in a shorthand format to save space and make them easier to follow. Here’s an example of a simple crochet pattern instruction: “ch 10, sc in 2nd ch from hook, sc across, turn.”
This instruction means you should start by making a chain of 10 stitches. Then, make a single crochet in the second chain from the hook, and continue making single crochets across the rest of the chain. Finally, turn your work to start the next row. Understanding these basic instructions is key to successfully following more complex patterns.
Patterns will also include instructions for creating different shapes and designs. For example, you might see an instruction like “inc” (increase) or “dec” (decrease). Increasing means adding extra stitches to make the piece wider, while decreasing means combining stitches to make it narrower. These techniques are often used to create shaping in garments or amigurumi (crocheted stuffed animals).
Interpreting Stitch Diagrams
Stitch diagrams are a visual representation of the pattern and can be extremely helpful for understanding how to construct your project. These diagrams use symbols to represent each stitch, and they show how the stitches should be placed in relation to each other. Here’s a quick guide to interpreting stitch diagrams:
- Chains (ch) are usually represented by small ovals or circles.
- Single crochets (sc) are represented by “x” or “+” symbols.
- Double crochets (dc) are shown as “T” shapes with a slash through the middle.
To read a stitch diagram, start at the bottom and work your way up, following the arrows or numbers that indicate the order of the stitches. The diagram will show you exactly where to place each stitch, making it easier to visualize the final product.
Stitch diagrams can be particularly useful for complex patterns with intricate designs. They provide a clear, visual guide that complements the written instructions. If you ever find yourself stuck, refer back to the diagram to see if it can help clarify the steps.
Common Crochet Pattern Techniques
Many crochet patterns incorporate special techniques to create unique textures and designs. Here are a few common techniques you might encounter:
- Working in the round: Instead of working in rows, some patterns are worked in continuous rounds. This technique is often used for making hats, amigurumi, and other circular projects. To start, you’ll usually make a chain and join it into a ring with a slip stitch. Then, you’ll work the stitches in a spiral or concentric circles.
- Changing colors: Color changes can add visual interest to your projects. To change colors, finish the last stitch of the old color up to the last yarn over. Then, yarn over with the new color and pull through to complete the stitch. Continue crocheting with the new color as instructed by the pattern.
- Post stitches: These stitches are worked around the post of the stitch in the previous row, rather than into the top loops. They create a raised texture that’s great for adding depth and dimension to your projects. Post stitches can be made in front (front post) or behind (back post) the work.
Following Complex Crochet Patterns
As you become more comfortable with basic crochet patterns, you can start tackling more complex designs. These patterns often include multiple stitch types, color changes, and shaping techniques. Here’s how to approach a complex pattern:
- Break it down: Start by reading through the entire pattern to get an overview of the project. Then, break it down into smaller sections and focus on one step at a time. This can make the pattern feel less overwhelming and more manageable.
- Use stitch markers: Stitch markers can be a lifesaver when working on complex patterns. They help you keep track of your place, mark the beginning of rounds, and highlight specific stitches. Use them liberally to avoid losing your place.
- Count your stitches: Regularly counting your stitches can help you catch mistakes early. Patterns often include stitch counts at the end of rows or rounds, so make sure to check your work against these counts to ensure accuracy.
Troubleshooting Common Issues
Join our VIP list and receive exclusive free patterns. You’ll have daily access to the best designs, delivered straight to your device. Don’t miss this chance to get inspired and improve your projects with new and amazing patterns!
Even experienced crocheters encounter issues with their patterns from time to time. Here are some common problems and how to solve them:
- Misreading instructions: It’s easy to misread a pattern, especially if you’re new to crochet. If something doesn’t seem right, double-check the instructions and refer to any accompanying diagrams or photos.
- Tension problems: If your stitches are too tight or too loose, it can affect the overall look and size of your project. Make sure to check your gauge before starting and adjust your tension as needed.
- Missed stitches: Missing a stitch can throw off the entire pattern. If you realize you’ve missed a stitch, carefully unravel your work back to the mistake and correct it. It’s better to fix mistakes early than to continue with an incorrect pattern.
Practice Makes Perfect
Like any skill, understanding crochet patterns takes practice. The more patterns you work on, the more comfortable you’ll become with the terminology and techniques. Start with simple patterns and gradually work your way up to more complex designs. Over time, you’ll develop the confidence and skills needed to tackle any pattern that comes your way.
One of the best ways to practice is by joining a crochet community. Online forums, social media groups, and local crochet clubs are great places to connect with other crocheters, share tips, and get help with tricky patterns. Surrounding yourself with a supportive community can make learning and improving your crochet skills more enjoyable.
Understanding crochet patterns is a valuable skill that opens up a world of creative possibilities. By familiarizing yourself with the common terms and symbols, practicing reading patterns, and learning to interpret stitch diagrams, you’ll be well on your way to becoming a proficient crocheter. Remember to take your time, break down complex patterns into manageable steps, and seek help when needed. With patience and practice, you’ll soon be able to tackle any crochet project with confidence.


