Creating a charming KITTY keychain tutorial is a fun and rewarding project for crochet enthusiasts. This adorable accessory is not only a great way to practice small-scale crochet but also makes a perfect gift or personal keepsake. By using simple crochet patterns, even beginners can create a delightful kitty keychain with a few basic stitches and some creativity.
In this KITTY keychain tutorial, we will explore the materials, techniques, and step-by-step process needed to bring this cute project to life. Whether you’re looking to improve your crochet skills or create unique handmade gifts, this tutorial will guide you through each stage with clear instructions and helpful tips.
Crocheting small items like keychains is a fantastic way to use leftover yarn and experiment with colors and textures. This project not only enhances your crochet abilities but also allows you to customize each kitty keychain with different features and accessories. Let’s get started with this enjoyable crochet pattern and make your own adorable keychain.
Materials and Measurements for KITTY Keychain
Selecting the Perfect Yarn
- For the KITTY keychain tutorial, you will need lightweight yarn such as cotton or acrylic, which provides excellent stitch definition.
- Choose soft, smooth yarn in colors that match your desired kitty design; typical colors include white, gray, pink, or black.
- Cotton yarn is highly recommended because it creates a firm, structured keychain that holds its shape well.
- You can also experiment with multi-colored or variegated yarns for a playful look.
- Using leftover yarn from other crochet patterns is a great way to minimize waste.
- Approximately 25 grams of yarn per keychain will be sufficient.
Choosing the Right Crochet Hook
- A 2.5 mm to 3.0 mm crochet hook is perfect for making the KITTY keychain tutorial.
- Smaller hooks are essential for creating tight stitches that prevent stuffing from showing.
- Always match the hook size to your chosen yarn weight for the best results.
- Using the correct hook ensures the keychain remains sturdy and compact.
- Tight stitches will keep the stuffing securely inside the kitty keychain.
- Testing your gauge with a small swatch can help ensure stitch consistency.
Additional Supplies Needed
- Polyester fiberfill or cotton stuffing to give the keychain its shape.
- A keyring attachment or small lobster clasp to convert the project into a keychain.
- Safety eyes or black embroidery thread to create the kitty’s facial features.
- A yarn needle for sewing pieces together and weaving in ends.
- Stitch markers to keep track of your rounds in the crochet pattern.
- Scissors for trimming excess yarn and finishing touches.
Cutting the Fabric and Measuring Pieces
- The kitty head should measure approximately 2.5 inches in diameter when stuffed.
- Each ear should be a small triangle measuring about 1 inch on each side.
- The body, if added, can be a small oval around 2 inches long.
- Facial features should be embroidered or crocheted to fit proportionally on the head.
- Optional accessories like bows or scarves can be sized to 1 inch wide.
- Keep all fabric cuts precise to maintain a polished look.
Selecting the Crochet Patterns
- Choose crochet patterns that involve simple stitches like single crochet, increases, and decreases.
- Look for amigurumi-style patterns that are designed for small, stuffed projects.
- Patterns that work in continuous rounds will give a seamless appearance.
- Opt for clear, well-illustrated crochet patterns to follow the steps easily.
- Using beginner-friendly patterns will ensure your kitty keychain turns out successfully.
- Customizable patterns allow for creative expression through colors and accessories.
Preparing Your Workspace
- Set up a clean, organized workspace with good lighting.
- Keep all your materials within easy reach to avoid interruptions.
- Print out or save your crochet pattern instructions nearby for quick reference.
- A small tray or container can help keep small parts like safety eyes and keyrings from getting lost.
- Having a comfortable chair and a flat surface will make crocheting easier and more enjoyable.
- Being well-prepared will help you stay focused and complete your KITTY keychain tutorial efficiently.
Step-by-Step Instructions: Crochet the Kitty Head
Creating the Foundation Circle
- Begin with a magic ring and work six single crochet stitches into the ring.
- Tighten the ring and join with a slip stitch to complete the first round.
- For the next round, increase by making two single crochet stitches in each stitch around.
- Continue increasing each round by evenly spacing additional stitches until you reach about 2.5 inches in diameter.
- Keep your tension tight to form a firm base for the keychain.
- This forms the round, sturdy base of your KITTY keychain tutorial.
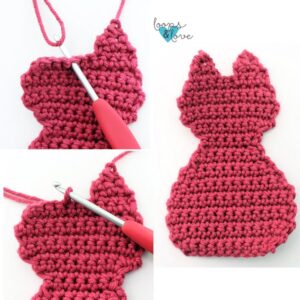
Building the Shape of the Head
- Work several rounds of single crochet without increasing to build the sides of the head.
- Check your stitch count regularly to maintain a consistent shape.
- Use stitch markers to track your rounds and ensure accuracy.
- Try to keep the sides straight and even for a neat appearance.
- You may want to add a tiny amount of stuffing as you go to shape the head.
- The head should form a soft, rounded sphere by the end of this step.
Shaping and Closing the Head
- Begin decreasing by single crocheting two stitches together at regular intervals.
- Continue decreasing and adding stuffing until the head is firmly filled but still soft.
- Ensure that the stuffing is evenly distributed to avoid lumpy areas.
- Once the head is fully closed, fasten off and weave in the ends securely.
- The head should feel compact and springy to the touch.
- Completing the head is a significant milestone in the KITTY keychain tutorial.
Adding Facial Features
- Use safety eyes or small black yarn to embroider the kitty’s eyes evenly.
- Position the eyes approximately one-third down from the top of the head.
- Use pink or black yarn to stitch a small triangular nose.
- Add tiny whiskers with straight stitches to give the kitty a playful look.
- Ensure all features are securely attached and symmetrical.
- Personalizing the face adds charm and uniqueness to your KITTY keychain tutorial.
Crocheting the Kitty Ears
- Start with a magic ring and work three single crochet stitches to form the ear base.
- Work in continuous rounds, increasing slightly to shape the triangle.
- The ears should measure about 1 inch tall for a balanced look.
- Fasten off and leave a long tail for sewing onto the head.
- Position the ears symmetrically and sew them securely to the top of the head.
- The ears complete the classic kitty silhouette in your crochet pattern.
Final Touches to the Head
- Add a small crocheted bow or accessory if desired to personalize your keychain.
- Attach the keyring securely through a loop at the top of the head.
- Weave in any remaining loose ends neatly.
- Check the entire keychain for security and finish.
- Lightly shape the kitty head by hand for a polished appearance.
- Completing the head is a major step in your KITTY keychain tutorial journey.
Step-by-Step Instructions: Optional Kitty Body
Starting the Kitty Body
- Chain two and work six single crochet stitches into the second chain from the hook.
- Increase each round by evenly spacing additional stitches to form a small oval.
- Continue building the body until it reaches about 2 inches in length.
- Keep the stitches tight and even for a smooth surface.
- Stuff the body lightly as you crochet to maintain shape.
- This forms the base of the optional body in your KITTY keychain tutorial.
Shaping the Kitty Body
- Once the body has reached the desired size, begin decreasing rounds.
- Continue decreasing while adding small amounts of stuffing.
- Close the body securely by crocheting two stitches together until shut.
- Fasten off and weave in the ends tightly to maintain structure.
- Attach the completed body to the bottom of the kitty head.
- This optional body can give your crochet pattern a more complete look.
Adding Kitty Paws
- Crochet small ovals or circles to form the kitty’s paws.
- Each paw should measure about 0.5 inch in diameter.
- Attach the front and back paws evenly to the body.
- Ensure that all paws are symmetrically placed for balance.
- Add small yarn or embroidered pads to each paw if desired.
- These paws add extra cuteness to your KITTY keychain tutorial.
Finishing the Body Assembly
- Attach all parts securely with tight stitches to prevent loosening.
- Double-check the positioning of each part for visual balance.
- Ensure that the body is properly aligned with the head.
- Weave in all ends and trim any excess yarn.
- Reinforce all seams to create a durable, long-lasting keychain.
- Completing the body assembly finalizes the structural aspect of your crochet pattern.
Optional Accessories for the Body
- Crochet a small scarf or collar to accessorize the kitty body.
- Use contrasting yarn colors to make accessories stand out.
- Add a tiny crocheted bag or bow to give the keychain a unique character.
- Optional accessories allow further customization.
- These additions make the KITTY keychain tutorial even more adorable and personalized.
- Secure all accessories well to withstand daily use.
Final Review of the Kitty Keychain
- Check the entire keychain for any loose stitches or weak spots.
- Ensure the keyring is attached securely to prevent detachment.
- Lightly steam block the keychain to set its shape.
- Inspect all parts for neatness and symmetry.
- Test the durability by gently tugging on the keychain components.
- A well-finished keychain is now ready to use or gift.
Final Thoughts on KITTY Keychain Tutorial
The KITTY keychain tutorial offers a delightful and accessible crochet project suitable for all skill levels. With simple stitches, minimal materials, and an easy-to-follow crochet pattern, you can create a charming accessory that is both practical and fun.
This project encourages creativity by allowing endless customization through color choices, facial expressions, and accessories. Whether you are making one for yourself, as a gift, or to sell at craft fairs, the KITTY keychain tutorial will result in an adorable and memorable item.
Enjoy the process of crafting this cute keychain, and don’t hesitate to experiment with different crochet patterns and embellishments to make each kitty unique. Happy crocheting!


