
Miniature Crochet Chameleon – Tutorial is the perfect project for crochet lovers who enjoy creating adorable tiny animals full of personality. This charming handmade piece combines creativity, color, and simple shaping techniques to produce a miniature chameleon that can be used as a keychain, desk decoration, gift, or collectible item. Whether you are a beginner looking for a fun challenge or an experienced crocheter searching for a quick project, this tutorial will guide you through every important detail.
Creating a miniature crochet chameleon is not only entertaining but also an excellent opportunity to improve your crochet skills. You will practice shaping, increasing, decreasing, color changes, and assembling small parts while creating a cute animal with expressive eyes and a curled tail. The beauty of this project lies in its flexibility, as you can customize colors, sizes, and facial expressions to make each chameleon unique.
This detailed Miniature Crochet Chameleon – Tutorial explains the essential techniques, materials, and tips needed to make your project successful. Throughout this guide, you will discover how to work with amigurumi, choose the best yarn, shape the body correctly, and add finishing touches that bring your tiny reptile to life. By the end, you will have a lovely handmade creation and the confidence to experiment with your own designs.
Materials and Basic Crochet Techniques
Before starting your Miniature Crochet Chameleon, gather all the necessary materials. Most crocheters prefer cotton yarn because it provides excellent stitch definition and durability. Lightweight acrylic yarn can also work well if you want a softer texture. Choose a crochet hook slightly smaller than recommended on the yarn label to create tight stitches that prevent stuffing from showing through.
Besides yarn and a crochet hook, you will need fiberfill stuffing, a yarn needle, stitch markers, and safety eyes or embroidery thread for the eyes. Small projects like this require only a small amount of yarn, making them perfect for using leftover colors from previous projects.
One of the most important techniques used in this project is the magic ring, which creates a tightly closed center without leaving holes. Most parts of the chameleon begin with this technique because it produces a clean and professional appearance.
You will also use single crochet, which is the primary stitch in many amigurumi projects. This stitch creates a dense fabric that helps maintain the shape of the miniature animal and keeps the stuffing securely inside.
Learning how to make increases and invisible decreases is equally important. Increases allow the body and head to expand gradually, while invisible decreases create smooth curves without noticeable gaps or bulky areas.
Finally, keep track of your stitches with a marker. Since this project is worked in continuous rounds, a stitch marker helps you identify the beginning of each round and prevents counting mistakes that could affect the overall shape.
How to Crochet the Body and Head
The body and head are the central components of the Miniature Crochet Chameleon – Tutorial. Many crocheters prefer making them as one piece because it reduces sewing and creates a smoother transition between sections.
Start with a magic ring and work several rounds of single crochet increases to create a rounded base. Gradually continue increasing until the head reaches the desired width. The rounded head is one of the most recognizable features of a chameleon and gives the project a cute appearance.
Once the head is complete, crochet several rounds without increasing. This creates height and helps maintain a balanced proportion between the head and body. Stuff the head lightly as you go to ensure an even shape.
Next, begin making decreases to transition into the neck area. The neck should be slightly narrower than the head but not too thin, as it needs enough structure to support the finished piece.
Continue crocheting the body by increasing again. The body of a miniature chameleon is generally oval and compact, allowing it to stand or sit comfortably depending on your preferred design. Add stuffing gradually and shape it with your fingers to avoid lumps.
Finish the body by making invisible decreases until only a few stitches remain. Close the opening neatly with a yarn needle and weave in the ends securely. At this stage, your crochet chameleon already starts to show its adorable personality.
Creating the Legs, Tail, and Unique Details
The legs of the Miniature Crochet Chameleon are small but important details that contribute to the overall appearance. Crochet each leg separately using a few rounds of single crochet and slight shaping. Keep them symmetrical to ensure the chameleon sits evenly.
After completing the legs, sew them securely to the body. Positioning matters greatly because slightly angled legs create a more natural and playful pose. Take your time adjusting their placement before sewing permanently.
The curled tail is perhaps the most iconic feature of a chameleon. To create it, crochet a narrow tube using single crochet stitches. Stuffing is optional, as many crocheters prefer leaving the tail flexible so it curls naturally.
Once the tail is complete, gently shape it into a spiral and attach it firmly to the back of the body. This instantly gives your miniature reptile its recognizable silhouette and adds a charming decorative element.
Eyes are another essential feature. You can use safety eyes for a polished appearance or embroider them using black thread. Some crocheters add small white highlights to create sparkle and give the chameleon a lively expression.
Finally, consider adding decorative touches such as embroidered stripes, tiny spots, or subtle color changes. These details make every miniature crochet chameleon unique and allow you to express your creativity through your handmade project.
Tips for Customizing and Displaying Your Miniature Crochet Chameleon
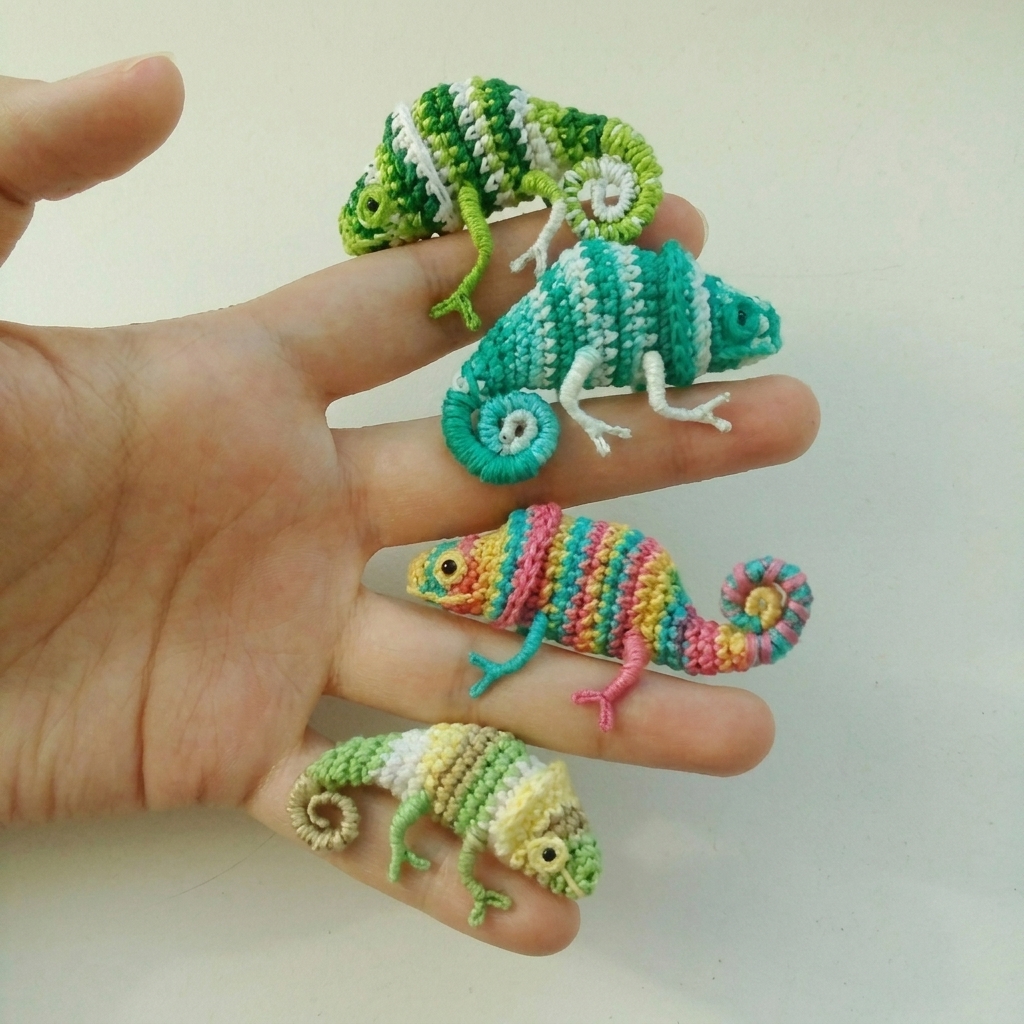
One of the best aspects of this Miniature Crochet Chameleon – Tutorial is the freedom to customize colors. Real chameleons are famous for their ability to display different shades, so feel free to experiment with greens, blues, yellows, pinks, or even rainbow combinations.
Using gradient yarn is another excellent option. The natural color transitions create a fascinating effect and make the finished chameleon appear even more vibrant and realistic without requiring complicated color changes.
You can also transform your crochet chameleon into a keychain, zipper charm, or bag accessory. Simply attach a small keyring or lobster clasp to the top of the head or back before closing the final stitches.
For collectors, creating multiple chameleons in different colors and expressions is a wonderful idea. Display them together on a shelf or inside a glass cabinet to create an adorable miniature animal collection.
This project also makes a thoughtful handmade gift. Friends and family often appreciate receiving a cute amigurumi animal crafted with care and attention to detail. Handmade gifts carry a personal touch that store-bought items cannot replace.
Most importantly, enjoy the creative process. Crochet is not only about the final result but also about relaxing, learning new techniques, and expressing your imagination through every stitch you make.
FAQ About Miniature Crochet Chameleon
1. Is this Miniature Crochet Chameleon suitable for beginners?
Yes. Beginners who know basic techniques such as magic ring, single crochet, increases, and decreases can successfully complete this project. Patience and careful stitch counting are the keys to success.
2. What type of yarn is best for a miniature crochet chameleon?
Cotton yarn is one of the best choices because it offers excellent stitch definition and durability. However, lightweight acrylic yarn also works well and provides a softer texture.
3. Can I use different colors for my crochet chameleon?
Absolutely. Chameleons are naturally colorful animals, making this project ideal for experimenting with vibrant shades, gradients, and creative color combinations.
4. How long does it take to make this project?
The time varies depending on experience. Most crocheters can complete a miniature crochet chameleon within a few hours, making it a quick and satisfying project.
5. Can I turn the chameleon into a keychain?
Yes. By attaching a small keyring or clasp, you can easily transform your miniature crochet chameleon into a charming keychain or bag accessory.
Conclusion
This Miniature Crochet Chameleon – Tutorial demonstrates how enjoyable and rewarding it can be to create a tiny handmade animal filled with charm and personality. Throughout this guide, you learned about essential amigurumi techniques, the best materials to use, how to crochet the head and body, ways to create the iconic curled tail, and creative ideas for customization.
By practicing these techniques, you will not only create an adorable miniature crochet chameleon but also improve your crochet skills and gain confidence for future projects. Remember that every handmade piece is unique, and experimenting with colors and details is part of the fun.

