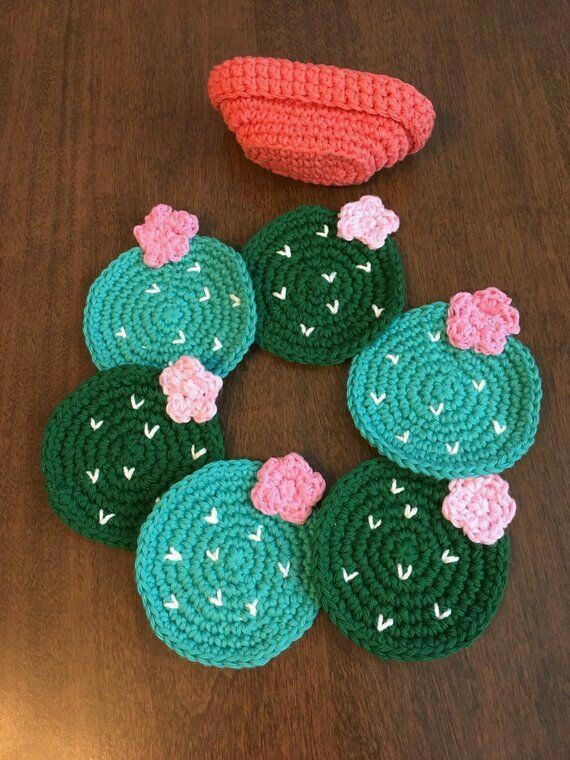
Creating a Prickly Pear Cactus Coaster – Step by Step Tutorial is a fun and practical way to add personality to your home décor while exploring your creativity through crochet. These coasters are not only functional for protecting surfaces but also bring a touch of desert charm to your living space. The vibrant colors and unique shape of a prickly pear cactus make them a delightful project for crafters of all skill levels.
The Prickly Pear Cactus Coaster – Step by Step Tutorial is perfect for beginners and experienced crocheters alike. With just a few basic materials and stitches, you can create a set of these coasters that will impress guests or make for thoughtful handmade gifts. They are lightweight, washable, and can be customized with different shades of green and pops of color for the cactus fruit.
In this guide, we will go through everything you need to know: gathering materials, creating the base shape, adding cactus details, and finishing your coaster with a professional look. At the end, you will find a FAQ section to answer common questions about this project, followed by a conclusion summarizing the steps and encouraging readers to share their own experiences and suggestions.
Materials and Preparation
To start the Prickly Pear Cactus Coaster – Step by Step Tutorial, you will need 100% cotton yarn in shades of green for the cactus body and small amounts of pink, red, or yellow for the fruit accents. Cotton yarn is the best choice for coasters because it absorbs moisture and is easy to wash.
You will also need a crochet hook suitable for your yarn weight, usually a 3.5mm or 4mm hook for medium-weight yarn. Additional tools include scissors, a yarn needle for weaving in ends, and stitch markers if you prefer extra guidance while working in rounds.
Before starting, decide on the size of your coaster. A typical coaster measures around 4 to 5 inches in diameter, but you can make it larger for mugs or smaller for cups.
Prepare a comfortable workspace with good lighting to ensure you can see your stitches clearly. If you are new to crochet, practice making basic stitches like chains, single crochet, and slip stitches before starting the project.
Keep your yarn organized and tangle-free by winding it into a ball. Having all your materials ready makes the process smoother and more enjoyable.
Finally, review the pattern instructions to familiarize yourself with each step before you begin.
Creating the Cactus Base
The next step in the Prickly Pear Cactus Coaster – Step by Step Tutorial is to create the round base of the coaster, which will form the cactus shape. Begin with a magic ring and work single crochet stitches in the round.
As you increase stitches, the circle will grow evenly. Make sure to count your stitches in every round to avoid mistakes and uneven edges.
When the base reaches the desired size, fasten off and weave in any loose ends with a yarn needle. Press the circle lightly with an iron if it curls at the edges.
To add the cactus pads, create small oval shapes by working in rows and attaching them to the base with a yarn needle. These pads give the coaster its distinctive prickly pear look.
You can vary the number of pads depending on how decorative you want your coaster to be. Each pad can be sewn securely to the base so that the coaster is sturdy and functional.
Once the base and pads are complete, you can move on to the decorative details that bring the cactus to life.
Adding Decorative Details
In this part of the Prickly Pear Cactus Coaster – Step by Step Tutorial, you will add the characteristic fruits and spines to the cactus. For the fruits, crochet small circles or ovals in bright colors like red, pink, or yellow.
Attach these fruits to the ends of the cactus pads using a yarn needle. Position them randomly to make the coaster look natural and playful.
To create the spines, use simple embroidery stitches with white or beige yarn. Place them evenly around the cactus pads to give the appearance of small thorns.
Adding these details makes your coaster stand out and adds a unique handmade touch.
You can also personalize your coaster by adding a border in a contrasting color. A simple single crochet border around the coaster can make it look more finished.
Once all the details are added, weave in any remaining ends and trim excess yarn for a neat look.
Finishing and Care
The final steps in the Prickly Pear Cactus Coaster – Step by Step Tutorial involve blocking and caring for your new coaster. Blocking helps to flatten the coaster and give it a polished shape.
To block, lightly dampen the coaster and pin it to a flat surface in the correct shape. Allow it to dry completely before using it.
Because the coaster is made of cotton yarn, it can be easily washed. Hand wash or machine wash on a gentle cycle with cold water.
Lay the coaster flat to dry to prevent stretching. Avoid wringing or twisting the coaster as it may lose shape.
You can make several coasters in different shades of green and fruit colors to create a fun set for your home.
These coasters also make wonderful handmade gifts for friends, family, or housewarming parties.
FAQ – Prickly Pear Cactus Coaster
1. What type of yarn is best for this project?
Cotton yarn is ideal because it absorbs moisture and is durable for repeated washing.
2. How big should the coaster be?
A typical coaster is around 4 to 5 inches in diameter, but you can adjust the size as desired.
3. Can I use acrylic yarn instead?
Yes, but acrylic is less absorbent and may not protect surfaces as well as cotton.
4. Is this project beginner-friendly?
Yes, it only requires basic crochet stitches like chain, single crochet, and slip stitch.
5. How long does it take to make one coaster?
On average, it takes about 1–2 hours to complete one coaster, depending on your skill level.
6. Can I sell the coasters I make?
Yes, as long as you follow any copyright rules if using a specific pattern. Handmade coasters are great for craft fairs and online shops.
Conclusion
The Prickly Pear Cactus Coaster – Step by Step Tutorial is a fun and practical crochet project that allows you to create unique and colorful coasters for everyday use. With just a few materials and simple stitches, you can craft a set of coasters that bring charm and personality to any table setting.
We have covered everything from materials and base creation to decorative details and care instructions. This tutorial is perfect for beginners and experienced crocheters who want to try something creative and functional.
We hope you found this guide helpful and inspiring. Share your experiences, opinions, and suggestions in the comments—we would love to hear your thoughts and see your creations!


