The Ripple Stitch – Crochet Stitch Tutorial is a delightful guide for crocheters looking to add movement and texture to their projects. This classic technique, also known as the chevron or wave stitch, creates a dynamic, zigzag pattern that brings depth to any piece. From blankets to scarves to pillow covers, the ripple stitch adds visual interest while remaining beginner-friendly.
What sets the ripple stitch apart is its versatility and visual appeal. It’s perfect for crochet enthusiasts who want to explore beyond simple rows and create a design that flows naturally. This stitch pairs beautifully with color changes, making it ideal for scrap yarn projects or gradient effects. Even better, it’s easy to memorize, allowing for relaxing, rhythmic stitching.
In this tutorial, we’ll walk you through the full process: from materials and preparation to the final stitches. Whether you’re new to the world of crochet patterns or simply expanding your stitch library, the ripple stitch is a must-learn. Let’s explore how to make waves with yarn!

Materials, Yarn Choices, and Measurements
To get started with this Ripple Stitch – Crochet Stitch Tutorial, it’s essential to have the right tools and understanding of the pattern’s structure. Choosing the proper materials will ensure your ripple stitch project looks professional and holds its shape.
- Recommended Yarn Types
Medium-weight yarn (category 4) is an ideal choice for ripple stitch projects. Acrylic or cotton yarns provide great stitch definition and durability. Choose soft yarns for baby blankets or scarves, and firmer yarns for home decor items. - Crochet Hook Sizes
A 5.0 mm (H-8) or 5.5 mm (I-9) crochet hook is typically used for worsted weight yarns. Always check your yarn label for the recommended hook size, and consider going up or down a size based on personal tension. - Finished Project Size
The size of your project depends on how many stitches you begin with. Ripple stitch patterns work in multiples of 14 plus 2. For a baby blanket, you might start with 98 + 2 stitches, resulting in about 36 inches in width. - Gauge and Swatching
Gauge isn’t always crucial unless you’re following specific crochet patterns. Make a test swatch with your chosen yarn and hook to check how wide your ripples will be. This helps in planning the final dimensions. - Yarn Color Planning
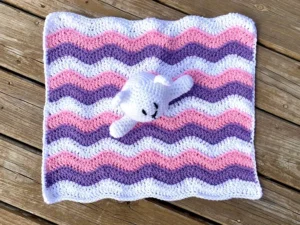
Ripple stitches shine with color changes. You can alternate colors every 2 rows or use a self-striping yarn to make it effortless. Think about your palette beforehand to create a cohesive or bold look. - No Fabric Cutting Required
Unlike quilting or sewing tutorials, the ripple stitch requires no fabric cuts or measurements. Everything is shaped by your yarn, hook, and the number of stitches per row.
How to Start the Ripple Stitch
Beginning the ripple stitch is easy when you understand the basic rhythm of increases and decreases. The peaks and valleys of this pattern are made by strategically adding and skipping stitches.
- Chain Foundation Row
Start with a foundation chain in a multiple of 14, then add 2 extra stitches. For practice, try chaining 30. This will give you 2 ripple segments and help you visualize the pattern clearly. - First Row Setup
In the second chain from your hook, work one single crochet (sc). Continue working sc across the chain. This row gives stability to your ripples. Count your stitches to ensure accuracy. - Pattern Row (Double Crochet)
Chain 3 (counts as first dc), dc in next 3 stitches, then dc2tog (decrease) twice to form a valley. Dc in next 3 stitches, work 2 dc in the next stitch twice to form a peak. Repeat this pattern across the row. - Understanding Peaks and Valleys
The beauty of the ripple stitch comes from its rising and falling motion. Peaks are made by increasing stitches, while valleys are created with double crochet decreases. This maintains the stitch count across the row. - Consistency is Key
To maintain even ripples, you must consistently count your stitches. Place stitch markers if needed to mark the start of each repeat section. This avoids accidental shaping errors. - Turning Rows
At the end of each row, chain 3 and turn. Always work your double crochets in alignment with the previous row’s increases and decreases to preserve the ripple effect.
Building Texture and Color with Ripple Stitch
Once you have the foundation set, you can experiment with texture and colors to bring the ripple stitch to life. It’s a great opportunity to explore the creative side of crochet.
- Adding Stripes
Change yarn colors every 2 or 4 rows to add stripes. Fasten off and weave in ends neatly. This creates an eye-catching design that highlights the wave pattern. - Using Gradient or Ombre Yarns
Ombre or gradient yarns make your ripple stitch project visually stunning with minimal effort. The gradual color shift adds depth without extra work. - Experimenting with Texture
Use textured yarn or alternate stitch heights (e.g., alternating dc and hdc rows) for added dimension. This makes blankets extra cozy and unique. - Adding Surface Crochet
To define ripples even more, try surface crochet on top of peaks or valleys. Use a contrasting color to outline shapes. It’s a bold, artistic touch. - Blocking Your Work
Blocking flattens your ripples and makes the stitch definition pop. Lightly mist and pin your project to a blocking mat. Let it dry completely for best results. - Stitch Count Maintenance
Every time you add a new row, ensure your stitch count remains consistent. Errors can throw off the ripple effect and distort the project’s shape.
Step-by-Step Ripple Stitch Blanket Pattern
Let’s walk through a full mini pattern using the ripple stitch to create a small lap blanket or sampler. Follow each step closely to reinforce the technique.
- Foundation Chain
Chain 98 + 2 (100 total). This gives you 7 ripple segments. Feel free to increase the starting chain to make a larger blanket. - Row 1: Setup
Single crochet in each chain across. You should have 100 sc. Chain 3 and turn. - Row 2: Begin Ripple Pattern
Double crochet in the next 3 stitches. Dc2tog twice. Dc in the next 3 stitches. 2 dc in the next stitch twice. Repeat this sequence across the row. - Rows 3–100: Continue Ripple Pattern
Continue in the established ripple pattern. Change colors every 4 rows for stripes, or use a gradient yarn for seamless transitions. - Final Row
Once you reach your desired length, end with a row of single crochets to match the beginning. Fasten off and weave in all ends. - Finishing Touches
Block your blanket lightly for a polished look. You can also add a simple single crochet border to frame the ripples.
Ideas and Inspiration for Ripple Stitch Projects
The ripple stitch is one of the most versatile designs in the crochet patterns world. It fits seamlessly into various projects for home, fashion, and gifting.
- Baby Blankets
Soft yarns and gentle color transitions make ripple blankets perfect for newborns. They are lightweight, warm, and soothing. - Throws and Lapghans
Add style to your living room with a chevron throw. Use bold colors to make a modern statement, or neutrals for a classic look. - Scarves and Shawls
Narrow ripple stitch patterns make beautiful scarves and wraps. They’re cozy, textured, and eye-catching. - Cushion Covers
Add ripple stitch panels to pillow fronts for a handmade home decor upgrade. Use matching colors to coordinate with your furniture. - Bags and Pouches
Use ripple stitch to create textured bags or purses. Line them with fabric for structure and durability. - Table Runners and Placemats
For an elegant handmade table setting, try ripple stitch runners. Use fine yarn for a lacy, delicate effect or heavier yarn for casual charm.
Final Thoughts
This Ripple Stitch – Crochet Stitch Tutorial is more than just a how-to—it’s an invitation to bring rhythm and movement into your crochet projects. With its easy-to-follow structure, endless customization options, and timeless appeal, ripple stitch is a must-know pattern for every crocheter.
So grab your hook and favorite yarn, and let the waves begin!


