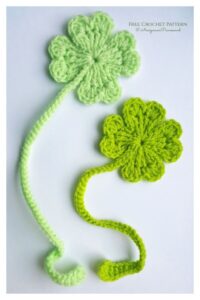
If you’re looking to bring a little bit of luck into your life or want a festive handmade touch for St. Patrick’s Day, this Shamrock Four Leaf Clover Crochet Tutorial is exactly what you need. Using just a small amount of yarn and some basic stitches, you can whip up a beautiful four-leaf clover that’s perfect as an applique, keychain, magnet, or decorative piece. Plus, it’s a quick and satisfying project for all skill levels.
The best part about making a crochet shamrock is how versatile the final piece can be. Add one to a greeting card, pin it on your jacket for March 17th, or string a bunch together for a St. Patrick’s Day garland. You can even use this crochet pattern to teach beginners about working in the round, increasing, and shaping small motifs.
In this article, we’ll walk you through the tools and materials you’ll need, how to crochet each part of the clover, ways to personalize it, and how to make it look professionally finished. With four leaf hearts and a sweet little stem, you’ll have your lucky clover made in no time. Let’s get started!
Materials and Tools You’ll Need
To make the Shamrock Four Leaf Clover Crochet Tutorial as smooth as possible, start by gathering all your materials. This is a small project, which makes it a great scrap-buster and very beginner-friendly in terms of cost and complexity.
1. Yarn Selection
For best results, use worsted weight (medium #4) cotton yarn. Cotton gives your shamrock structure, durability, and a clean stitch definition, which makes the shape stand out. Traditional green is the go-to, but feel free to experiment with shades like lime, emerald, or even glitter-infused yarn for some sparkle.
2. Crochet Hook Size
A 3.5 mm (E-4) hook is ideal for this project. It keeps your stitches tight enough so the shape holds up well, but not too tight to be difficult. If you crochet loosely, drop to a 3.25 mm hook.
3. Additional Notions
You’ll need scissors, a yarn needle to weave in ends, and optionally stitch markers if you want to track the beginning of your rounds. You may also want a small blocking mat and pins to help shape the final piece.
4. Yarn Yardage Estimate
Since the crochet pattern is small, you only need about 8–10 yards of green yarn for each clover. This makes it perfect for leftover yarn projects or mass production if you’re making several at once.
5. Optional Fabric Cuts
Although no fabric is directly used in this pattern, if you want to turn your shamrock into a patch or ornament, consider backing it with green felt fabric. Cut a piece about 3” x 3” (7.5 cm) to sew or glue your finished clover onto.
6. Finished Size
Your crochet four-leaf clover will measure approximately 2.5 to 3 inches (6.5 to 7.5 cm) across depending on your tension and yarn type.
Step-by-Step Instructions for the Four Leaf Clover
Now for the heart of the Shamrock Four Leaf Clover Crochet Tutorial—creating the four individual leaves and assembling the iconic clover shape. Each leaf is worked separately and then joined together to form the full clover.
1. Starting with the Heart-Shaped Leaf
Make a magic ring and work the following into the ring: ch 2, 3 dc, 3 hdc, ch 1, 1 dc, ch 1, 3 hdc, 3 dc, ch 2, then sl st into the ring. Pull the ring tight to form a heart. Fasten off.
2. Repeat for 3 More Leaves
You’ll need to create four identical heart-shaped leaves. Use the same steps above for each one. Make sure to leave a tail of about 6 inches on two of the hearts—these will be used to attach them later.
3. Assembly
Lay the hearts in a cross pattern with the points of the hearts meeting in the center. Use your yarn needle and the long tails to sew the tips of the hearts together, forming a four-leaf clover. Make sure the leaves are evenly spaced.
4. Crochet the Stem
Attach green yarn to the bottom center where all four leaves meet. Ch 8, then sl st back down the chain to form the stem. You can add a sc into each chain for a thicker stem if preferred.
5. Weaving and Trimming
Weave in all ends on the back using your yarn needle. Trim any visible threads for a neat finish.
6. Blocking (Optional but Recommended)
To make your shamrock lie flat, lightly block it by pinning it to a foam board and steaming it with an iron. Use a damp cloth to avoid melting the yarn if you’re using acrylic.
Creative Uses and Variations
With your crochet four-leaf clover completed, you may be wondering what to do with it. Luckily, this charming little motif has endless possibilities and makes a lovely addition to various crafts and decorations.
1. Use as an Applique
Sew or glue your shamrock to tote bags, headbands, hats, scarves, or pillows. It adds a playful touch, especially during March festivities.
2. Turn into a Keychain
Attach a jump ring and keychain clasp to the top and you’ve got yourself a festive charm. Add a tiny tag that says “Lucky” or “Made with Love” for extra flair.
3. Create a Garland
Make several shamrocks and string them together using a long chain or ribbon. Hang across a fireplace, window, or party table for easy St. Patrick’s Day decor.
4. Use in Scrapbooking or Greeting Cards
These lie flat and can be glued onto paper. Perfect for handmade cards, scrapbook pages, or festive table place cards.
5. Personalize Colors or Yarn Type
Try making your shamrock in variegated green yarn for a watercolor effect, or go bold with neon shades. You can also use glitter thread held with your main yarn for a sparkly look.
6. Add Embellishments
Sew a small button or bead in the center where the leaves meet. You can also embroider a small “L” for lucky with contrasting thread to make it stand out.
Tips for Beginners and Left-Handed Crocheters
Even if you’re just starting out, this Shamrock Four Leaf Clover Crochet Tutorial is a great way to build confidence in your crochet skills. With some patience and practice, you’ll soon be crocheting these clovers in under 20 minutes.
1. Mastering the Magic Ring
The magic ring is used frequently in crochet patterns, especially for motifs worked in the round. If it feels tricky at first, try practicing with a larger hook or yarn until you get the motion down.
2. Consistent Tension Matters
Try to keep your tension even throughout the piece. If your leaves curl too much, your tension may be too tight. If they’re floppy, it may be too loose.
3. Repetition Builds Confidence
Since all four leaves are made the same way, this project gives you a chance to practice a small section repeatedly. You’ll find the motion gets easier with each heart you make.
4. Mirror Patterns for Lefties
If you’re left-handed, most crochet tutorials still apply—just work in reverse. Make sure you’re reading charts and symbols accordingly, especially if using a diagram instead of written instructions.
5. Watching Video Tutorials
If you’re a visual learner, consider following a video guide alongside this written crochet pattern. Watching someone complete the steps can make everything click faster.
6. Join a Crochet Community
Whether online or local, joining a crochet group can provide support, feedback, and encouragement. Share your finished clover for inspiration and celebration!
Final Thoughts: Craft Your Luck with Crochet
This Shamrock Four Leaf Clover Crochet Tutorial is a fun, fast, and beginner-friendly project that delivers both charm and function. Whether you’re looking to add a lucky touch to your crafts or gift something handmade with heart, this simple crochet pattern is perfect for the job.
The great thing about small crochet motifs like this is how adaptable they are. From fashion to home decor to party accessories, your little clover can go a long way. And because it’s made with just a few yards of yarn, you can make a bunch in a single afternoon.


