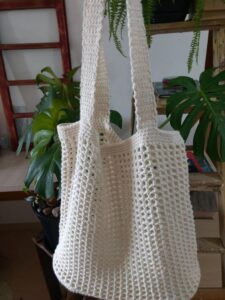
If you’re looking for a project that is both stylish and beginner-friendly, the Super Easy and Minimal Crochet Bag is the perfect solution. This pattern is a fantastic introduction to the world of crochet, offering a chic and functional bag with minimal effort. The best part? You don’t need advanced skills to craft something beautiful and useful.
In this article, we’ll guide you through everything you need to know about making this bag, from choosing the right materials to assembling the final piece. Whether you’re new to crochet patterns or simply looking for a relaxing project, this is a great place to start. Plus, the minimalist design makes it a versatile accessory for any outfit or season.
With simple stitches and clean lines, the Super Easy and Minimal Crochet Bag is not only quick to make but also looks professionally crafted. Let’s dive into the step-by-step guide and learn how you can create this bag on your own. Be sure to follow each section carefully to get the most out of your project.
Choosing Materials and Tools
To make a high-quality crochet bag, your materials matter. Choosing the right yarn and hook size ensures a sturdy and stylish end product. Since the project is simple, the focus will be on texture and durability.
Start by selecting a medium-weight yarn such as cotton or a cotton blend. Cotton is preferred for bags because of its strength and resistance to stretching. Choose a neutral or pastel color for a true minimalist look, or go bold if you want a pop of personality.
You’ll need a crochet hook size that complements your yarn. For worsted weight cotton, a 4.5mm to 5.5mm hook is ideal. Always check your yarn label for recommendations.
Besides yarn and hook, gather a pair of scissors, a yarn needle for weaving in ends, and stitch markers to help track your rounds or rows.
Optional additions include a magnetic snap or zipper for closure and a fabric lining for extra durability. These are not essential but can enhance the finished product.
Lastly, have a measuring tape or ruler handy to ensure accurate dimensions during the crafting process.
Basic Bag Construction
The base of your crochet bag starts with a simple rectangle or oval shape. This foundation provides structure and sets the size of your bag.
Start with a chain of 31 stitches using your chosen yarn. Single crochet into the second chain from the hook and continue across. This creates the first row.
For the second row, chain 1, turn your work, and single crochet across all stitches again. Repeat this process until your base reaches approximately 12 inches (30 cm) long.
Once your base is complete, begin working in rounds to build up the sides. Single crochet evenly around the rectangle, placing 3 single crochets in each corner stitch to maintain the shape.
Continue working in rounds, using single crochet or half-double crochet stitches depending on your preferred texture. Repeat until the bag height is about 10-12 inches (25-30 cm).
Finish off the last round with a slip stitch, cut the yarn, and weave in all loose ends. This completes the body of the bag.
Creating the Handles
The handles add functionality and style to your Super Easy and Minimal Crochet Bag. You can choose to create short hand straps or a longer crossbody strap.
To make handles, start by determining their placement. Measure and mark equal distances from the side seams to ensure symmetry. Typically, straps are spaced about 4 inches (10 cm) apart.
For short handles, chain 40–50 stitches depending on your desired length. Attach them directly to the top edge of the bag with single crochets, reinforcing each side by going over the stitches twice.
For a long strap, chain around 100–120 stitches. This gives you a comfortable crossbody length. Make sure both ends are securely sewn into the sides of the bag.
You may also create the strap separately and attach it with D-rings or crochet rings for a professional finish. Reinforce the join points for added strength.
Handles can also be padded with fabric or interfacing to make them sturdier, especially for heavy use.
Optional Lining and Embellishments
Adding a lining not only strengthens your bag but also gives it a clean, finished interior. Choose a lightweight cotton fabric in a complementary color or fun pattern.
Cut the fabric slightly larger than your bag’s dimensions. Fold and iron the edges to prevent fraying, then sew the sides together to form a pouch.
Insert the fabric pouch into your crochet bag. Use a needle and thread to hand-sew the lining to the top inside edge of the bag. Make sure your stitches are small and hidden.
To close your bag, you can add a magnetic snap, button, or zipper. Sew these onto the lining before inserting it into the bag for ease.
Embellishments like tassels, pom-poms, or a crocheted flower can personalize your design. Attach them securely and in moderation to maintain the minimal look.
Keep the embellishments optional. The goal is a minimal crochet design that is both stylish and easy to pair with any wardrobe.
Final Thoughts and Styling Tips
Congratulations! You’ve now completed your own Super Easy and Minimal Crochet Bag. This simple yet elegant accessory is a testament to how effective minimal design can be.
To style your bag, consider pairing it with summer dresses, casual jeans, or even work outfits. Its neutral and minimal design allows for ultimate versatility.
Maintenance is easy. Hand wash with mild detergent and lay flat to dry to keep your bag looking new. If you used a fabric lining, be sure to check its washing instructions too.
This pattern is highly customizable. Try different yarn textures or colors for new versions. Once you master the basic structure, you can adapt it into larger totes or smaller clutches.
Share your finished bags on social media and inspire others to try their hand at crochet patterns. Don’t forget to credit the design or share your unique twist.
Whether you’re gifting it or keeping it, your crochet bag will surely become a favorite accessory. Happy crocheting!


