The tulip-shaped crochet coasters – Step by Step Tutorial is a delightful project for anyone who loves combining creativity with functionality. These coasters are perfect for adding a touch of spring to your home décor while also protecting your furniture from drink rings. With their charming floral design, they can be customized in many colors and make wonderful gifts for friends and family.
One of the best parts of this tutorial is that it is beginner-friendly while still offering room for creativity for more experienced crafters. You only need basic crochet stitches, making it a great project for practicing your skills or relaxing with a simple yet beautiful craft. By following this tulip-shaped crochet coasters – Step by Step Tutorial, you can create lovely pieces that add warmth and personality to your table settings.
In this article, we will guide you through the materials you need, the step-by-step instructions, tips for customization, and ways to use your finished coasters. By the end, you will feel confident making your own set of tulip-shaped coasters to enjoy or share as thoughtful handmade gifts.
Materials and Preparation
To start the tulip-shaped crochet coasters – Step by Step Tutorial, gather the necessary materials. You will need medium-weight cotton yarn in your preferred colors. Cotton yarn is recommended because it is absorbent and holds its shape well. Choose green for the leaves and stems, and any bright color like pink, yellow, or red for the tulip petals.
A 3.5 mm to 4 mm crochet hook works best for this type of project, but you can adjust the size depending on your yarn weight and desired coaster size. You will also need a pair of scissors, a yarn needle for weaving in ends, and a stitch marker if you prefer extra guidance while crocheting.
Make sure you are familiar with basic crochet stitches such as chain (ch), slip stitch (sl st), single crochet (sc), half double crochet (hdc), and double crochet (dc). These stitches are enough to complete the coaster design.
Before you begin, decide how many coasters you want to make. Creating a set of four or six is perfect for everyday use or as a gift.
Prepare your yarn by rolling it into balls to prevent tangling during crocheting. Having your materials ready will make the process smoother and more enjoyable.
Finally, find a comfortable and well-lit workspace where you can follow the tutorial step by step without distractions.
Step-by-Step Instructions
Start the tulip-shaped crochet coasters – Step by Step Tutorial by creating a magic ring with your chosen petal color. Crochet 12 double crochets into the ring, then pull it tight and join with a slip stitch. This forms the base circle of your tulip.
In the second round, chain 3, work 2 dc in the same stitch, then continue by working 3 dc in each stitch around. Join with a slip stitch. This creates a larger circle to build the petal shape.
For the petals, chain 6, then work back down with 1 sc, 1 hdc, and 3 dc into the chain. Skip the next stitch on the circle and slip stitch into the following one. Repeat this petal process around the circle until you have six petals.
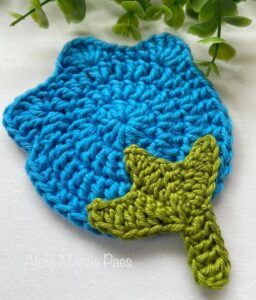
Once the petals are done, fasten off and weave in the ends using your yarn needle. Your tulip shape should now be clearly visible.
Switch to the green yarn for the leaf and stem. Attach the yarn at the bottom of the tulip, chain 8, then work back with sc, hdc, and dc stitches to create a simple stem.
For the leaf, chain 7, then work 1 sc, 1 hdc, 3 dc, 1 hdc, and 1 sc back down the chain. Attach it to the side of the stem with a slip stitch, fasten off, and weave in ends.
Customization and Styling Tips
One of the joys of the tulip-shaped crochet coasters – Step by Step Tutorial is the ability to customize each piece. Try making tulips in different colors to create a vibrant set of coasters. Using pastel tones can give a soft spring look, while bold colors like red and orange make the coasters stand out.
You can also add a small border around the petals by switching to a contrasting yarn color. Simply slip stitch around the edge of the petals to give them a defined outline.
If you prefer larger coasters, use a thicker yarn or a larger hook size. Conversely, smaller hooks and finer yarn will create more delicate coasters.
Another fun idea is to add a loop at the top of one petal so you can hang the coasters when not in use. This is both practical and decorative.
You can even attach felt to the back of the coasters for extra stability and durability.
Lastly, combine the tulip coasters with matching crochet placemats or table runners for a complete handmade table set.
Uses and Gift Ideas
After completing the tulip-shaped crochet coasters – Step by Step Tutorial, you can use your coasters in many ways. They are perfect for protecting your tables from cups, mugs, and glasses.
These coasters also make wonderful handmade gifts for birthdays, housewarming parties, or holidays. Pair them with a matching mug or teapot for a thoughtful and unique gift set.
They can be used as decorative accents at spring-themed parties, tea gatherings, or garden events. Their floral design adds a cheerful touch to any occasion.
For craft fairs or online shops, these coasters are a popular item because they are quick to make and appeal to a wide audience.
You can also use them as appliqués for bags, pillows, or blankets, giving your other projects a floral theme.
The versatility and charm of these tulip-shaped coasters make them a great addition to any home or gift collection.
FAQ – Tulip-Shaped Crochet Coasters
1. What is the best yarn for tulip-shaped coasters?
Cotton yarn is best because it is durable, absorbent, and easy to clean.
2. How long does it take to make one coaster?
Depending on your skill level, one coaster can be finished in 30–45 minutes.
3. Can beginners make these coasters?
Yes! The project uses basic stitches, making it perfect for beginners.
4. Can I wash these coasters?
Yes, since they are made with cotton yarn, they can be machine washed gently and air-dried.
5. How many coasters should I make for a set?
A set of 4–6 coasters is ideal for personal use or as a gift.
6. Can I sell these coasters?
Absolutely! Handmade coasters are popular at craft fairs and online markets.
Conclusion
The tulip-shaped crochet coasters – Step by Step Tutorial is a fun and rewarding project that combines creativity with practicality. We explored the materials needed, the step-by-step instructions, customization tips, and creative ways to use or gift your coasters.
By following this guide, you can create beautiful and functional tulip-shaped coasters for your home or as thoughtful gifts.
We would love to hear your thoughts! Share your experience, let us know how your coasters turned out, and feel free to leave suggestions for future tutorials!


