Creating a Blossoms Table Runner Pattern is a rewarding quilting project that combines creativity with practicality.
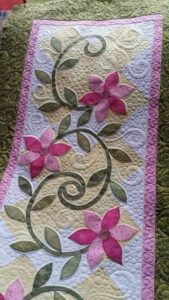
This beautiful quilt pattern adds charm to any dining or coffee table, making it a perfect decorative piece for spring, summer, or any season you choose. Whether you’re an experienced quilter or a beginner, this guide will walk you through the entire process, from fabric selection to the final stitch.
One of the best things about quilting is the ability to customize your design with different fabrics, colors, and textures. The Blossoms Table Runner Pattern allows you to play with floral prints, bright pastels, and geometric designs to create a unique piece that complements your home decor. Plus, this project is a great way to use up fabric scraps and practice essential quilt techniques.
In this article, we will cover everything you need to know about making your own Blossoms Table Runner, including fabric measurements, step-by-step instructions, and finishing touches. Follow along to create a stunning handmade quilted table runner that will impress your family and guests.
Choosing the Right Fabric and Tools
Selecting the right fabric is crucial for a successful quilt project. The colors and patterns you choose will define the overall look of your Blossoms Table Runner Pattern.
- Fabric Selection: Choose high-quality cotton quilting fabric in floral prints, solids, or pastels. A mix of prints and solids adds visual interest to the quilt design.
- Fabric Measurements:
- Main Blossom Blocks: (8) 6.5″ x 6.5″ squares
- Background Fabric: (16) 2.5″ x 2.5″ squares
- Sashing Strips: (4) 2.5″ x 12.5″ strips
- Border Strips: (2) 3.5″ x 40.5″ and (2) 3.5″ x 16.5″
- Backing Fabric: 15″ x 45″
- Batting: 14″ x 44″
- Cutting the Fabric: Use a rotary cutter, ruler, and cutting mat to ensure precise fabric cuts. Accuracy is essential in quilting to ensure the blocks fit together perfectly.
- Additional Tools: You will need coordinating thread, sewing pins, a quilting needle, and a sewing machine with a ¼” foot for precise seam allowances.
- Pre-washing Fabric: This step prevents shrinkage and ensures that colors do not bleed when the quilt is washed later.
- Pressing the Fabric: Iron each piece to remove wrinkles before sewing. Pressing also helps in accurate seam alignment.
Piecing the Blossoms Blocks
The Blossoms Table Runner Pattern consists of multiple blocks arranged in a linear design to create a cohesive look.
- Assembling the Blossom Blocks: Each blossom consists of four 6.5″ squares. Arrange them in a 2×2 grid with background fabric in the corners.
- Creating Half-Square Triangles (HSTs): To add dimension, sew background fabric squares diagonally across one corner of each blossom square and trim the excess.
- Joining the Pieces: Sew the squares together using a ¼” seam allowance. Press seams open to reduce bulk.
- Adding Sashing Strips: The sashing strips separate the blossom blocks and create a more structured look. Sew one sashing strip between each blossom row.
- Sewing the Rows Together: Align the rows carefully, making sure the seams match up for a polished finish.
- Checking Alignment: Before moving to the next step, lay out all blocks to ensure the pattern flows smoothly.
Adding Borders and Quilting
Borders frame the quilt pattern and give it a finished look. Quilting stitches secure the layers and enhance the design.
- Attaching the Borders: Sew the shorter border strips to the sides first, then add the longer strips to the top and bottom.
- Preparing the Quilt Sandwich: Layer the backing fabric, batting, and quilt top. Use basting spray or safety pins to hold the layers together.
- Quilting the Table Runner: Choose a quilting style, such as straight-line quilting, free-motion quilting, or stitch-in-the-ditch.
- Stitching Techniques: Use a walking foot for straight-line quilting or a free-motion foot for custom designs.
- Trimming the Edges: Once quilting is complete, trim any excess batting and backing to match the quilt top.
- Pressing Again: Give the entire quilt a final press before adding the binding.
Binding and Finishing Touches
The final step in making a Blossoms Table Runner Pattern is binding the edges and adding finishing details.
- Cutting the Binding Strips: Cut (4) 2.5″ x WOF (width of fabric) strips.
- Sewing the Binding: Join the strips end-to-end, fold in half lengthwise, and sew to the quilt’s edge using a ¼” seam allowance.
- Mitering the Corners: Fold the binding neatly at each corner to create a professional finish.
- Hand-Stitching or Machine Stitching: Attach the binding to the back using hand stitching for a traditional look or machine stitching for efficiency.
- Adding Embellishments: Consider adding decorative quilting stitches, embroidery, or applique for extra charm.
- Final Pressing: Press the finished table runner and admire your handmade quilted piece!
- PATTERN HERE
By following this step-by-step guide, you can create a beautiful Blossoms Table Runner Pattern that showcases your quilting skills. Enjoy the process, and happy quilting!


