
Apple-Shaped Trivet – Sewing Tutorial is the perfect creative project for anyone who loves combining practicality with handmade charm. Whether you are new to sewing or already experienced, creating a handmade apple trivet is a rewarding way to add personality to your kitchen décor. This project is simple, functional, and incredibly satisfying, especially when you see your finished piece protecting your table from hot dishes.
A well-made Apple-Shaped Trivet – Sewing Tutorial not only teaches you sewing techniques but also helps you understand fabric layering, heat-resistant materials, and decorative finishing methods. Unlike store-bought trivets, a DIY apple trivet allows you to customize colors, textures, and stitching styles according to your taste and kitchen theme. It can be modern, rustic, farmhouse-inspired, or playful — the choice is entirely yours.
In this complete Apple-Shaped Trivet – Sewing Tutorial, you will learn everything step by step, from materials selection to final pressing. We will cover fabric preparation, cutting techniques, assembling layers, quilting for durability, and finishing details like stems and leaves. By the end of this guide, you will feel confident creating your own apple-shaped hot pad that is both beautiful and functional.
Materials and Tools for Your Apple-Shaped Trivet
Before starting your Apple-Shaped Trivet – Sewing Tutorial, it’s important to gather the correct materials. Using high-quality supplies ensures durability and safety, especially because a trivet must withstand heat. Cotton fabric is highly recommended, as synthetic fabrics may melt under high temperatures.
For the outer layer, choose 100% cotton fabric. This material handles heat better and is easy to sew. You can select red or green for a classic apple look, or experiment with patterned fabric for a more decorative touch. Make sure the fabric is pre-washed to prevent shrinking after sewing.
For the inner layers, you will need cotton batting and heat-resistant batting. Heat-resistant batting, sometimes labeled as insulated batting, helps protect surfaces from hot pots and pans. Layering cotton batting with insulated batting increases thickness and improves performance.
You will also need basic sewing tools such as fabric scissors, pins or clips, tailor’s chalk, sewing machine, matching thread, and an iron. A paper template of the apple shape is essential for achieving symmetry. You can draw your own apple silhouette with a rounded bottom and slight indentation at the top.
Do not forget small fabric scraps for the stem and leaf. Brown cotton works well for the stem, while green fabric creates a realistic leaf effect. These small details elevate your DIY apple trivet sewing project and give it a charming finish.
Finally, prepare your workspace. A clean, organized sewing table helps you focus and reduces mistakes. Proper lighting is especially important when working with curved seams, as accuracy is key in this Apple-Shaped Trivet – Sewing Tutorial.
Step-by-Step Instructions to Sew an Apple-Shaped Trivet
Start by placing your apple template on the folded outer fabric. Trace the shape twice so you have a front and back piece. Repeat the process with cotton batting and heat-resistant batting, cutting each layer carefully to maintain consistent sizing.
Next, layer the pieces in this order: outer fabric (right side down), outer fabric (right side up if making reversible, or batting layer if single-sided), cotton batting, and heat-resistant batting. Ensure all layers align perfectly. Use pins or clips to secure everything in place.
Before sewing around the edges, quilt the layers together. Straight-line quilting or gentle curves work well for an apple shape. Quilting stabilizes the layers and prevents shifting during washing or use. Keep your stitches evenly spaced for a professional finish.
Now sew around the apple shape with a ¼-inch seam allowance, leaving a small opening for turning if necessary. Trim excess batting carefully without cutting into the seam. If your design includes a separate binding, you can skip the turning step and prepare for edge finishing instead.
Turn the trivet right side out if you used the turning method, and press carefully with an iron. Make sure to use appropriate heat settings for cotton fabric. Tuck in the seam allowance at the opening and stitch it closed neatly.
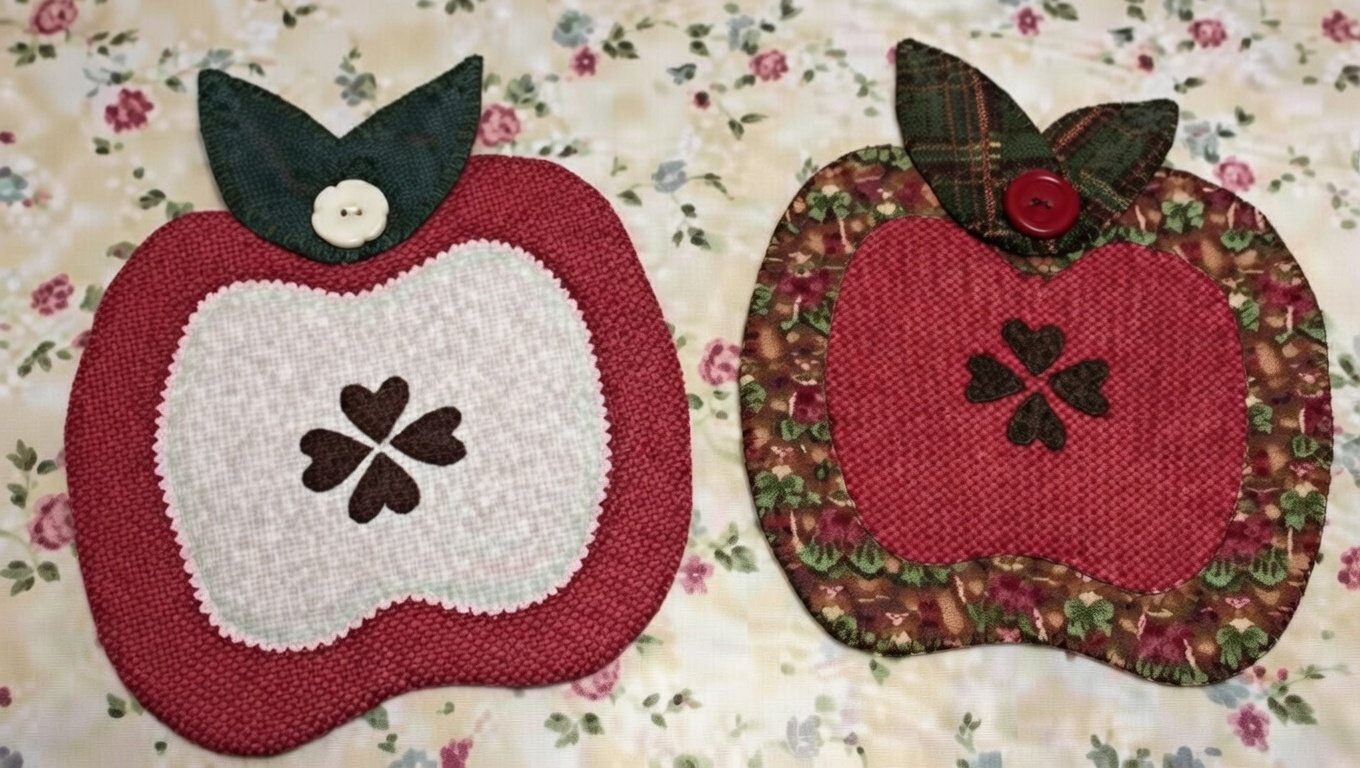
Attach the stem and leaf at the top indentation of the apple. You can insert them into the seam before final stitching or topstitch them securely afterward. This finishing touch completes your Apple-Shaped Trivet – Sewing Tutorial and gives your project its recognizable apple appearance.
Design Variations and Creative Customization
One of the best aspects of an Apple-Shaped Trivet – Sewing Tutorial is the opportunity for personalization. You can play with different fabric combinations to match seasonal décor. Red apples are perfect for fall kitchens, while green apples bring a fresh spring vibe.
Consider adding decorative stitching to mimic apple texture. Simple embroidery lines radiating from the center create a quilted apple slice effect. Decorative topstitching enhances durability and adds visual interest.
You can also create a patchwork apple by sewing small fabric scraps together before cutting the apple shape. This method is ideal for using leftover quilting cotton and adds a unique handmade touch to your DIY apple trivet.
For gifting purposes, think about adding a hanging loop. A small strip of fabric sewn into the top seam allows the trivet to hang on a kitchen hook. This functional detail increases convenience and makes your handmade trivet even more practical.
Another variation involves making a double-layer reversible trivet. By using contrasting fabrics on each side, you essentially create two designs in one. This approach maximizes versatility and enhances the value of your sewing project.
You can even scale the template up or down. A smaller version works beautifully as a mug rug, while a larger apple shape functions as a centerpiece heat pad for serving dishes. The flexibility of this Apple-Shaped Trivet – Sewing Tutorial makes it suitable for many creative adaptations.
Tips for Durability, Safety, and Professional Finishing
When sewing any heat-resistant item, safety is essential. Always use heat-safe materials. Avoid polyester batting, as it may melt when exposed to high temperatures. Cotton and insulated batting are the safest options for a handmade apple trivet.
Reinforce seams with backstitching, especially near the stem area. This part often experiences stress during handling. Strong seams ensure your trivet remains durable over time and frequent use.
Press seams carefully throughout the process. Pressing improves accuracy and helps layers lay flat. A well-pressed project always looks more professional, even if you are a beginner following this Apple-Shaped Trivet – Sewing Tutorial for the first time.
Wash your finished trivet in cold water and air dry when possible. Excessive heat in dryers can gradually reduce the lifespan of batting. Proper care maintains the structure and safety of your trivet.
If you plan to sell your handmade trivets, maintain consistent measurements and stitching quality. Uniformity builds trust with customers and enhances perceived craftsmanship. High-quality finishing details make a noticeable difference.
Finally, practice patience. Curved seams can feel challenging at first, but sewing slowly and guiding the fabric gently will produce smooth, rounded edges. With practice, your DIY apple trivet sewing project will look increasingly refined and polished.
FAQ About Apple-Shaped Trivet – Sewing Tutorial
What fabric is best for an Apple-Shaped Trivet – Sewing Tutorial?
100% cotton fabric is the safest and most recommended option because it withstands heat better than synthetic materials.
Can beginners follow this Apple-Shaped Trivet – Sewing Tutorial?
Yes, this project is beginner-friendly. Basic sewing skills such as straight stitching and simple quilting are sufficient.
Do I need heat-resistant batting?
Using heat-resistant batting is strongly recommended to protect surfaces from hot cookware. It improves insulation and safety.
How thick should a DIY apple trivet be?
A combination of cotton batting and insulated batting usually provides sufficient thickness for most kitchen needs.
Can I wash a handmade apple trivet?
Yes, wash it gently in cold water and avoid high dryer heat to maintain its structure and durability.
Is it safe to place extremely hot pans directly on the trivet?
While the trivet is designed for heat protection, avoid placing cookware directly from high flames or oven broilers without testing the heat resistance first.
Conclusion
In this detailed Apple-Shaped Trivet – Sewing Tutorial, you learned how to select materials, prepare fabric layers, sew curved seams, quilt for stability, and add decorative finishing touches. Creating a DIY apple trivet is not only a practical sewing project but also a creative opportunity to personalize your kitchen space.
By following each step carefully and prioritizing safety with heat-resistant materials, you can produce a durable and charming handmade apple trivet that protects your surfaces while enhancing your décor. This project is perfect for personal use, thoughtful gifts, or even small handmade business ventures.

