
The Bunny Cutlery Holder Quilt Pattern has become a delightful favorite among crafters who enjoy creating handmade pieces that blend functionality, charm, and seasonal celebration. This adorable quilted accessory brings a touch of whimsy to any dining table, making it perfect for Easter gatherings, springtime décor, or everyday use for those who love cute handmade items.
Many people are drawn to the Bunny Cutlery Holder Quilt Pattern because it transforms an ordinary table setting into something warm, inviting, and memorable. Quilted cutlery holders add a handmade touch that stands out, especially when shaped like charming little bunnies with ears, pockets, and customizable details.
One of the greatest advantages of working with the Bunny Cutlery Holder Quilt Pattern is its versatility. While many people use it during Easter festivities, others incorporate it into baby showers, spring brunches, children’s parties, or rustic farmhouse table settings. The project is small, quick to make, and easy to personalize, making it a great choice for gifting as well.
Understanding the Bunny Cutlery Holder Concept
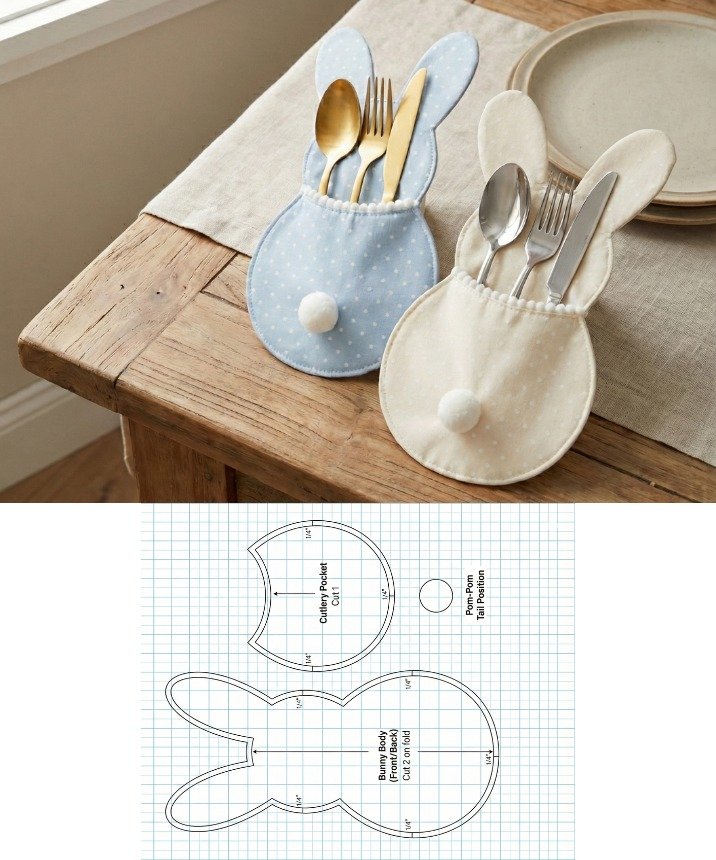
Creating a Bunny Cutlery Holder Quilt Pattern starts with understanding the structure of the holder itself. The design usually includes a bunny-shaped silhouette, a pocket for utensils, and two elongated ears that add a charming touch. This simple yet adorable construction makes it ideal for practicing basic quilting skills while still creating a finished item with personality and purpose.
The foundation of the design typically begins with two layers of fabric and a piece of batting sandwiched in between. This quilting method creates softness, durability, and structure, ensuring the holder keeps its shape even after repeated use. The size can vary, but most holders are designed to comfortably fit a fork, knife, and spoon, making them practical for daily meals or special events.
Another key aspect of understanding this pattern is deciding which quilting technique you want to apply. Some crafters prefer simple straight-line quilting for a clean and modern look, while others choose free-motion stitching to add swirls, flowers, or bunny-inspired lines. Both approaches work beautifully, depending on your desired style.
It’s also helpful to think about color combinations early on. Traditional bunny cutlery holders are made in pastel shades such as pink, lavender, mint, and butter yellow. However, neutral tones like beige, cream, or light gray work equally well for a minimalist or farmhouse aesthetic. Playful prints—such as polka dots, florals, or tiny carrots—can add extra charm to your project.
Finally, this pattern is easily adaptable. You can modify the pocket style, change the shape of the ears, add embroidered facial features, or personalize the holder with initials. This flexibility makes the project even more enjoyable, as you can infuse your own creativity into every detail.
Materials and Fabric Choices
Choosing the right materials is an essential part of making a Bunny Cutlery Holder Quilt Pattern. Because the project is small, it doesn’t require large amounts of fabric, making it a great opportunity to use leftover quilt scraps or fat quarters. High-quality cotton fabric is the recommended choice because it is easy to sew, durable, and ideal for detailed cuts and shapes.
To begin, you will need fabrics for the bunny’s body and the pocket. Many crafters choose a solid color for the main bunny shape and a patterned fabric for the pocket to create a nice visual contrast. Alternatively, you can reverse this selection and use prints for the bunny body with a solid pocket. No matter the combination, ensure the fabrics complement each other to achieve a cohesive look.
Next, you’ll need batting to add structure and padding to the holder. Cotton batting gives a soft, low-loft finish, while polyester batting provides more thickness. For this project, either type works well, depending on your preference for firmness and quilting texture.
Thread selection is equally important. Choose a strong, high-quality thread that matches or blends with your fabric. If you plan to add decorative stitching to the ears, pocket, or outline, you can select thread in a contrasting color to make the details stand out.
You’ll also need tools such as scissors or a rotary cutter, pins or clips, a sewing machine, an iron, and optional embellishments like buttons or embroidery floss. These small additions can enhance the look of your bunny cutlery holder, giving each one a unique personality.
For personalization, consider adding small felt pieces for noses or inner ears. These accents bring your bunny to life and can be sewn or glued in place depending on your preference. With all materials prepared, you’re ready to begin assembling your project.
How to Assemble the Bunny Cutlery Holder
Assembling your Bunny Cutlery Holder Quilt Pattern is an enjoyable process that lets you combine quilting techniques with creative shaping. Begin by cutting out the bunny silhouette from your main fabric and batting. You will need two pieces of fabric and one piece of batting for the main body. Stack them in a sandwich-style layout: fabric right side down, batting, and fabric right side up.
Once layered, you can begin quilting the pieces together. Many crafters choose simple lines or soft curves that follow the shape of the bunny. This initial quilting step adds stability and gives your project a classic quilted appearance. After quilting, trim the edges to ensure clean, even lines.
Next, prepare the pocket. Cut a rectangular or oval-shaped piece of fabric, fold the top edge, press it with an iron, and stitch it to create a neat seam. Place this pocket onto the bunny body, positioning it in a way that aligns with the overall shape. Pin it securely before sewing around the edges, leaving the top open for cutlery insertion.
The next step is sewing the bunny’s ears. Some patterns use separate ear pieces that are sewn on top, while others incorporate ears directly into the silhouette. If you are making separate ears, quilt them lightly, turn them inside out for clean edges, and stitch them to the top of the bunny’s head.
Customization Ideas and Creative Variations
One of the best things about the Bunny Cutlery Holder Quilt Pattern is how customizable it is. You can create dozens of variations, each with its own personality and theme. This makes the project perfect for holidays, events, or seasonal décor.
For Easter-themed holders, use pastel colors and add small embroidered eggs, carrots, or floral accents. These little extras enhance the festive spirit and make your quilted holders stand out during holiday meals. Children especially love fun designs with bright colors and playful details.
If you’re making a more sophisticated version, choose neutral fabrics like linen blends, soft grays, or cream tones. Add delicate quilting lines and minimalist facial features for a modern farmhouse look. These holders are elegant, subtle, and perfect for year-round use.
Another idea is to personalize each holder with initials or embroidered names. This works wonderfully for family gatherings, dinner parties, or gift sets. Guests love receiving handmade items that feel unique and thoughtful.
You can also play with pocket shapes. Instead of a simple rectangular pocket, consider a heart-shaped pocket, a half-circle, or even a patchwork-style pocket with multiple small pieces. This adds texture and creativity while still maintaining the functionality of the holder.
For a fun twist, make an entire set of bunny holders with different colors or ear shapes. Some can have floppy ears, while others have pointy ones. You can also vary facial expressions, creating a charming family of quilted bunnies.
These customization options make every project feel fresh and exciting. Whether you want a playful, elegant, or child-inspired design, you can adapt the pattern to match your personal style perfectly.
FAQ
What is a Bunny Cutlery Holder Quilt Pattern?
It is a quilted design shaped like a bunny with a built-in pocket that holds utensils such as forks, knives, and spoons.
Is this project beginner-friendly?
Yes. The pattern uses simple quilting techniques and small pieces, making it ideal for beginners.
What fabrics work best?
High-quality cotton fabrics are recommended because they are easy to cut, sew, and quilt.
Can I personalize the bunny holder?
Absolutely. You can embroidery features, add names, use decorative thread, or customize ears and pockets.
Conclusion
Creating a Bunny Cutlery Holder Quilt Pattern is a fun, meaningful, and highly customizable project that adds charm to any table setting. Throughout this article, you learned how to choose the right materials, assemble the bunny shape, quilt the layers, and personalize your design with creative touches. Whether for Easter, spring gatherings, or everyday decoration, this adorable quilted accessory is sure to bring smiles to your home. I hope you enjoyed this guide—please share your honest opinion and let me know what other quilted patterns you would like to see next!

