If you’re a passionate quilter or a curious beginner looking for a delightful project, learning the butterfly quilt pattern – step by step tutorial is an inspiring place to start. This pattern blends charm and creativity, allowing you to craft a quilt that captures the grace of butterflies in flight. Whether you’re quilting for a loved one or decorating your space with handmade flair, mastering this butterfly quilt pattern – step by step tutorial is both a joyful and rewarding experience.
The butterfly quilt pattern – step by step tutorial offers a clear and organized way to piece together blocks that resemble delicate butterflies. Each block becomes a canvas for creativity, offering endless options for color and texture combinations. As with any quilting project, preparation is key, and this tutorial guides you through the process from fabric selection to final assembly. By the end, you’ll not only have a beautiful quilt but also new skills and a deeper appreciation for the art of patchwork.
In this article, we’ll guide you through everything you need to know about creating a butterfly quilt pattern – step by step tutorial using beginner-friendly language, clear instructions, and helpful tips. You don’t need to be a quilting expert to complete this project—just a bit of patience, creativity, and the willingness to enjoy the process. Let’s explore how to bring your butterfly blocks to life with fabric, thread, and heart.
Choosing Your Materials for the Butterfly Quilt
Before you begin the butterfly quilt pattern – step by step tutorial, the first and most exciting step is selecting the right materials. You’ll need a variety of cotton fabrics, ideally in different colors and patterns. Think about how real butterflies look: vibrant, soft, colorful, or even monochromatic. Use that as inspiration for your fabric choices.
Quality quilting cotton is recommended for both the top of your quilt and the backing. It’s durable, easy to work with, and comes in a wide variety of prints. Choose a solid background color that will allow your butterfly blocks to really pop and stand out in the final quilt.
Batting is the layer between the quilt top and the backing, providing warmth and softness. For a beginner-friendly quilt, select low-loft cotton batting, which is easier to quilt by hand or machine. Make sure it’s cut to fit the final dimensions of your quilt.
Thread selection also plays an important role in the butterfly quilt pattern – step by step tutorial. Use a high-quality thread in a color that complements your fabrics. For a neat, clean finish, avoid threads that contrast too much with your block fabrics.
You’ll also need basic quilting tools like rotary cutters, cutting mats, quilting rulers, pins, and a reliable sewing machine. These tools help you achieve precise cuts and accurate seams throughout the quilt-making process.
Once all materials are gathered, organize them by color and purpose. Keeping things sorted at this stage will help you stay focused as you progress through each step in the butterfly quilt pattern – step by step tutorial.
Assembling Your Butterfly Blocks
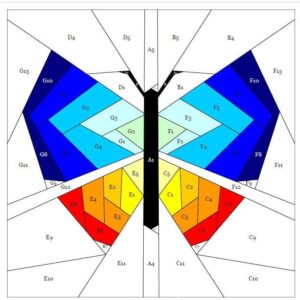
Creating the butterfly blocks is the heart of this butterfly quilt pattern – step by step tutorial. Each block typically represents a butterfly with wings made from triangle and rectangle shapes sewn together in a symmetrical layout.
Start by cutting your fabric pieces. Most butterfly blocks are made from half-square triangles and squares. You’ll need four triangle wings (two on each side), a body strip in the center, and optional antennae or embellishment pieces.
To make the wings, pair contrasting fabrics and sew half-square triangles. Press the seams and trim them neatly. These triangles will be arranged diagonally to form the top and bottom wings of the butterfly.
The body of the butterfly is usually a rectangular strip placed vertically between the wings. You can choose a darker fabric for the body to create a natural butterfly appearance. Align the wings on either side of this strip and sew them together, keeping the seams consistent and flat.
Depending on your style, you can embellish your butterflies with fabric appliqué antennae, embroidery, or even tiny buttons to simulate eyes. This adds personality and uniqueness to each block while allowing for creative expression.
Once a few blocks are complete, lay them out to see how they’ll look when joined. This helps in planning the layout and ensuring a balanced color distribution. This stage of the butterfly quilt pattern – step by step tutorial is where your quilt truly starts to come to life.
Sewing and Arranging the Quilt Top
Now that your butterfly blocks are ready, the next stage in the butterfly quilt pattern – step by step tutorial is arranging and sewing the quilt top. Decide how many blocks you’ll need based on the desired quilt size. Layout options include rows of butterfly blocks, a patchwork effect with alternate plain squares, or a more intricate garden scene.
Lay out the blocks on a flat surface or design wall and rearrange them until you’re happy with the visual flow. Consider alternating bold and pastel butterflies for contrast, or grouping similar tones together for a gradient effect.
Sew the blocks into rows, carefully matching seams at the corners. Press each row with an iron before joining them together to form the full quilt top. Be consistent with your seam allowances to ensure the rows line up correctly.
After the rows are sewn, add any desired borders. A border can help frame your butterfly quilt and add to its final dimensions. You might opt for a thin inner border and a thicker outer border in coordinating fabrics.
Once the top is complete, double-check all seams for strength and alignment. Trim any excess threads and make sure the edges are clean and square. This preparation ensures that the quilt sandwich will go together smoothly in the next step of the butterfly quilt pattern – step by step tutorial.
Taking time at this stage will ensure your quilt top is neat, polished, and ready for layering and quilting. Don’t rush this part—it’s the foundation of your finished masterpiece.
Quilting and Finishing Your Project
With the quilt top ready, it’s time to move into one of the most rewarding parts of the butterfly quilt pattern – step by step tutorial: the actual quilting. Layer the quilt top, batting, and backing fabric, making sure all three layers are smooth and free from wrinkles.
Use safety pins or basting spray to hold the layers together securely. Start quilting from the center and move outward to avoid shifting or puckering. You can quilt by hand or machine, depending on your preference and comfort level.
A simple stitch-in-the-ditch technique (sewing directly along the seam lines) works well for beginners and keeps the quilt visually clean. Alternatively, you can add free-motion quilting to trace the wings of the butterflies or create floral patterns in the background.
After quilting is complete, it’s time to trim the edges and attach the binding. Binding is the fabric strip that wraps around the raw edges of the quilt, securing the layers and giving a finished look. You can make your own or use pre-made bias tape in a color that complements your quilt.
Sew the binding to the front of the quilt, fold it over to the back, and hand-stitch or machine-sew it down. Take your time with this step for a neat and even finish. It’s the final touch in the butterfly quilt pattern – step by step tutorial.
When the binding is secured, give your quilt a final press with a warm iron. Admire your work and consider labeling the back with your name, date, or a special message. Your handmade butterfly quilt is now complete!
FAQ – Frequently Asked Questions
What size should I make my butterfly quilt?
This depends on its intended use. A baby quilt might be around 36″ x 52″, a throw about 60″ x 70″, and a bed-size quilt can go much larger. Plan the number of butterfly blocks accordingly.
Can I use scraps to make the butterfly quilt pattern?
Yes! The butterfly quilt pattern – step by step tutorial is great for using up scraps. Mixing and matching fabrics gives each butterfly a unique personality.
Is this pattern suitable for beginners?
Absolutely. The block construction uses basic shapes like squares and triangles, and with patience, even beginners can follow along successfully.
How do I keep my butterfly blocks uniform in size?
Always use a quilting ruler and rotary cutter for accuracy. Consistent seam allowances and pressing after each step also help keep blocks uniform.
What if I don’t have a sewing machine?
You can hand-sew the quilt, though it will take more time. Choose a simple hand-quilting technique and use strong thread for durability.
Can I personalize the quilt for a gift?
Yes! Add initials, dates, or embroidered messages on the butterfly wings or in the quilt border to make it extra special for the recipient.
Conclusion
Creating a quilt using the butterfly quilt pattern – step by step tutorial is a beautiful journey that combines creativity, skill, and heart. From selecting the fabrics to stitching each butterfly block and assembling the final quilt, every step offers an opportunity to express your personal style and passion for quilting.
Whether you’re making it for a child, a friend, or yourself, the butterfly motif symbolizes transformation and beauty. It’s a project that will be treasured for years to come and a wonderful way to expand your quilting abilities.
I hope this guide has inspired you to start your own butterfly quilt. If you try this butterfly quilt pattern – step by step tutorial, please leave a sincere opinion below and feel free to share your suggestions, experiences, or questions. Your feedback helps keep the creative community alive and thriving.


