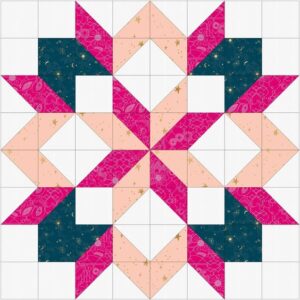
The Carpenter Star block is a stunning and versatile quilt pattern that quilters of all skill levels can enjoy.
With its intricate design and striking appearance, it’s no wonder this pattern is a favorite among quilting enthusiasts. In this tutorial, we’ll guide you through the step-by-step process of creating your own Carpenter Star block, including all the necessary fabric cuts and measurements.
Let’s get started on this beautiful quilting journey!

Materials and Fabric Selection
When embarking on your Carpenter Star quilt, the first step is to gather all the necessary materials. You will need fabric in various colors and patterns, a rotary cutter, a quilting ruler, and a cutting mat. Ensure you have a sewing machine, thread that matches your fabrics, and an iron for pressing your seams.
Choosing the right fabric is crucial for the success of your quilt. Select fabrics that contrast well with each other to highlight the intricate design of the Carpenter Star. Typically, you will need four different fabrics: one for the background, one for the star points, one for the secondary design, and one for the center. Make sure to prewash your fabrics to prevent any shrinkage or color bleeding after your quilt is completed.
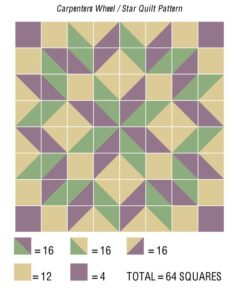
Once your materials are gathered and fabrics selected, you can begin cutting your pieces. For a single Carpenter Star block, you will need the following fabric cuts: Background fabric – 16 squares of 4.5 inches, Star points fabric – 16 squares of 4.5 inches, Secondary design fabric – 8 squares of 4.5 inches, Center fabric – 4 squares of 4.5 inches. These measurements ensure your block comes together seamlessly.
Cutting and Preparing Your Fabric
Before you start cutting, press all your fabrics to remove any wrinkles. This ensures your cuts are accurate, which is essential for a precise Carpenter Star block. Using your rotary cutter, quilting ruler, and cutting mat, cut the required number of squares as specified in the materials section. Accuracy is key, so take your time with this step.
Next, it’s time to prepare your half-square triangles (HSTs). These are a crucial part of the Carpenter Star pattern. To create HSTs, pair each background square with a star points square, and each secondary design square with another star points square. Draw a diagonal line from corner to corner on the back of the lighter fabric square in each pair.
Sew a quarter-inch seam on both sides of the drawn line. After sewing, cut along the drawn line to create two HSTs from each pair. Press the seams open or to one side, depending on your preference. Trim the HSTs to 4.5 inches to ensure they match the rest of your squares perfectly. This preparation will make assembling the block much smoother.
Assembling the Carpenter Star Block
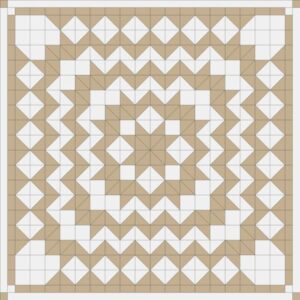
With all your pieces cut and prepared, it’s time to lay out your Carpenter Star block. Arrange your squares and HSTs according to the pattern. Start with the center four squares and build outwards. The key to a successful layout is ensuring the star points and secondary designs are in the correct positions.
Once you’re satisfied with the layout, start sewing the squares together in rows. Use a quarter-inch seam allowance and press the seams as you go. It’s essential to keep the rows organized and labeled if needed, to avoid confusion. After completing the rows, sew them together to form the full block. Press the entire block to give it a neat, finished look.
Accuracy during this step is crucial. Aligning the seams correctly will ensure your Carpenter Star block looks sharp and professional. Take your time, double-check your placements, and adjust as necessary. This careful attention to detail will pay off in the final appearance of your quilt.
Adding Borders and Finishing Touches
After completing your Carpenter Star block, you might want to add borders to enhance the design and size of your quilt. Measure your block and cut border strips accordingly. The width of the borders can vary based on your preference, but typically, a 2.5-inch strip works well. Sew the borders to the sides first, then to the top and bottom, pressing the seams after each addition.
The final touches involve layering, quilting, and binding your quilt. Layer your completed quilt top with batting and backing fabric, and baste them together. Quilt as desired, following the lines of the Carpenter Star or adding additional patterns to complement the design. Once quilting is complete, trim the excess batting and backing, and add the binding to finish the edges.
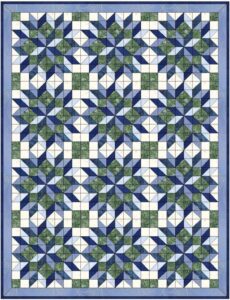
Creating a Carpenter Star quilt is a rewarding experience, and the end result is a beautiful piece of art. This block can be used in various quilt patterns, from single-block wall hangings to full-sized quilts. Experiment with different fabric combinations and quilt designs to make it uniquely yours.
Tips for a Successful Carpenter Star Quilt
- Fabric Choice: Select fabrics with good contrast to highlight the intricate design of the Carpenter Star. Experiment with solids and prints to add depth and interest to your quilt.
- Precision Cutting: Accurate cutting is crucial for a successful quilt. Use a sharp rotary cutter and take your time to ensure each piece is cut correctly.
- Seam Allowance: Maintain a consistent quarter-inch seam allowance throughout the process. This consistency is key to ensuring your pieces fit together perfectly.
- Pressing: Press your seams as you go to keep your block flat and neat. Whether you press seams open or to one side, consistency is important.
- Quilting Design: Consider the quilting design carefully. Echoing the Carpenter Star pattern with your quilting can enhance the overall look of your quilt.
By following these tips and steps, you’ll be well on your way to creating a stunning Carpenter Star quilt. This timeless pattern offers endless possibilities for customization and creativity. Enjoy the process and happy quilting!
In this tutorial, we’ve covered the essential steps to create a Carpenter Star block, from selecting and cutting your fabric to assembling and finishing your quilt.

With the right materials, precision, and patience, you can craft a beautiful quilt that showcases the classic Carpenter Star pattern.
Whether you’re making a single block or a full quilt, this project is sure to be a cherished addition to your quilting portfolio.


