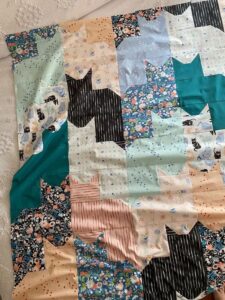
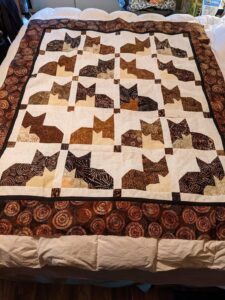
The Cats on Cats Quilt Pattern is a delightful design that combines the warmth of quilting with the charm of feline friends. If you love cats and sewing, this adorable quilt pattern is a must-try for your next creative endeavor. Whether you’re an experienced quilter or a curious beginner, this pattern is accessible, fun, and an excellent way to explore new quilt patterns.
In this article, we’ll walk you through everything you need to know to create your own Cats on Cats Quilt Pattern masterpiece. We’ll cover fabric selection, cutting measurements, assembly instructions, and finishing tips. The goal is to guide you with a human touch, offering both technical advice and creative encouragement along the way.
This pattern not only showcases your love of cats but also opens the door to practicing techniques like appliqué and patchwork. The finished quilt makes a wonderful gift or a cozy addition to your own home. Let’s dive into the furry fun and learn how to stitch together the perfect quilt using the Cats on Cats Quilt Pattern!
Choosing Fabrics for the Cats on Cats Quilt Pattern
When working with the Cats on Cats Quilt Pattern, fabric selection is one of the most enjoyable parts. You get to mix and match textures, prints, and colors to create whimsical and unique feline blocks.
Start with a neutral background fabric such as white, cream, or pale gray. This allows the cat appliqué shapes to really stand out. You’ll need about 1½ yards of background fabric if making a throw-size quilt (approximately 50″ x 60″).
For the cats, gather scraps or fat quarters in various shades and patterns. A mix of solids and prints gives each cat its own personality. Aim for around 8-10 fat quarters for variety. These will be used to make the cat shapes, ears, tails, and facial features.
If you want to add sashing or borders, choose complementary tones that won’t compete with your main design. For sashing, ¾ yard should suffice. A bold border can use up to 1 yard, depending on width and design.
Don’t forget the backing and binding! For a throw quilt, 3½ yards of backing fabric and ½ yard for binding should do the trick. Consider a fun cat-themed print on the back for an extra surprise.
Finally, batting will be needed to give your quilt loft and warmth. Select a cotton or cotton-blend batting that fits your desired size. A crib-size or throw-size batting works well for this project.
Cutting Instructions and Quilt Block Assembly
The Cats on Cats Quilt Pattern uses a mix of patchwork and appliqué. You’ll be cutting various pieces for the blocks and assembling them to form each cat square.
Each cat block measures 10.5″ x 10.5″ unfinished. You’ll need a total of 20 blocks for a 4 x 5 layout. Begin by cutting 20 squares from your background fabric, each measuring 10.5″ x 10.5″.
From your chosen cat fabrics, cut:
-
(20) 7″ x 9″ rectangles for cat bodies
-
(40) 2.5″ x 3.5″ rectangles for ears
-
(20) 1.5″ x 6″ strips for tails
-
Optional: (20) 1.5″ x 2″ for facial features or whiskers (can be embroidered)
You can create a template for the cat shape using sturdy paper or template plastic. Position the body, ears, and tail onto each block using fusible webbing or basting spray, then appliqué using a zigzag or blanket stitch.
Take your time with the appliqué step—it adds charm and personality to your quilt patterns. Don’t be afraid to get creative by adjusting ear angles or adding embroidered details like noses or whiskers.
Once all blocks are completed, lay them out in a grid. Arrange the colors and patterns until you’re happy with the balance. This part lets you personalize the layout based on your color sense and favorite cat prints.
Sew the blocks together row by row, pressing seams as you go. Then join the rows and press again. At this point, you can add sashing between the blocks or leave them edge-to-edge for a modern look.
Quilting and Finishing Touches
Now that the quilt top is assembled, it’s time to quilt it! Layer your quilt top, batting, and backing. Baste the layers together using safety pins or temporary spray adhesive.
Choose a quilting style that complements the Cats on Cats Quilt Pattern. A meandering free-motion design adds a playful touch, or you can stitch in the ditch along the block seams for a cleaner look.
If you’re comfortable with decorative stitches, consider outlining the cat shapes with quilting to emphasize the appliqué. You can also quilt paw prints, whiskers, or hearts throughout the top for extra flair.
After quilting, trim the edges of the quilt sandwich to make them even. Prepare your binding strips by cutting 2.5″ wide strips from your binding fabric. Join the strips, fold in half lengthwise, and press.
Attach the binding to the front of the quilt with a ¼” seam, then fold it over to the back and hand-stitch or machine-stitch in place. Binding gives your quilt a finished, polished edge.
Lastly, add a label to your quilt! Use a small piece of fabric and a permanent marker to write your name, the date, and the quilt’s name—“Cats on Cats Quilt.” This is a sweet and meaningful final detail.
Tips for Customization and Creative Variations
One of the best parts about the Cats on Cats Quilt Pattern is its flexibility. You can make it your own by adjusting the size, fabric, or layout depending on your style or the occasion.
To make a baby quilt, reduce the block size to 8.5″ x 8.5″ and make a 3 x 4 layout. Use softer colors and fabrics like flannel for a gentle, cozy result. Baby quilts make wonderful gifts for cat-loving families.
Turn the pattern into wall art by making a single cat block with extra border and quilting details. Mount it on canvas or frame it. This is a great way to use leftover fabric and showcase your quilting skills.
Use embroidery to personalize the cats. Add names, collars, or even fun sayings beneath each cat. Embroidered features can really enhance the charm and individuality of your quilt patterns.
Another creative option is to use novelty fabrics that feature cat faces or paw prints. These can add a layer of humor and visual interest to your quilt without needing extra embellishment.
If you’re making the quilt as a gift, try matching the fabric colors to the recipient’s real-life cats. This thoughtful touch can turn a simple quilt into a heartfelt keepsake.
Finally, share your creations online or with local quilt groups. The quilting community loves seeing how others interpret patterns like the Cats on Cats Quilt Pattern, and your work can inspire others to join in the fun.
Creating a Cats on Cats Quilt Pattern is more than just sewing—it’s a joyful way to express your love for cats, creativity, and the art of quilting. With a bit of planning, careful cutting, and playful imagination, you’ll have a quilt that’s as cozy as it is cute.


