
The Churn Dash Block Pattern is one of the most iconic and enduring quilt block designs in quilting history. Known for its clean geometry and timeless appeal, the Churn Dash Block Pattern has remained a favorite among quilters for generations. Whether you are a beginner exploring traditional blocks or an experienced maker seeking a versatile design, this pattern offers both simplicity and creative potential.
One of the reasons the Churn Dash Block Pattern continues to be so popular is its perfect balance between structure and flexibility. The block combines straightforward piecing techniques with strong visual impact, making it suitable for a wide range of quilt styles—from classic farmhouse to modern minimalist. With just a few fabric choices, the Churn Dash Block Pattern can look completely different.
In this comprehensive guide, you will learn everything you need to successfully create the Churn Dash Block Pattern. We will explore its history and design, essential materials, step-by-step construction tips, and creative layout ideas. By the end, you will feel confident and inspired to incorporate this timeless block into your next quilting project.
Understanding the Design of the Churn Dash Block Pattern
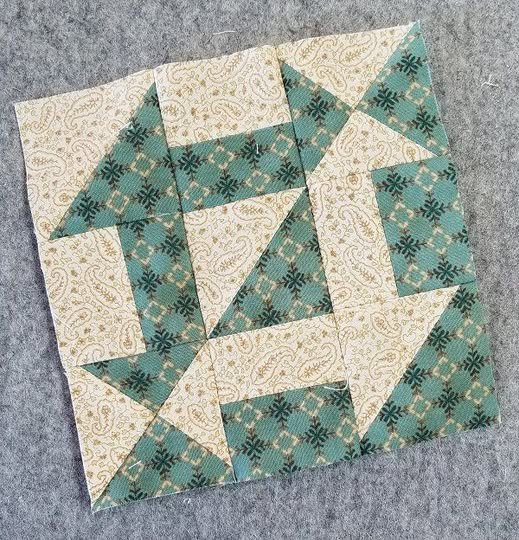
The Churn Dash Block Pattern dates back to the 19th century and is considered a cornerstone of traditional American quilting. Its name is believed to be inspired by the shape of a butter churn’s dash, which is reflected in the block’s distinctive cross-and-frame layout.
At its core, the Churn Dash Block Pattern is made from a combination of half-square triangles and straight strip units arranged around a central square. This simple construction creates a bold, graphic look that stands out even in scrappy fabric combinations.
One of the biggest strengths of the Churn Dash Block Pattern is its adaptability. Quilters can easily change the block size, color placement, or fabric style without altering the fundamental structure. This makes it an excellent building block for both traditional and contemporary quilts.
The block’s strong lines make it especially effective for showcasing contrast. Light and dark fabric pairings highlight the churn dash shape clearly, while softer contrasts create a more blended, subtle appearance.
Because the Churn Dash Block Pattern uses basic piecing techniques, it is often recommended for beginners who want to build confidence with half-square triangles and accurate seam allowances.
Understanding the geometry behind the block will help you assemble it more accurately and open the door to creative variations later in your quilting journey.
Essential Materials and Fabric Planning
Before starting your Churn Dash Block Pattern, gathering the right materials will make the process smoother and more enjoyable. Quality supplies contribute greatly to the accuracy and durability of your finished block.
Quilting cotton is the most popular fabric choice for the Churn Dash Block Pattern. It is stable, easy to cut, and presses crisply. For a traditional look, many quilters use a light background fabric paired with a darker print for the churn dash elements.
Color contrast is especially important in this block. High contrast emphasizes the geometric design, while low contrast creates a softer visual effect. Planning your palette ahead of time helps your Churn Dash Block Pattern achieve the desired impact.
You will also need reliable cutting tools, including a rotary cutter, self-healing mat, and acrylic ruler. Precision cutting is critical because the Churn Dash Block Pattern relies on accurate unit sizes to assemble properly.
Thread selection should not be overlooked. A high-quality cotton or polyester thread in a neutral shade usually works best, ensuring strong seams without distracting from the fabric design.
Finally, keep your iron ready for pressing at each stage. Proper pressing—not ironing—helps maintain sharp edges and keeps your Churn Dash Block Pattern blocks square and flat.
Step-by-Step Construction Tips for Perfect Blocks
Building a clean and accurate Churn Dash Block Pattern is very achievable when you follow a careful process. Attention to detail at each step will greatly improve your final results.
Start by cutting all pieces precisely according to your chosen block size. Even small measurement errors can cause alignment issues later. Consistency is key when preparing units for the Churn Dash Block Pattern.
Next, create the half-square triangles that form the corner units. Many quilters prefer the draw-a-line method or specialty rulers for accuracy. After sewing, trim and square each unit to ensure uniformity.
Construct the strip units that form the block’s side bars. Press seams toward the darker fabric when possible. Proper seam direction helps the Churn Dash Block Pattern nest neatly during assembly.
Before sewing the full block together, lay out all components in the correct orientation. This visual check prevents common placement mistakes and ensures the churn dash shape appears correctly.
Sew the rows together carefully, maintaining a consistent quarter-inch seam allowance. Press each row flat before joining them. This step keeps the Churn Dash Block Pattern crisp and professional.
Finally, square up the completed block. Trimming to the exact unfinished size ensures smooth assembly when combining multiple blocks into a quilt.
Creative Layout Ideas and Finishing Touches
Once you have mastered the Churn Dash Block Pattern, the fun truly begins with layout and finishing options. This block is incredibly versatile and works beautifully in many quilt designs.
A traditional grid layout is the most common arrangement. It highlights the symmetry of each block and creates a classic quilt appearance. This is often the first choice for beginners using the Churn Dash Block Pattern.
For a more dynamic look, try rotating alternate blocks. This creates a secondary pattern that adds movement and visual interest without changing the block itself.
Sashing between blocks can dramatically change the quilt’s appearance. Narrow sashing strips help each Churn Dash Block Pattern stand out, while wider sashing creates a more framed, structured look.
Border choices also influence the final design. A simple solid border keeps the focus on the blocks, while a pieced border adds extra complexity and charm.
Quilting motifs such as straight-line grids or gentle curves complement the strong geometry of the Churn Dash Block Pattern. Choose stitching that enhances rather than competes with the design.
Taking time with these finishing details will elevate your quilt from simple to stunning and showcase the beauty of the Churn Dash Block Pattern.
Frequently Asked Questions About Churn Dash Block Pattern
Is the Churn Dash Block Pattern good for beginners?
Yes, the Churn Dash Block Pattern is considered beginner-friendly because it uses basic piecing techniques and straightforward shapes.
What size should I make my blocks?
Common finished sizes range from 6 to 12 inches. The best size for your Churn Dash Block Pattern depends on your quilt layout and fabric scale.
How do I keep my block square?
Accurate cutting, consistent seam allowances, and careful pressing are essential for keeping your Churn Dash Block Pattern square.
Can I make this block using scraps?
Absolutely. The Churn Dash Block Pattern works beautifully as a scrap quilt because the design remains clear even with varied fabrics.
What is the best contrast for this block?
High contrast between background and churn dash fabrics will make the Churn Dash Block Pattern stand out most clearly.
How many blocks do I need for a quilt?
The number depends on your desired quilt size and block dimensions when planning your Churn Dash Block Pattern project.
Conclusion
The Churn Dash Block Pattern remains a timeless quilting favorite thanks to its bold geometry, beginner-friendly construction, and endless design possibilities. In this guide, you learned about the block’s history, how to choose the right materials, step-by-step construction techniques, and creative layout ideas that bring the design to life.

