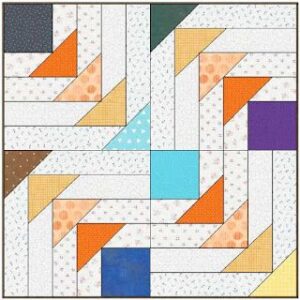
The Dizzy Geese Block is a stunning and dynamic quilt pattern that adds movement to any quilt project.
Its design consists of a spinning arrangement of flying geese, making it both visually captivating and perfect for those who love working with triangles. In this tutorial, you’ll learn how to create a Dizzy Geese Block with precise fabric cuts and clear instructions.
Whether you’re new to quilting or an experienced quilter, this block will add a touch of modern elegance to your quilt.

Materials You’ll Need for the Dizzy Geese Block
To get started, gather all the necessary materials for your Dizzy Geese Block. You’ll need various fabrics, a rotary cutter, a ruler, a cutting mat, and a sewing machine. When choosing your fabrics, it’s best to pick high-contrast colors to emphasize the spinning effect of the geese in the block. You can use solids or prints, depending on your personal style.
Ensure you have at least four different fabrics for this block. The base fabric should be light or neutral to make the flying geese pop. For the geese, select three different colored fabrics that will enhance the spinning illusion. Having the right tools will make the process smoother and more enjoyable, so make sure your rotary cutter is sharp and your cutting mat is clean.
The final tool you’ll need is your sewing machine. This block involves a lot of straight stitching, so set your machine to a quarter-inch seam allowance for precise seams. Having all of these materials at hand before starting will keep you organized and ensure your Dizzy Geese Block comes together perfectly.
Cutting the Fabric for the Dizzy Geese Block
Accurate fabric cuts are essential for creating a flawless Dizzy Geese Block. Start by cutting your background fabric into four 4.5″ squares. These squares will serve as the base for your flying geese units. Ensure the fabric is well-ironed before cutting to avoid any distortion in the measurements.
Next, cut your geese fabrics. From each of your three geese fabrics, cut eight rectangles measuring 2.5″ x 4.5″. These rectangles will form the “geese” in your flying geese units. You’ll need to cut carefully, as uneven cuts will affect how well the pieces fit together later.
Finally, cut twelve 2.5″ squares from each of your geese fabrics. These squares will be used to form the tips of the flying geese and help create the spinning effect in the final block. Double-check your measurements as you cut to ensure precision.
Assembling the Flying Geese Units
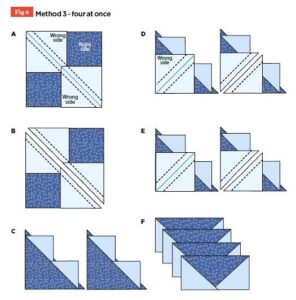
The next step in creating your Dizzy Geese Block is assembling the flying geese units. Start by taking one of the 2.5″ squares and placing it right sides together on one side of a 2.5″ x 4.5″ rectangle. Draw a diagonal line from one corner to the opposite corner of the square.
Sew directly on the diagonal line, and then trim the excess fabric a quarter-inch away from the seam. Press the seam toward the smaller triangle, ensuring the fabric lays flat and smooth. Repeat this process with another square on the opposite side of the rectangle, again sewing along the diagonal line.
After sewing both sides, your rectangle should now resemble a flying geese unit with two triangles on either side. Repeat this process for all of your rectangles until you have a total of 24 flying geese units. These units will form the spinning geese pattern in your quilt block.

Constructing the Dizzy Geese Block
Now that all your flying geese units are assembled, it’s time to construct the Dizzy Geese Block. Lay out the geese in a circular pattern, with the tips of the triangles pointing inward to create the illusion of spinning motion. Arrange the geese in groups of four, alternating the different fabric colors for a more dynamic effect.
To start assembling the block, sew four flying geese units together to form a larger unit. Press the seams open to reduce bulk. Repeat this step until you have six larger units that will come together to form the Dizzy Geese Block. Pay close attention to the orientation of the geese as you sew to maintain the spinning design.
Finally, sew the larger units together. You should have a complete 12.5″ Dizzy Geese Block once all units are joined. Press the entire block, ensuring all seams lay flat. The result should be a bold and dynamic quilt block that adds both movement and a sense of energy to your quilt.

Tips for Perfecting Your Dizzy Geese Block
Achieving a precise Dizzy Geese Block requires patience and attention to detail. One key tip is to use a scant quarter-inch seam allowance. This slightly smaller seam allowance helps ensure that your flying geese units maintain their correct size and fit together properly in the block.
Another important tip is to press your seams carefully. Pressing, rather than ironing, keeps the fabric from stretching or becoming distorted. For best results, press each seam as you go, and use a hot iron with steam to set the seams and make them crisp.
Lastly, check your measurements throughout the process. Measure your units after sewing and pressing to ensure they are accurate. Small discrepancies in measurement can add up and cause your block to be uneven. By staying precise at each step, you’ll end up with a perfect Dizzy Geese Block that will be a standout in any quilt.
Incorporating the Dizzy Geese Block into a Quilt
The Dizzy Geese Block is a versatile design that can be used in various quilt patterns. It works well as a focal block in a quilt, surrounded by solid fabrics or simpler blocks to highlight its dynamic design. You can also repeat the block across an entire quilt for a modern, cohesive look.
If you’re using the Dizzy Geese Block as part of a larger quilt, consider mixing it with other geometric blocks. Pair it with half-square triangles, pinwheels, or log cabin blocks for a visually interesting quilt. The spinning effect of the geese will complement other angular shapes and add movement to your quilt top.
Additionally, the Dizzy Geese Block works beautifully in both traditional and modern quilts. Play with fabric choices—using bright, bold colors will give the block a more contemporary feel, while soft, muted tones can make it suitable for a more traditional quilt. The possibilities are endless with this versatile block.
Final Thoughts on the Dizzy Geese Block – Free Pattern
The Dizzy Geese Block is a stunning addition to any quilt project, offering both movement and visual interest. Its unique spinning design makes it an exciting challenge for quilters looking to add dynamic elements to their work. By following the step-by-step instructions in this free pattern, you’ll have a perfect Dizzy Geese Block ready for your next quilt.
Quilt patterns like the Dizzy Geese Block allow for endless creativity. With each fabric choice and color combination, you can create a one-of-a-kind quilt. Whether you’re making a single block or an entire quilt filled with Dizzy Geese Blocks, this pattern is sure to impress.

Incorporate this block into your next quilting project and enjoy the satisfaction of mastering a unique and beautiful quilt design. Happy quilting!


