
Dome Pouch Quilt Pattern is a practical and stylish sewing project that blends quilting techniques with functional bag construction. A Dome Pouch Quilt Pattern creates a curved-top pouch that is both visually appealing and highly useful for organizing small items such as sewing tools, cosmetics, chargers, or travel accessories. Because it combines piecing, quilting, and zipper installation, this project is excellent for skill building while still being accessible.
Many crafters love the Dome Pouch Quilt Pattern because it delivers professional-looking results without requiring complex templates or advanced bag-making experience. The dome shape naturally creates extra interior space while keeping the pouch compact on the outside. With thoughtful fabric selection and careful quilting, each pouch can become a unique handmade piece.
Another major benefit of the Dome Pouch Quilt Pattern is creative flexibility. You can use patchwork panels, quilted solids, scraps, or coordinated fabric bundles. Size is easy to adjust, and design details such as tabs, pockets, and decorative stitching can be added. In this complete guide, you will learn materials, cutting strategy, quilting prep, curved assembly, zipper techniques, finishing steps, and customization ideas using SEO-optimized structure and clear, humanized teaching.
Materials and Fabric Planning for Dome Pouch Quilt Pattern
Choosing the right materials is the foundation of a successful Dome Pouch Quilt Pattern project. Because this pouch is both quilted and structured, you will need outer fabric, lining fabric, batting or foam, and stabilizer. Each layer plays a different role in the final shape and durability.
Outer fabric for a Dome Pouch Quilt Pattern should be durable and visually interesting. Quilting cotton is the most common choice because it is easy to piece and quilt. Canvas and lightweight denim also work well if you want a sturdier pouch.
Batting or foam gives body to the Dome Pouch Quilt Pattern panels. Cotton batting produces a soft, traditional quilted feel. Foam stabilizer creates a more structured, padded pouch that stands up better when filled.
Lining fabric should be smooth and tightly woven. A good lining improves usability in a Dome Pouch Quilt Pattern by allowing items to slide in and out easily. It also hides interior seams for a clean finish.
Interfacing adds support to zipper edges and curved seams. Applying fusible interfacing to key areas of your Dome Pouch Quilt Pattern reduces stretching and distortion during sewing.
Zipper quality matters more than expected. A smooth, flexible zipper that matches the width of your pouch opening makes your Dome Pouch Quilt Pattern feel professional and reliable in daily use.
Cutting and Quilting Panels in Dome Pouch Quilt Pattern
Most Dome Pouch Quilt Pattern designs begin with flat quilted panels that are later cut into curved shapes. This method keeps quilting simple and avoids trying to quilt small, awkward pieces.
Start by creating a quilt sandwich for each outer panel of your Dome Pouch Quilt Pattern. Layer outer fabric, batting or foam, and backing fabric or stabilizer. Secure with pins or temporary spray adhesive.
Quilting lines should be evenly spaced. Straight-line quilting is popular in a Dome Pouch Quilt Pattern because it is beginner friendly and keeps the panel stable without heavy bulk.
Grid quilting produces a modern look. A crosshatch grid on your Dome Pouch Quilt Pattern panel adds texture and structure while staying visually balanced.
Decorative quilting is also an option. Waves, diagonals, or echo lines can give your Dome Pouch Quilt Pattern more personality without changing construction steps.
After quilting, trim panels square before cutting shapes. Accurate trimming ensures both sides of your Dome Pouch Quilt Pattern match perfectly during assembly.
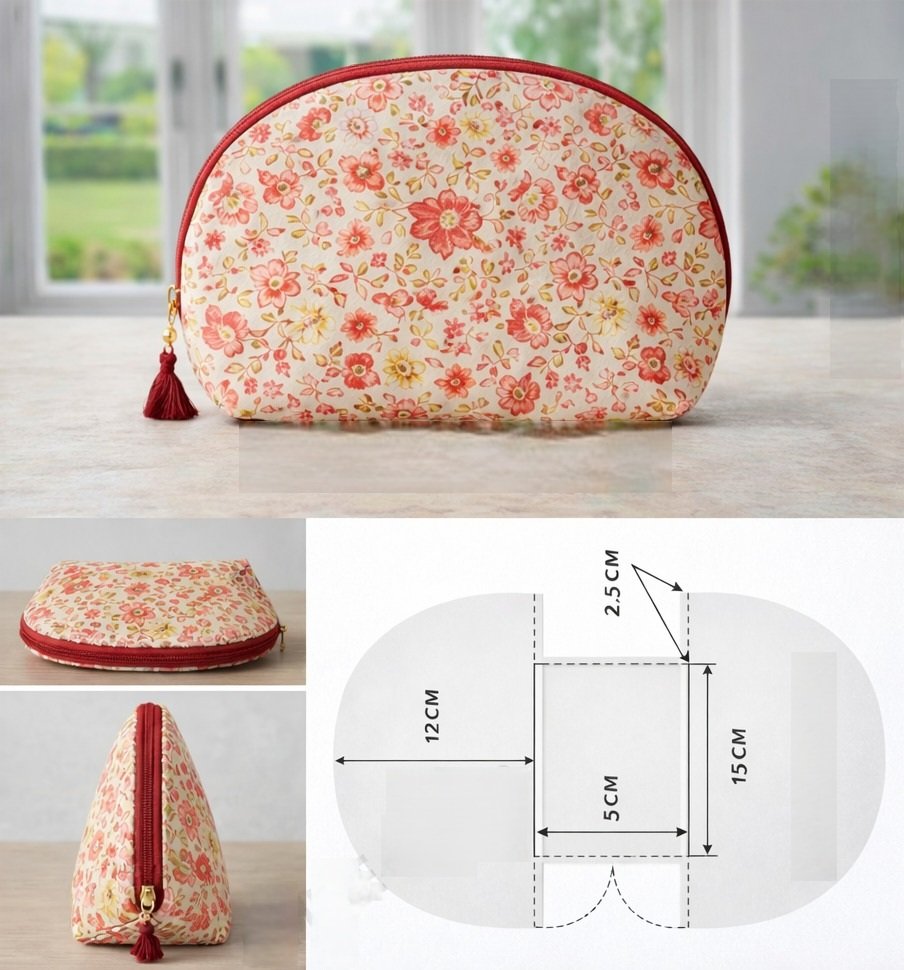
Use a template to cut the dome curve. Mark and cut identical curved top edges on each quilted panel so the Dome Pouch Quilt Pattern zipper will fit smoothly.
Sewing the Curved Top and Zipper in Dome Pouch Quilt Pattern
The curved zipper seam is the signature feature of a Dome Pouch Quilt Pattern. It may look intimidating, but with proper preparation it becomes very manageable. Accuracy and slow stitching are the keys.
First attach the zipper to one curved edge of the outer panel. Align carefully and clip in place. In a Dome Pouch Quilt Pattern, small clips work better than pins on curves.
Use a zipper foot to maintain control. Stitch slowly along the curve when sewing your Dome Pouch Quilt Pattern zipper seam to prevent shifting or puckering.
Add the lining piece to create a fabric sandwich. This enclosed method gives the Dome Pouch Quilt Pattern a clean interior zipper finish with no exposed raw edges.
Topstitch along the zipper curve. This step strengthens the seam and keeps fabric from folding into the zipper when using the Dome Pouch Quilt Pattern pouch.
Repeat for the other side of the zipper. Both quilted panels should now be attached, forming the arched opening typical of a Dome Pouch Quilt Pattern.
Open the zipper halfway before continuing. This prevents a common turning problem later and is an essential habit in every Dome Pouch Quilt Pattern build.
Assembling the Body of Dome Pouch Quilt Pattern
With the zipper installed, you can assemble the body of the Dome Pouch Quilt Pattern. Separate outer panels from lining panels and match them right sides together.
Sew around the outer edges first. Use a consistent seam allowance so your Dome Pouch Quilt Pattern maintains symmetry and the base aligns correctly.
Sew the lining pieces together next, leaving a turning gap. This opening is required to turn the Dome Pouch Quilt Pattern right side out at the end.
Clip seam allowances along the curved dome area. Small clips help the Dome Pouch Quilt Pattern curve spread smoothly without pulling or wrinkling.
Box the bottom corners for depth. Pinch each lower corner and sew across to create a flat base in your Dome Pouch Quilt Pattern so it can stand upright.
Trim excess fabric from boxed corners. Reducing bulk improves the interior look and feel of your Dome Pouch Quilt Pattern.
Turn the pouch through the lining gap. Gently push out curves and corners so the Dome Pouch Quilt Pattern takes its full dome shape.
Reinforcement and Structure in Dome Pouch Quilt Pattern
Reinforcement steps increase the lifespan of your Dome Pouch Quilt Pattern. Stress points include zipper ends, corner seams, and boxed edges.
Backstitch at zipper ends. This strengthens one of the highest-tension areas in a Dome Pouch Quilt Pattern and prevents seam failure.
Add small fabric tabs at zipper ends. Tabs give your Dome Pouch Quilt Pattern a cleaner look and make opening and closing easier.
Extra stitching along the base seam adds durability. A reinforced base helps your Dome Pouch Quilt Pattern handle heavier contents.
Edge topstitching around the dome improves structure. This optional step helps your Dome Pouch Quilt Pattern hold its curved profile over time.
Heavier stabilizer can be added to the base only. This targeted support keeps the Dome Pouch Quilt Pattern stable without making the dome too stiff.
Custom Features for Dome Pouch Quilt Pattern
Customization makes each Dome Pouch Quilt Pattern unique. Interior slip pockets are easy to add and help organize small items.
Elastic loops hold bottles upright. Adding them inside your Dome Pouch Quilt Pattern is especially useful for travel use.
Patchwork exteriors showcase scraps. A pieced outer panel turns a Dome Pouch Quilt Pattern into a mini quilted artwork.
Quilted labels personalize the pouch. Name tags or theme labels give your Dome Pouch Quilt Pattern gift value.
Handles or side loops add convenience. A grab tab improves portability of your Dome Pouch Quilt Pattern.
Decorative binding on seams adds contrast. Visible binding inside a Dome Pouch Quilt Pattern can become a design feature.
FAQ About Dome Pouch Quilt Pattern
Is Dome Pouch Quilt Pattern good for beginners
Yes, confident beginners can complete it if they are comfortable with straight seams and zippers.
What batting is best for Dome Pouch Quilt Pattern
Cotton batting for softness or foam stabilizer for strong structure both work well.
How do I sew curves in Dome Pouch Quilt Pattern without puckers
Use clips, sew slowly, and avoid stretching the fabric while stitching.
What size zipper should I use for Dome Pouch Quilt Pattern
Choose a zipper slightly longer than the dome width so trimming is easier than stretching.
Can I resize a Dome Pouch Quilt Pattern
Yes, scale the panel template evenly to create larger or smaller versions.
Do I quilt before or after cutting Dome Pouch Quilt Pattern pieces
Quilt first, then cut shapes for best stability and accuracy.
Conclusion
The Dome Pouch Quilt Pattern is a rewarding project that combines quilting texture with practical bag construction. You learned how to choose materials, quilt panels, cut curved shapes, install zippers, assemble the body, reinforce stress points, and add custom features. With careful cutting and patient curved sewing, you can create a structured, beautiful pouch that is both functional and gift-worthy.

