
Flying Bird Quilt Pattern designs have become a beloved choice among quilters who enjoy blending artistry, symbolism, and timeless craftsmanship. The phrase Flying Bird Quilt Pattern captures the essence of movement, freedom, and creativity—qualities that make this motif inspiring for both beginners and experienced quilters. In this article, you will explore how this pattern works, why it remains popular, and how you can create beautiful quilt projects using it.
The Flying Bird Quilt Pattern is more than a visual design; it carries symbolic meaning deeply rooted in many cultures. Birds often represent hope, journeys, and new beginnings. When stitched into a quilt, they bring a sense of lightness and motion that transforms a simple blanket into a meaningful keepsake.
Before diving into the technical aspects, it’s important to understand that the Flying Bird Quilt Pattern is approachable for quilters of all skill levels. Its shapes are typically geometric, making cutting and piecing manageable even for beginners.
Understanding the Flying Bird Quilt Pattern
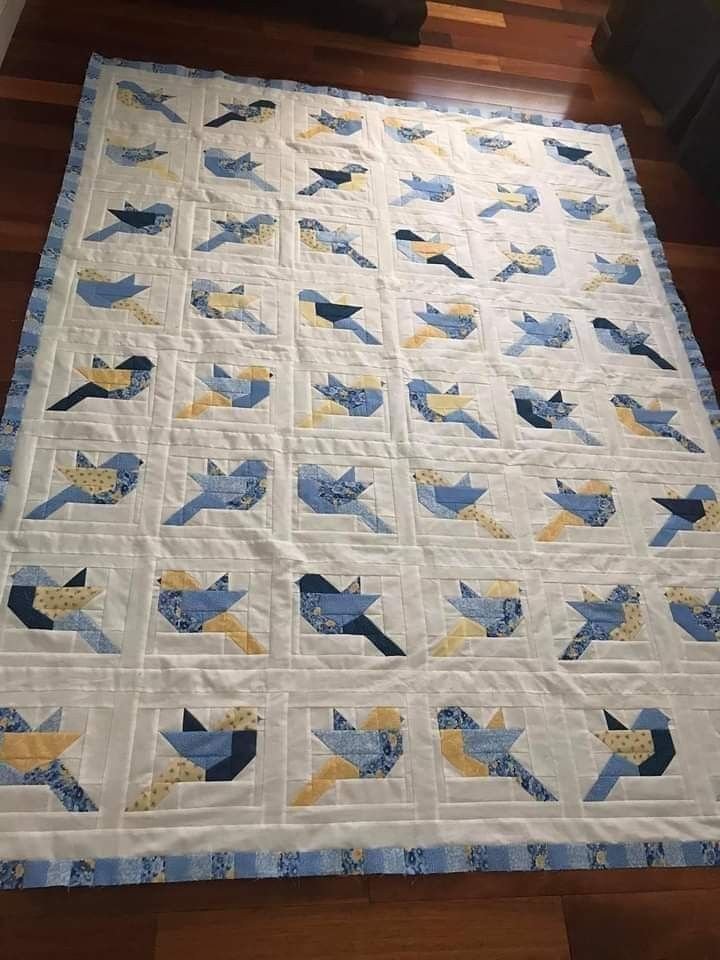
The Flying Bird Quilt Pattern usually features bird silhouettes or stylized wing shapes formed by triangles or angled blocks. This makes it ideal for quilters who enjoy crisp lines and clean geometry. Many versions of the pattern use half-square triangles, which are among the most commonly used shapes in quilting due to their versatility.
You can create a single bird block or a series of repeated birds flying in formation. This allows endless customization—your quilt can look serene and minimalist or bold and colorful. The repeated shapes help your eye travel across the quilt, creating a sense of movement that makes the design feel alive.
Color selection plays a major role in how the Flying Bird Quilt Pattern appears. Light fabrics give the birds an airy, delicate look, while dark or vibrant tones can create contrast and visual drama. Beginners may prefer using precut fabrics, as they reduce preparation time and ensure consistent sizing.
Another advantage of this pattern is that it adapts well to all quilt sizes. Whether you’re making a baby quilt, lap quilt, or full-sized bed quilt, the bird blocks scale easily to match your needs. Simply adjust the number of blocks or the size of the triangles to reach your desired dimensions.
When planning your quilt layout, consider how the birds will “fly.” Some quilters choose a diagonal direction for added movement, while others alternate directions for a dynamic, playful effect. There is no wrong choice—only the version that best suits your vision.
Finally, assembling the quilt requires only basic piecing techniques. If you are comfortable sewing straight lines and maintaining a consistent seam allowance, you are fully prepared to create this beautiful and meaningful design.
Materials and Tools Needed
To create a quilt using the Flying Bird Quilt Pattern, you will need a few essential quilting tools. Most items are standard and easy to find at craft stores or online. Preparing everything beforehand ensures that your quilting experience is smooth and enjoyable from start to finish.
You will need quilting cotton in various colors. Choose one fabric for the birds and one for the background, or mix multiple colors to add personality. Cotton is preferred because it is durable, easy to work with, and lies flat when pressed.
A rotary cutter, cutting mat, and acrylic ruler will help you cut clean and accurate pieces. Since the Flying Bird Quilt Pattern relies heavily on straight lines and triangles, accurate cutting will make assembly much easier and prevent alignment issues later.
You will also need thread that matches or blends with your fabric. Many quilters choose neutral tones like white, cream, or light gray, but the choice is yours. A high-quality cotton thread is recommended for best results.
Pins or quilting clips will help you keep pieces aligned while sewing. Beginners often find clips easier to manage, especially when working with small triangles or angled seams.
Don’t forget your basic sewing machine equipped with a standard quilting needle. Most quilters use a 1/4-inch seam allowance for this pattern, so a quarter-inch foot can be helpful if you have one.
Finally, have an iron ready for pressing seams. Pressing is crucial in quilting because it keeps your blocks flat and helps maintain proper alignment as you assemble the quilt.
Step-by-Step Construction
The first step in constructing your Flying Bird Quilt Pattern quilt is cutting your fabric pieces. Begin by cutting squares and dividing them into triangles as instructed by your chosen block size. Precision at this stage will save time and frustration later.
Next, pair your triangles—one bird fabric triangle with one background triangle. Sew along the diagonal edge to create the half-square triangles that form the core of your bird block. Press each piece flat and trim any uneven edges if necessary.
Now, begin arranging the triangles to shape the bird. Most Flying Bird Quilt Pattern blocks place the body triangle facing forward, with smaller triangles positioned to represent wings and tail. Keep arranging until the shape looks balanced.
Sew the triangles together in small sections before joining the larger units. This reduces distortion and helps keep seams aligned. Press carefully after each seam, as proper pressing makes the finished block look clean and professional.
Once all your blocks are complete, lay them out on a flat surface and adjust the arrangement until you are satisfied with how the birds appear. You can align them flying in the same direction or mix directions for variety.
Finally, sew the blocks together row by row. Add borders if desired, then attach the backing, batting, and quilt layers. Finish with your preferred quilting method—straight-line quilting works beautifully for geometric designs.
Styling and Variations
The Flying Bird Quilt Pattern is incredibly versatile, giving you countless ways to style your project. You can create a modern look using solid fabrics or embrace a vintage feel with floral prints and muted tones.
One popular variation involves using ombre fabrics to give the birds a gradient appearance. This adds a sense of depth and movement that complements the nature-inspired theme.
Another option is to alternate background colors for each block. This creates a patchwork-style effect that makes each bird stand out individually.
If you prefer minimalist aesthetics, try using neutral backgrounds like white, cream, or soft gray. This makes the birds the focal point and gives your quilt a clean, airy look.
You can also experiment with the size of the birds. Larger blocks make the quilt faster to assemble and highlight the bird design boldly. Smaller blocks allow for intricate detail and create a more delicate finished piece.
Adding borders, sashing, or accent triangles can enhance the overall design. These stylistic elements are optional but help personalize the quilt to your taste.
FAQ About the Flying Bird Quilt Pattern
What skill level is needed for the Flying Bird Quilt Pattern?
This pattern is suitable for beginners because it uses simple geometric shapes and straight-line sewing.
What fabrics work best for this quilt?
Quilting cotton is the most popular choice due to its durability and ease of handling.
Can I make this quilt in different sizes?
Yes, you can easily scale the blocks to create anything from a baby quilt to a king-sized quilt.
Do I need special tools to make this pattern?
Basic quilting tools like a rotary cutter, ruler, and sewing machine are all you need.
How should I press the seams?
Press seams carefully after each step, usually toward the darker fabric, for the cleanest result.
Can I mix colors or prints?
Absolutely—mixing prints and colors can give your quilt a unique and personalized look.
How long does it take to finish?
The time varies by size and skill level, but most quilters can finish a lap quilt in a few days or weeks.
Conclusion
The Flying Bird Quilt Pattern is timeless, meaningful, and wonderfully accessible to quilters of all skill levels. Throughout this article, you learned what makes the pattern special, the tools you need, how to construct it step by step, and creative ways to personalize your quilt. If you feel inspired to begin your next project, this pattern is an excellent choice due to its beauty, symbolism, and beginner-friendly structure. I hope this guide has helped you feel confident and excited to start your own creation. Please leave a sincere opinion and share suggestions so future tutorials can be even better.

