
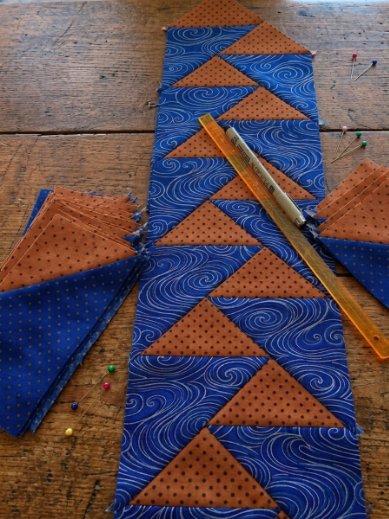
Flying Geese Block Pattern is one of the most recognizable and versatile designs in the world of quilting. Made from simple geometric shapes, this classic block creates the appearance of small triangles moving in the same direction, much like a group of geese flying across the sky. The design can be traditional, modern, colorful, or minimalist depending on the fabrics and arrangement chosen. A single Flying Geese quilt block can become part of a border or small decorative project, while many units can be combined to create dramatic quilts filled with movement and secondary patterns.
One of the greatest strengths of the Flying Geese Block Pattern is its flexibility. The basic unit generally features one central triangle surrounded by two contrasting corner triangles. Although the construction looks simple, these units can be rotated, stacked, grouped, and repeated in countless ways. Quilters can create straight rows, zigzags, stars, arrows, circles, and abstract geometric arrangements. Changing only the direction of a few blocks can completely transform the appearance of the finished quilt, making this pattern useful for both traditional and contemporary projects.
Learning how to make a Flying Geese Block Pattern is also an excellent way to improve important quilting skills. Accurate cutting, consistent seam allowances, careful pressing, matching points, and precise trimming all contribute to successful blocks. Several construction methods can be used, including traditional piecing, the stitch-and-flip method, and techniques that create multiple units at once. This guide explains the materials, fabric selection, basic construction, assembly, creative arrangements, common problems, and frequently asked questions involved in making beautiful Flying Geese blocks.
Choosing Fabrics, Colors, and Materials for Flying Geese Blocks
The first step in making a Flying Geese Block Pattern is choosing fabrics with enough contrast to show the triangular design clearly. Good-quality quilting cotton is an excellent choice because it is stable, easy to cut, and comfortable to sew. Fabrics with similar weights usually produce the most consistent results.
Traditional Flying Geese quilts often combine a dark or colorful central triangle with lighter background triangles. This contrast makes the direction of each unit easy to see. However, the design can also be reversed, using light central triangles against a dark background for a more dramatic appearance.
Color value is often more important than the specific colors selected. Light, medium, and dark fabrics create visual separation between the pieces. If the central triangle and background fabrics have similar values, the shape may become difficult to recognize from a distance.
Scraps are perfect for a Flying Geese quilt pattern. Each central triangle can be made from a different fabric while the background remains consistent. This creates variety without making the finished quilt feel disorganized. Another option is to use many background fabrics within the same color family.
Essential tools include fabric, coordinating thread, a sewing machine, rotary cutter, self-healing cutting mat, acrylic quilting ruler, pins or clips, iron, and ironing surface. A quarter-inch presser foot can help maintain accurate seams. A square or rectangular ruler is useful for checking and trimming completed units.
Before cutting fabric for an entire quilt, make a few sample units. This allows you to test the seam allowance, pressing method, fabric contrast, and finished dimensions. Small adjustments made at the beginning can prevent problems from being repeated across dozens of blocks.
How to Cut and Sew the Flying Geese Block Pattern
One common method for making a Flying Geese Block Pattern uses one rectangle for the central goose shape and two smaller squares for the background corners. Begin by cutting all pieces accurately. Even small measurement differences can affect the points and final size of the unit.
Place one background square on one end of the main rectangle with right sides together. Draw a diagonal guideline from one corner of the square to the opposite corner. This line becomes the sewing guide. Check the direction carefully before stitching.
Sew along the marked diagonal line. Before trimming, fold the outer corner back temporarily and check that it covers the original rectangle correctly. If the edges do not align, adjust the seam before removing any fabric. This simple check can save fabric and prevent inaccurate units.
Trim away the excess layers beyond the seam, leaving an appropriate seam allowance. Press the remaining triangle outward. Use a gentle pressing motion and avoid stretching the diagonal edge. The first side of the Flying Geese unit is now complete.
Place the second background square on the opposite end of the rectangle. Mark the diagonal, sew carefully, check the fold, trim the excess, and press the triangle outward. The finished unit should have one large central triangle with two smaller triangles at the sides.
Measure the completed unit before making the entire collection. Check the width, height, and position of the points. A small amount of trimming may be necessary, but avoid cutting away the seam allowance above the main point. Accurate units are easier to join into larger Flying Geese quilt blocks.
Arranging, Joining, and Finishing Flying Geese Quilt Blocks
Once several units are complete, the creative possibilities of the Flying Geese Block Pattern become easier to see. Place the units on a design wall, clean floor, or large table and experiment with different directions. The same pieces can create many different patterns simply by changing their rotation.
Straight rows are one of the most traditional arrangements. Position all the geese so they move in the same direction. This creates strong visual movement across the quilt. Alternating the direction of each row can create a zigzag effect.
Groups of Flying Geese can also be arranged to form stars, arrows, diamonds, or circular designs. Four groups placed around a central point can create a dynamic rotating effect. This makes the Flying Geese quilt block useful as both a main design and a supporting element.
When joining units, protect the triangle points carefully. Sew with a consistent seam allowance and watch the intersection where the point meets the seam line. There should be a small amount of background fabric above the point before sewing so the tip remains visible after the seam is completed.
Press completed rows carefully. Depending on the layout, seams may be pressed to one side or open. Pressing neighboring seams in opposite directions can help intersections nest together. In bulky areas, pressing open may create a flatter result.
After completing the quilt top, prepare the backing and batting to create the quilt sandwich. Baste the layers securely and choose a quilting design. Straight lines can emphasize the geometric shapes, while gentle curves can create contrast. Finish the project by trimming the edges and adding quilt binding.
Creative Variations, Helpful Tips, Frequently Asked Questions, and Conclusion
A scrappy Flying Geese Block Pattern is a wonderful way to use leftover fabric. Choose a consistent background and make every central triangle from a different print. This approach creates variety while preserving the recognizable structure of the design.
For a modern quilt, use solid fabrics and strong contrast. Black and white can create a bold graphic appearance, while a gradient of one color can produce a smooth sense of movement. Neutral backgrounds allow bright geese to become the main focus.
Flying Geese blocks can also be used as borders. A continuous row around a quilt can frame the central design and add movement. The units can all point in one direction or change direction at the corners.
Smaller projects are another excellent option. A few units can become a table runner, pillow cover, tote bag panel, wall hanging, or placemat. These projects are useful for practicing construction before beginning a large quilt.
Consistent habits improve accuracy. Cut carefully, check the seam allowance, press without stretching, and measure completed units regularly. If the first units are not the correct size, identify the problem before continuing.
Most importantly, experiment with layouts. The Flying Geese Block Pattern is popular because one simple unit can create countless designs. Color, scale, rotation, and spacing can completely change the personality of the finished project.
Conclusion
The Flying Geese Block Pattern is a timeless quilting design that transforms simple triangles into a project filled with movement and creative possibilities. Through accurate cutting, careful sewing, consistent pressing, and thoughtful arrangement, quilters can create beautiful blocks for both traditional and modern projects.
Throughout this guide, you learned about choosing fabrics, understanding color value, cutting the main pieces, sewing diagonal corners, protecting triangle points, arranging blocks, joining rows, quilting the layers, and finishing the project with binding.

