Creating a fruit placemats template quilt – step by step tutorial is a wonderful way to combine creativity, practicality, and fun. Quilted placemats bring warmth and charm to any dining table, especially when designed with colorful fruit-themed blocks. These placemats not only protect your table but also serve as a cheerful decorative touch for family meals or gatherings. By following this guide, you will learn how to prepare materials, cut the fabrics, assemble the quilt blocks, and finish your project with professional results.
The fruit placemats template quilt – step by step tutorial is perfect for quilters of all levels, from beginners to experienced crafters. Because each placemat is small, it is a manageable project that can be completed in a short time. You can make a set in different fruit designs, such as apples, lemons, strawberries, or watermelons, which makes the dining table look playful and vibrant. These placemats are also great gift ideas for housewarming parties or festive occasions.
In this tutorial, we will walk through each stage of the process, providing helpful tips and techniques to ensure success. You will also find a detailed FAQ at the end with answers to common questions about quilting placemats. Finally, we will conclude with a summary of what you have learned and an invitation to share your own thoughts and suggestions.

Materials and Fabric Preparation
To start the fruit placemats template quilt – step by step tutorial, you need to gather all necessary materials. Choose 100% cotton fabrics in various colors that represent the fruits you want to create. For example, red for apples or strawberries, yellow for lemons, and green for leaves. Cotton fabrics are ideal for quilting because they are durable and easy to work with.
You will also need batting to add thickness to the placemats and a backing fabric in a complementary color. A standard placemat size is approximately 12 x 18 inches, but you can adjust the dimensions to your preference.
Essential tools include a rotary cutter, self-healing cutting mat, acrylic ruler, sewing pins, an iron, and a sewing machine with a quilting foot. These tools will help you achieve precise cuts and seams.
Before cutting, wash and press your fabrics to remove any shrinkage and creases. This step ensures that your placemats will not distort after the first wash.
Once your fabrics are prepared, cut out the pieces according to your chosen fruit template. Use sharp scissors or a rotary cutter for clean edges.
Label each piece if you are working with multiple colors and shapes to make assembly easier and prevent mistakes.
Assembling the Quilt Blocks
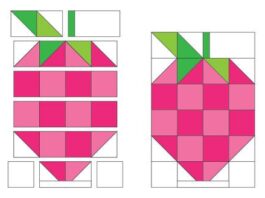
The next step in the fruit placemats template quilt – step by step tutorial is to assemble the quilt blocks. Start by laying out your fabric pieces following the fruit design you have chosen.
Pin the pieces together in sections, making sure the colors and shapes align properly. Sew each section using a ¼-inch seam allowance, which is standard for quilting.
Press the seams open or to one side with an iron to reduce bulk and keep the block flat. Pressing is an essential step to ensure neat and professional-looking blocks.
After completing the fruit block, trim it to the correct size, leaving extra fabric for seam allowances.
Repeat this process for all the placemats you plan to make. You can create a matching set or mix different fruit blocks for variety.
Once all blocks are complete, you are ready to assemble them with batting and backing to create the quilted placemat.
Quilting and Finishing
To quilt your fruit placemats template quilt – step by step tutorial, place the backing fabric right side down, batting in the middle, and the fruit block right side up.
Pin or baste the layers together to prevent shifting while quilting. You can use straight-line quilting, diagonal lines, or even free-motion quilting to add texture.
Quilt slowly and evenly, making sure the stitches are consistent. Quilting not only secures the layers but also enhances the overall look of the placemats.
After quilting, trim any excess batting and backing to match the block’s edges.
Next, prepare binding strips, usually 2.5 inches wide, to finish the raw edges. Fold the strips in half lengthwise and press.
Attach the binding to the placemat using a sewing machine, folding the corners neatly, and finish by hand-stitching the back for a polished look.
Tips for a Professional Finish
When making a fruit placemats template quilt – step by step tutorial, accuracy in cutting and sewing is key. Double-check measurements before cutting to avoid wasting fabric.
Experiment with decorative stitching or embroidery to add details like seeds or leaf veins to the fruit blocks.
Choose thread colors that either blend with or contrast against your fabrics for a creative effect.
If you are new to quilting, start with simple fruit shapes like apples or oranges before trying more complex designs.
Make use of fabric scraps for small details like stems or leaves, which reduces waste and adds character to your placemats.
Always finish by giving the placemat a final press to smooth out any wrinkles and set the seams.
FAQ – Fruit Placemats Template Quilt
1. What size should a quilted placemat be?
A standard placemat is about 12 x 18 inches, but you can adjust the size as you like.
2. What is the best fabric for quilted placemats?
100% cotton is recommended because it is durable, easy to sew, and washable.
3. Do I need batting for placemats?
Yes, batting adds thickness and structure, making the placemat more protective and durable.
4. Can I quilt by hand instead of using a machine?
Yes, hand quilting is possible, but it will take longer. Use small, even stitches for best results.
5. How do I wash quilted placemats?
Machine wash on a gentle cycle with cold water and tumble dry low or air dry to preserve the fabric.
6. Can I use fusible interfacing instead of batting?
Fusible interfacing can work, but it will make the placemat thinner and less cushioned.
Conclusion
The fruit placemats template quilt – step by step tutorial is a fun and practical project that allows you to express your creativity while making something useful. You have learned how to prepare fabrics, assemble quilt blocks, and finish placemats with a professional look.
This project is perfect for beginners and experienced quilters alike, and it can be customized with various fruit designs to create a cheerful table setting. Handmade placemats also make thoughtful gifts for friends and family.
We hope you enjoyed this tutorial and feel inspired to create your own fruit-themed quilted placemats. Share your thoughts, experiences, and suggestions in the comments—we would love to hear from you!


