
Hanging Gardens Quilt Pattern designs capture elegance, movement, and natural beauty in fabric form. Creating a Hanging Gardens Quilt Pattern project is a wonderful way to combine traditional quilting techniques with a flowing, garden-inspired aesthetic. Whether you are a beginner looking for a new challenge or an experienced quilter seeking a visually striking design, this pattern offers both creativity and satisfaction.
When working with a Hanging Gardens Quilt Pattern, thoughtful planning is essential. The layered look and graceful structure of this quilt style depend heavily on color placement, fabric selection, and careful piecing. Taking time at the beginning of the process will help ensure your finished quilt looks polished and professional.
In this complete guide to the Hanging Gardens Quilt Pattern, you will learn how to choose the right materials, design an eye-catching layout, sew with precision, and apply finishing touches that elevate your quilt. With patience and attention to detail, you can create a stunning quilt that truly stands out.
Choosing the Best Materials for Hanging Gardens Quilt Pattern
Selecting the right materials is the first step in achieving a beautiful Hanging Gardens Quilt Pattern. High-quality cotton fabric is strongly recommended because it is easy to cut, sew, and press. It also holds its shape well, which is especially important for patterns with layered visual effects.
Color selection plays a major role in the success of a Hanging Gardens Quilt Pattern. Many quilters choose gradient fabrics or coordinated color bundles to create the illusion of depth and cascading movement. Soft florals, batiks, and tone-on-tone prints work particularly well.
Batting choice affects both the quilt’s texture and warmth. Cotton batting provides a soft, breathable finish, while cotton-poly blends add extra loft. For wall hangings, a thinner batting often gives a cleaner drape.
Thread quality should not be overlooked. Strong, smooth thread reduces breakage and helps maintain even stitches throughout your Hanging Gardens Quilt Pattern project. Neutral thread works well, but color-matching can enhance the overall look.
Prewashing your fabrics is highly recommended. This step removes excess dye and prevents shrinkage after the quilt is completed. It is a simple precaution that protects your finished quilt.
Before starting, gather all essential tools: rotary cutter, cutting mat, quilting ruler, pins, and a dependable sewing machine. Having everything ready will make the process smoother and more enjoyable.
Designing a Stunning Hanging Gardens Quilt Pattern Layout
Design is where the magic of the Hanging Gardens Quilt Pattern truly begins. Start by determining the finished size of your quilt. Whether you are making a wall hanging, lap quilt, or bed quilt, the size will influence fabric requirements and block layout.
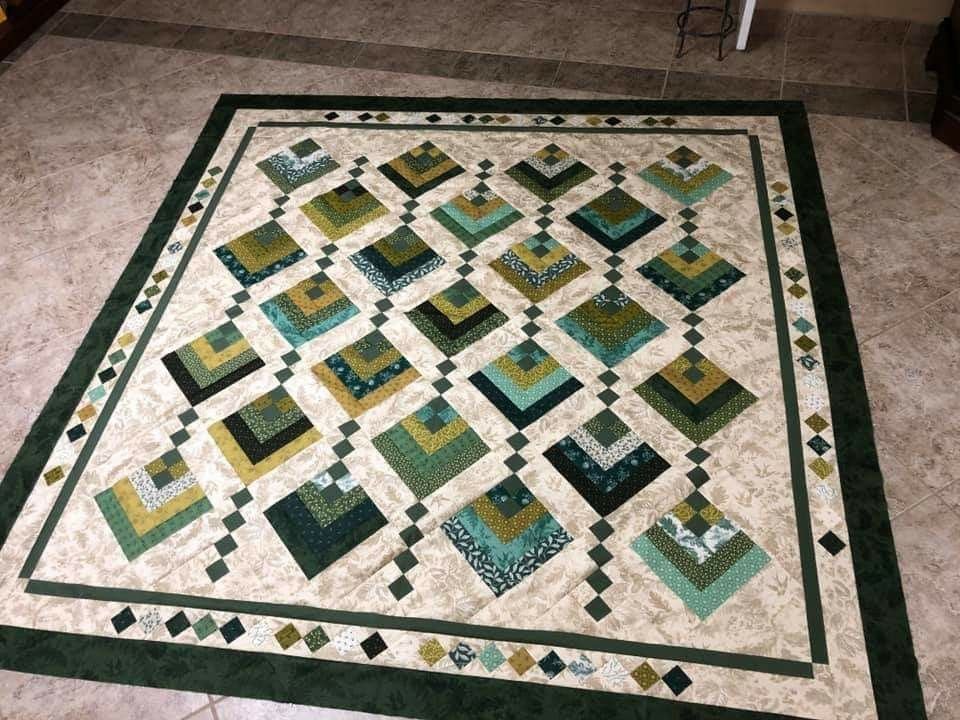
A key feature of the Hanging Gardens Quilt Pattern is its flowing, layered appearance. Many quilters achieve this look through careful color gradation. Arranging fabrics from light to dark can create the illusion of depth and movement.
Sketching your layout before cutting fabric is extremely helpful. Even a simple diagram allows you to visualize placement and avoid costly mistakes. Planning ahead saves time and fabric.
Block consistency is critical for this pattern. Accurate cutting and measuring ensure that pieces align correctly during assembly. Precision may feel slow at first, but it dramatically improves the final result.
Consider adding subtle floral or vine prints to enhance the garden theme. These details reinforce the visual story of your Hanging Gardens Quilt Pattern without overwhelming the design.
Before sewing, lay out all pieces on a flat surface or design wall. This preview helps you adjust colors and positioning until the quilt feels balanced and harmonious.
Step-by-Step Sewing Process for Hanging Gardens Quilt Pattern
Once your design is finalized, it is time to begin sewing your Hanging Gardens Quilt Pattern. Start by cutting all fabric pieces carefully according to your pattern measurements. Accuracy at this stage prevents alignment issues later.
Begin assembling your quilt blocks using a consistent quarter-inch seam allowance. Maintaining this standard seam width is one of the most important habits in quilting.
Press seams as you sew. Proper pressing keeps the quilt top flat and makes joining rows much easier. Many quilters find that pressing after every seam improves overall accuracy.
After completing the blocks, join them row by row. Pin at seam intersections to keep points aligned. Taking your time here ensures a professional-looking Hanging Gardens Quilt Pattern.
Next, prepare the quilt sandwich by layering backing, batting, and the quilt top. Smooth each layer carefully to remove wrinkles or bubbles.
Baste the layers together using safety pins, spray baste, or hand stitching. Then quilt the layers using straight lines, gentle curves, or free-motion quilting depending on your skill level.
Finishing Touches for a Professional Hanging Gardens Quilt
Finishing details are what truly elevate a Hanging Gardens Quilt Pattern from good to stunning. Start by trimming excess batting and backing so the edges are clean and even.
Binding frames your quilt and gives it a polished look. Choose a binding fabric that complements your color palette without overpowering the design. Double-fold binding is a popular durable choice.
When sewing the binding, slow down at the corners to create neat mitered edges. Crisp corners instantly improve the quilt’s professional appearance.
Adding a label is a meaningful finishing touch. Include your name and the date to personalize your Hanging Gardens Quilt Pattern project, especially if it is a gift.
Wash the finished quilt gently to achieve the soft, slightly crinkled texture many quilters love. Use mild detergent and cold water to protect the fabrics.
Finally, display or store your quilt properly. With good care, your handmade quilt can remain beautiful for many years.
FAQ About Hanging Gardens Quilt Pattern
Is the Hanging Gardens Quilt Pattern beginner-friendly?
Yes, but confident beginners will have the best experience. The design requires careful cutting and color placement, but the techniques themselves are approachable.
What fabrics work best for this pattern?
High-quality quilting cotton, batiks, and soft florals work beautifully in a Hanging Gardens Quilt Pattern because they enhance the flowing garden effect.
What size should I make my quilt?
Common options include wall hanging, lap size, or bed size. Beginners often start smaller to practice the layout and piecing.
Do I need special quilting skills?
Basic piecing skills are usually enough. More advanced quilting designs can be added later if desired.
How do I create the cascading garden look?
Use color gradients and careful fabric placement. Arranging fabrics from light to dark helps create depth and movement.
Can I machine wash the finished quilt?
Yes. Most cotton quilts are machine washable on gentle settings. Avoid high heat to preserve fabric quality.
Conclusion
Creating a Hanging Gardens Quilt Pattern is a rewarding quilting journey that blends precision, creativity, and thoughtful design. In this guide, you learned how to select the best materials, design an eye-catching layout, sew with accuracy, and apply finishing touches that give your quilt a professional look.
With practice, your confidence will grow, and each new Hanging Gardens Quilt Pattern project will become even more refined and personalized. Quilting is a skill that improves with every stitch, and this pattern is a beautiful way to expand your abilities.
I would love to hear your honest opinion — are you planning to try a Hanging Gardens Quilt Pattern soon? Share your thoughts, experiences, and suggestions to inspire fellow quilters.

