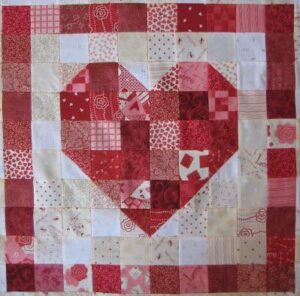
If you’re looking for a sweet and heartfelt sewing project, the Heart Gems Quilt Pattern is the perfect choice. This beautiful and symbolic quilt pattern features heart-shaped blocks that resemble sparkling gems, making it ideal for gifts, Valentine’s Day, or simply to add a touch of love to your home decor. Whether you’re a seasoned quilter or a beginner eager to try something new, this guide will help you create a stunning quilt from start to finish.
The Heart Gems Quilt Pattern offers endless possibilities in terms of fabric selection and color combinations. From bold reds and pinks to pastels or modern monochrome, you can customize the design to suit any occasion or style. What makes this pattern so special is the way it combines traditional quilt techniques with a modern, playful twist.
In this comprehensive tutorial, we will walk you through each step of making the Heart Gems Quilt, including fabric measurements, cutting instructions, block assembly, quilting, and finishing. Follow along to create a quilt that’s not only beautiful but also filled with love and creativity.

Choosing Your Fabric and Tools
The foundation of a successful quilt starts with the right fabric and quilting tools. For the Heart Gems Quilt Pattern, thoughtful fabric selection helps highlight the heart shapes and gives the design a gem-like sparkle.
- Fabric Choices: Choose high-quality quilting cotton in a range of coordinating prints and solids. Consider shades of red, pink, lavender, or even jewel tones like sapphire and emerald for a gem-inspired look.
- Fabric Requirements and Cutting Instructions:
- Heart Blocks (Gems): (18) 5″ x 5″ squares in assorted colors
- Background: (36) 2.5″ x 2.5″ squares in white or light fabric
- Block Sashing: (15) 2.5″ x 10.5″ strips
- Border Fabric: (2) 3.5″ x 48.5″ and (2) 3.5″ x 56.5″
- Backing: 60″ x 70″
- Batting: 58″ x 68″
- Essential Tools: You will need a rotary cutter, self-healing cutting mat, quilting ruler, sewing machine with a 1/4″ foot, pins, and coordinating thread.
- Pre-washing and Ironing: Pre-wash your fabric to prevent bleeding and shrinking. Press each piece to ensure it lies flat.
- Organization: Sort and label your fabric cuts. This step will save you time during assembly and help maintain pattern consistency.
- Thread Selection: Use thread that complements or blends with your fabric choices to create a seamless look.
Assembling the Heart Gems Blocks
Creating the heart-shaped blocks is the most enjoyable part of the Heart Gems Quilt Pattern. Each block comes together with a mix of color and symmetry to create a gem-like heart.
- Making Half-Square Triangles (HSTs): Combine a 5″ x 5″ heart fabric square with a 2.5″ x 2.5″ background square by sewing diagonally, trimming the excess, and pressing open.
- Forming the Heart Shape: Use four HSTs and one solid square to assemble each heart. Arrange the pieces into a heart layout before sewing.
- Sewing Rows Together: Stitch the top row of three units, then the bottom row. Press the seams toward the darker fabric.
- Joining Rows: Sew the rows together to complete the heart block. Make sure the points align properly.
- Repeat: Create 18 heart blocks in total. Use a variety of colors and prints to give the quilt a dynamic, sparkling effect.
- Final Pressing: After assembling all heart blocks, press each one flat to prepare for sashing and layout.
Adding Sashing, Borders, and Quilting
The sashing and borders help frame the heart blocks and give the quilt pattern a cohesive and polished appearance. Quilting adds texture and depth to your final project.
- Laying Out the Blocks: Arrange the heart blocks in a 3 x 6 grid. Play with the color placement until you’re happy with the flow.
- Adding Sashing: Sew a 2.5″ x 10.5″ strip between each block row and column. Press seams to the side.
- Attaching Borders: First, sew the shorter 3.5″ border strips to the sides. Then, add the top and bottom strips.
- Creating the Quilt Sandwich: Layer the backing (right side down), batting, and quilt top. Baste the layers with safety pins or basting spray.
- Quilting Options: Choose straight-line quilting for a clean, modern look or free-motion quilting to add artistic flair.
- Trimming and Squaring: Trim excess batting and backing. Square the edges to prepare for binding.
Binding and Finishing Your Heart Gems Quilt
The final steps of binding and finishing turn your project into a complete, professional-looking quilt. Take your time here to ensure every detail is perfect.
- Cutting Binding Strips: Cut (5) 2.5″ x WOF strips. Join end-to-end and press in half lengthwise.
- Sewing Binding to Front: Attach the binding to the front of the quilt using a 1/4″ seam, mitering the corners.
- Folding and Finishing: Fold the binding to the back and hand-stitch or machine-stitch in place for a neat edge.
- Labeling Your Quilt: Add a label with your name, date, and any special message to personalize your creation.
- Final Press and Inspection: Give the quilt one last press and check for loose threads or missed stitches.
- Displaying or Gifting: Your Heart Gems Quilt Pattern is now complete! Use it as a decorative throw, wall hanging, or thoughtful handmade gift.
- PATTERN HERE
With this easy-to-follow guide, you’ll be able to create a heartfelt and sparkling quilt that showcases your creativity and quilting skills. The Heart Gems Quilt Pattern is not only beautiful but also meaningful—a perfect addition to your collection of cherished quilt patterns. Happy quilting!


