is one of the most charming and meaningful projects for any quilting enthusiast. Whether you’re creating a Valentine’s Day gift, a baby blanket, or a loving decorative piece, a heart shaped block adds warmth and personality to your quilt. In this heart shaped quilt block – step by step tutorial, we’ll walk you through the process with clarity and detailed guidance, making it accessible for quilters of all levels.
Using a heart shaped quilt block in your project not only adds beauty but also allows for personal storytelling through fabric. The block itself can be adapted in various sizes and colors, fitting into almost any quilt pattern with a touch of love. This tutorial will help you make one block, but you can easily multiply it for a whole quilt filled with hearts.
If you’re ready to dive into a heartwarming project, grab your fabrics, thread, and rotary cutter, because this heart shaped quilt block – step by step tutorial will break it down into manageable and enjoyable steps. Plus, we’ll include exact fabric cuts, measurements, and all the key techniques that ensure your finished block is neat, symmetrical, and adorable.
Understanding the Basics of a Heart Shaped Quilt Block
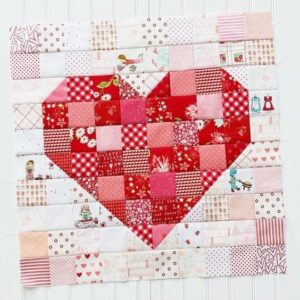
Creating a heart shaped quilt block involves combining traditional patchwork techniques with some clever angles. This block is typically made up of squares, rectangles, and half-square triangles (HSTs) that form the heart shape once sewn together.
The most popular finished block size is 8.5″ x 8.5″ (8″ finished), but it can be resized based on your overall quilt pattern. For beginners, starting with the standard size makes the assembly easier and visually striking. You’ll also become familiar with core skills like chain piecing and squaring up your blocks.
To begin, choose fabrics in contrasting colors: a red or pink fabric for the heart and a white or cream background. Prewashing your fabrics is optional but can help avoid shrinkage. Iron all pieces flat before cutting, and use a rotary cutter and quilting ruler for precision.
Here are the fabric cuts you’ll need for one 8.5″ x 8.5″ heart block:
- Two 2.5” x 2.5” squares (heart top corners)
- Two 3” x 3” squares (to make HSTs)
- Two 2.5” x 4.5” rectangles
- Two 1.5” x 4.5” strips (optional border)
- Two 4.5” x 1.5” strips (optional border)
- One 4.5” x 4.5” square (bottom of the heart)
Now that you have your pieces cut and ready, let’s begin constructing the heart one section at a time.
Assembling the Top of the Heart
The top of the heart shaped quilt block is created by forming two half-square triangles (HSTs) that will represent the gentle slope of the heart. HSTs are a fundamental quilting skill and perfect for creating the top curves of the heart.
To make your HSTs, take the two 3” x 3” squares – one from the heart fabric and one from the background. Place them right sides together and draw a diagonal line on the lighter fabric. Stitch a seam ¼” on either side of the line and cut along the line. Press open and square each HST to 2.5” x 2.5”.
Now you have two perfect HSTs. These form the angled top sides of the heart. Place a 2.5” x 2.5” square of heart fabric next to each HST to form a row: HST + square for the left, square + HST for the right. Sew these together to create the top row.
Pin your pieces carefully before sewing to avoid fabric shifting. Use a consistent ¼” seam allowance to ensure accurate sizing across your block. Press seams toward the heart fabric to give the block a smooth finish.
Repeat the process with your second set of squares. Chain piecing can speed up the process if you’re making multiple blocks at once. Keep your iron handy and press after every seam.
After completing the top row, label it as Row 1 and set it aside. We’ll build the heart downward with rectangles next.
Shaping the Heart Center and Bottom
The center of your heart shaped quilt block gives it that full, iconic shape. This part is made by adding two rectangles that serve as the middle section, just under the HSTs.
Sew the two 2.5” x 4.5” rectangles side by side. These form Row 2. Align and sew this row under Row 1 and press the seam flat. Now your block is starting to resemble a heart.
To create the point at the bottom of the heart, use the 4.5” x 4.5” square of heart fabric. This will be Row 3. Attach it beneath Row 2 to complete the heart shape. Again, press your seams toward the center.
Now you should have a three-row heart block. You can finish it as is, or add a simple border using the 1.5” strips you cut earlier.
Attach the 1.5” x 4.5” strips to the left and right sides of the block. Then attach the 4.5” x 1.5” strips to the top and bottom. This will frame the heart and bring your block to the correct 8.5” x 8.5” size.
If you’re planning a full quilt pattern using multiple heart blocks, keep the layout consistent. Make sure all your hearts are facing the same direction, unless you’re going for a scrappy, mixed-orientation look.
Now let’s go over some color and layout tips that will make your heart blocks pop in any quilt project.
Choosing Fabrics and Layout Ideas
One of the best parts of making a heart shaped quilt block is playing with color. You can use solids, florals, polka dots, or even novelty prints to personalize each heart.
Try making a rainbow quilt with hearts in every color of the spectrum. Or choose soft pastels for a baby quilt. For a Valentine’s Day quilt, red, pink, and white are classic choices that never fail.
If you’re using scraps, this project is a perfect way to give them new life. Each heart block can feature a different print, making a lovely and eclectic quilt. Be sure to choose a neutral background to unify the design.
Another idea is using hearts to spell out words or names. With careful placement, you can use blocks as letters or to separate text. This adds a fun and interactive touch to your project.
In terms of layout, heart blocks work beautifully in rows, in checkerboards with plain blocks, or arranged diagonally for a dynamic effect. Play around with your layout before stitching the rows together.
Remember to always square up your blocks before final assembly. This ensures that your quilt top will lie flat and all seams will match up neatly.
Finishing and Quilting Tips
Once all your heart shaped quilt blocks are complete and arranged, sew them into rows and then join the rows to form the quilt top. Use consistent seam allowances and press seams between rows in alternating directions.
After completing the top, layer it with batting and a backing fabric. Baste well using your preferred method – spray basting or safety pins both work fine.
Quilt as desired. Simple straight-line quilting looks clean and modern, while free-motion quilting adds texture. You can quilt around each heart to make them pop or fill the background with loops and swirls.
Trim the quilt, square up the edges, and bind with your favorite method. A scrappy binding adds fun; a solid color gives structure.
Label your quilt with the date and your name. It’s always nice to remember when you created it and for whom. Especially when hearts are involved, the story matters.
Congratulations, you’ve now finished a quilt filled with love using the heart shaped quilt block – step by step tutorial!
FAQ: Heart Shaped Quilt Block
1. Can beginners make a heart shaped quilt block?
Yes! This block is beginner-friendly. If you can sew straight seams and make HSTs, you can make a heart block.
2. What size fabric cuts do I need?
For an 8.5” block, follow the cuts listed in the tutorial: mostly 2.5” and 4.5” pieces. Adjust accordingly for other sizes.
3. Can I use fat quarters for this pattern?
Absolutely. One fat quarter can yield several hearts, depending on your cutting layout.
4. Do I need special tools?
Basic quilting tools: rotary cutter, quilting ruler, sewing machine, iron, and pins. A marking pencil helps with HSTs.
5. How many blocks do I need for a lap quilt?
That depends on the size. For example, 5 rows of 5 blocks (25 blocks) makes a nice 40” x 40” quilt, not including borders.
6. Can I make this block into a pillow or mini quilt?
Definitely! It works great for pillows, wall hangings, or even tote bags.
Conclusion
In this heart shaped quilt block – step by step tutorial, we’ve covered everything you need to create a beautiful, love-filled block. From fabric cuts and sewing tips to color ideas and quilting suggestions, you’re now fully equipped to start this heartwarming project.
Whether you’re making one block or a hundred, these hearts will brighten your quilt and warm the hearts of those who receive it. Don’t forget to experiment with colors, prints, and layouts to make it your own.
If you enjoyed this tutorial, please leave your honest opinion and share any suggestions or questions you might have. Happy quilting!


