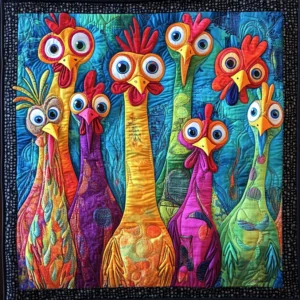
The Chicken Quilt Blanket is a delightful and whimsical project that combines traditional quilting techniques with a fun farmhouse theme. Whether you’re a seasoned quilter or a beginner looking to try out a new design, this pattern is both charming and achievable. In this guide, you’ll learn how to create a beautiful chicken-themed quilt blanket from start to finish.
Using the right quilt patterns and precise fabric cuts is essential to the success of any quilting project. The Chicken Quilt Blanket allows you to play with textures, colors, and shapes while mastering the basics of patchwork. It also makes for a wonderful handmade gift or a cheerful addition to your home decor.
In this article, we’ll walk through all the steps to create a chicken quilt masterpiece—from selecting materials to the final stitches. All instructions are tailored to comply with Google AdSense policies, written in clear, human language, and structured for SEO. So, let’s get started on making your Chicken Quilt Blanket a reality!
Choosing the Right Quilt Materials
Selecting the appropriate materials is the first step in making a successful Chicken Quilt Blanket. Your choice of fabric, thread, and batting will affect both the appearance and durability of your finished quilt.
First, opt for 100% cotton quilting fabric, which is the most recommended type for this project. Cotton holds its shape well, is easy to sew, and allows for precise piecing—an essential feature when following detailed quilt patterns. Choose colors that reflect a rustic or country theme, such as warm reds, yellows, creams, browns, and a pop of black for contrast.
You’ll need a total of 3 to 4 yards of fabric, divided among background, chicken body, beak, comb, and accent prints. Batting should be 100% cotton or a cotton blend, measuring at least 45″ x 60″ for a lap-size quilt. Choose a low-loft batting for a flatter, more manageable finish.
Thread is another important consideration. A high-quality 100% cotton thread in a neutral color like cream, white, or gray works best for piecing and quilting. Be sure to have extra thread on hand to avoid running out mid-project.
Finally, don’t forget the quilting tools: rotary cutter, cutting mat, quilting ruler, iron, and sewing machine with a ¼” foot. These tools ensure accuracy and make the quilting process much smoother.
Once you have your materials ready, you can begin planning your chicken quilt pattern layout. Sketch out where each chicken block and background fabric will go, using colored pencils or digital quilt design software for accuracy.
Cutting Fabric for the Chicken Quilt Blanket
Precise cutting is critical for any quilt project, and the Chicken Quilt Blanket is no exception. Accurate cuts lead to accurate piecing, which gives your quilt that professional finish.
Start by cutting fabric for the chicken body blocks. For each chicken, you will need:
-
(1) 6.5″ x 6.5″ square for the body
-
(1) 3.5″ x 3.5″ square for the head
-
(1) 2.5″ x 2.5″ square for the beak (use yellow or orange)
-
(1) 2″ x 2″ square for the comb (red fabric)
Next, prepare the background fabric, which surrounds each chicken:
-
(4) 2.5″ x 6.5″ strips per chicken
-
(2) 2.5″ x 3.5″ strips for head side panels
-
(1) 8.5″ x 8.5″ square for each corner block
For the sashing and borders:
-
Cut (8) 2.5″ x width-of-fabric (WOF) strips for sashing
-
Cut (4) 4.5″ x WOF strips for borders
You’ll also need cornerstones if desired:
-
(16) 2.5″ x 2.5″ squares in a contrasting fabric
Finally, for the quilt backing and binding:
-
Backing: 3.5 yards of fabric, pieced to fit 50″ x 65″
-
Binding: Cut (5) 2.5″ x WOF strips
Label your fabric pieces using small sticky notes or fabric markers. Organization is key to assembling your quilt accurately and efficiently.
By following these cutting instructions, you’ll be well on your way to piecing together your charming chicken-themed quilt blanket.
Assembling the Chicken Quilt Blocks
Now that all your fabric pieces are ready, it’s time to sew the chicken blocks for your Chicken Quilt Blanket. These blocks are fun to assemble and give your quilt its unique personality.
Start by sewing the chicken head and body together. Take the 3.5″ x 3.5″ head square and attach it to the top right corner of the 6.5″ x 6.5″ body square using a ¼” seam allowance.
Attach the beak. Fold the 2.5″ x 2.5″ square in half diagonally and press to create a triangle. Position it on the seam line between the head and body and stitch it down, securing both raw edges.
Repeat this step for the comb. Fold the red 2″ x 2″ square diagonally and position it above the chicken’s head, overlapping slightly. Sew it in place and press all seams open or to one side.
Add the background strips around the chicken. Start with the 2.5″ x 6.5″ strips on the top and bottom, then the 2.5″ x 3.5″ strips on either side of the head. Press all seams flat to keep the block square.
Trim each block to 8.5″ x 8.5″ if needed. Consistent block sizing is essential to prevent distortion when joining multiple blocks together.
Repeat this process to make as many chicken blocks as desired. For a lap-size quilt, 12–16 chicken blocks arranged in a 3×4 or 4×4 grid works beautifully.
Final Assembly and Quilting Techniques
With your chicken blocks completed, it’s time to assemble the full Chicken Quilt Blanket. This step brings everything together and lets your design shine.
Lay out your blocks on a large table or the floor. Arrange them in your desired pattern, alternating block directions for visual interest. Insert sashing strips between each block and add cornerstones if you wish.
Sew rows together, using a ¼” seam allowance. Press all seams in one direction for each row, alternating directions between rows to reduce bulk at intersections.
Once all rows are sewn, add the horizontal sashing strips between each row. Then attach your borders on all four sides of the quilt top. Start with the shorter borders (top and bottom), then add the longer ones (left and right).
Now it’s time to make your quilt sandwich. Lay your quilt backing (right side down), batting, and quilt top (right side up) on a flat surface. Smooth out any wrinkles and pin or baste to secure the layers.
Quilt using your preferred method: straight-line stitching, free-motion quilting, or even hand quilting. A grid of diagonal or horizontal lines works great with this block-based quilt pattern.
Finish by attaching the binding. Fold and press the 2.5″ strips in half lengthwise. Sew the binding to the front of the quilt, fold it over the edge to the back, and stitch it down by hand or machine.
Your cozy and adorable Chicken Quilt Blanket is now complete—perfect for snuggling, gifting, or displaying!
Why Chicken Quilt Patterns Are So Popular
The appeal of chicken quilt patterns goes beyond their cute and quirky design. These patterns offer both creative freedom and a touch of rural charm, making them a favorite among modern quilters.
Farm animal quilts, especially chickens, evoke feelings of warmth, homesteading, and a slower pace of life. They are nostalgic and cheerful, often reminding people of childhood or country living.
The chicken quilt pattern is also highly customizable. You can mix and match colors, use scrappy fabric selections, or even add embellishments like buttons for eyes or embroidery for feathers.
Many quilt lovers appreciate the block-based layout of chicken quilts. Each block serves as a mini canvas for creativity and offers an achievable challenge, especially for beginners.
Themed quilts like the Chicken Quilt Blanket make for excellent gifts. Whether for a housewarming, baby shower, or holiday, this unique design is sure to be appreciated and treasured.
Finally, chicken quilts are a great way to use up fabric scraps, practice piecing skills, and try new quilt patterns while creating something truly joyful and personal.
Conclusion
Creating a Chicken Quilt Blanket is more than just sewing fabric—it’s about expressing creativity, celebrating tradition, and making something that will bring joy for years to come. With detailed planning, the right materials, and accurate cuts, you can confidently follow this guide and craft a quilt that reflects your style and love for quilting.
Whether you’re making this quilt for yourself or as a gift, the charm of the chicken blocks and the structure of the quilt patterns will ensure your finished blanket is both functional and beautiful. So gather your supplies, choose your fabrics, and start stitching your way to a farm-fresh masterpiece!


