Creating an impeccable and very easy patchwork block is a wonderful way to explore the art of quilting, even if you’re a complete beginner. Whether you want to make a cozy blanket, a stunning wall hanging, or simply learn the foundational steps of quilting, this project is the perfect place to start. Simple yet beautiful, this quilt block pattern balances creativity with structure, helping you learn piecing techniques and color coordination effortlessly.
In this blog post, we’ll walk you through each step of crafting an impeccable and very easy patchwork block, using techniques that are beginner-friendly but result in a polished, professional finish. You’ll learn about fabric choices, accurate cutting, pressing techniques, and essential assembly steps to ensure that your block lays flat and squares up perfectly.
By the end of this article, you’ll not only have a finished quilt block in hand but also the confidence to move on to more complex patterns. Whether you’re planning to sew one block or a hundred, this tutorial will set you on the path to creating your own gorgeous quilt. Let’s get started with the materials and measurements.
Materials and Fabric Cuts You’ll Need
Before you dive into stitching your first patchwork block, it’s essential to gather the correct materials and tools. Proper preparation leads to cleaner cuts, straighter seams, and less frustration during the sewing process. For this quilt pattern, we’re keeping it simple yet stylish.
1. Fabric Selection
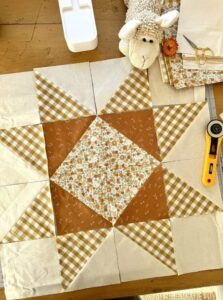
Choose 100% cotton quilting fabric in four contrasting prints or solid colors. Using high-quality quilting cotton ensures that your blocks are easy to press and sew. Aim for a light, medium, dark, and neutral fabric to create visual contrast.
2. Fabric Cuts
For one 12.5” x 12.5” unfinished quilt block, cut the following pieces:
-
(4) squares – 4.5” x 4.5” (Fabric A)
-
(4) rectangles – 4.5” x 2.5” (Fabric B)
-
(4) rectangles – 2.5” x 6.5” (Fabric C)
-
(1) square – 4.5” x 4.5” (Fabric D – center square)
3. Rotary Cutter and Mat
Use a rotary cutter, self-healing cutting mat, and a quilting ruler to ensure straight, clean edges. Accurate cutting is one of the most important steps in achieving an impeccable patchwork block.
4. Thread and Sewing Machine
Use 100% cotton thread in a neutral color and a standard sewing machine with a ¼” seam allowance foot. This will help keep your seams consistent throughout the project.
5. Iron and Pressing Surface
Pressing seams flat after each step makes a huge difference in the appearance of your quilt block. Set your iron to the cotton setting and use a pressing cloth if needed.
6. Optional Add-ons
For extra durability or style, you can use lightweight interfacing or batting under the block if you’re preparing it for a wall hanging or quilted project. This step isn’t necessary for assembling the block itself.
Step-by-Step Instructions to Make the Patchwork Block
Now that you have all your materials ready, let’s walk through the process of creating your impeccable and very easy patchwork block. These steps are easy to follow and include clear instructions for pressing, joining, and assembling your quilt top.
1. Lay Out Your Design
Begin by laying out all your pieces in the final block design. This will help you visualize your quilt pattern and ensure that your colors are balanced. Arrange the squares and rectangles in a nine-patch layout with the center square and surrounding shapes.
2. Sew the Corner Units
Start by sewing one 4.5” x 2.5” rectangle (Fabric B) to one side of a 4.5” square (Fabric A). Press the seam toward the rectangle. Repeat this for all four corners.
3. Add Vertical Rectangles
Next, attach a 2.5” x 6.5” rectangle (Fabric C) to the other side of each of your corner units to form L-shaped sections. Again, press seams toward the larger piece. You now have four outer sections.
4. Assemble the Rows
Sew two of your L-shaped corner units to the center square (Fabric D), placing one on the top and one on the bottom. Make sure they’re facing the correct direction so the block maintains symmetry.
5. Add the Side Units
Take the remaining two L-shaped corner units and attach them to the left and right sides of your assembled center strip. Match the seams carefully to ensure alignment, and press everything flat.
6. Square Up the Block
After pressing your completed block, measure it carefully. It should measure 12.5” x 12.5” unfinished. Trim any uneven edges using a rotary cutter and square ruler to prepare it for quilting or joining with other blocks.
Color Combinations and Styling Tips
One of the best parts about this easy quilt pattern is the opportunity to get creative with colors and fabric styles. Whether you’re making a full quilt or just testing out combinations, playing with colors is fun and rewarding.
1. Classic Color Combos
Try using blue, white, and gray for a nautical or coastal vibe, or red, cream, and green for a holiday-inspired theme. Earth tones like browns, golds, and tans are great for rustic or farmhouse styles.
2. Using Scraps for Variety
This patchwork block is ideal for using up fabric scraps. Mix prints like florals, stripes, and polka dots for a whimsical and modern look. Scrappy blocks give your quilt texture and uniqueness.
3. Solid Fabrics vs. Prints
For a bold look, use all solid colors. For a softer aesthetic, mix soft florals or tone-on-tone prints. Try alternating between solids and prints in the same color family for depth.
4. Add Sashing for Larger Projects
If you’re turning your blocks into a full quilt, consider adding sashing between the blocks. A sashing strip of 2” wide helps separate the designs and makes your final quilt feel more polished.
5. Borders and Bindings
Add a 3” border around each block to frame them individually, especially if you’re making a wall hanging. Bind your quilt in a complementary color to make the blocks pop.
6. Label Your Work
Always sign and date your finished quilt or block using a permanent fabric marker or embroidered label. It’s a great habit to start and adds personal meaning to your creations.
Project Ideas Using Your Patchwork Block
Once you’ve mastered the impeccable and very easy patchwork block, there’s no limit to how you can use it. Below are several project ideas for all skill levels to expand your quilting journey.
1. Make a Full Quilt
Combine 9, 12, or more of these quilt blocks to create a baby quilt, lap quilt, or full-sized blanket. Add sashing and borders for a polished finish, then layer with batting and backing to complete it.
2. Turn It into a Pillow
Sew one finished block to a backing square, stuff with pillow filling or insert a pillow form, and sew the edges shut. It’s an easy home decor upgrade with a personal touch.
3. Wall Art Display
Frame your patchwork block using a shadow box or canvas stretch frame. This makes a lovely handmade art piece for your sewing room, nursery, or living space.
4. Tote Bags and Pouches
Incorporate the quilt block as a decorative panel on a tote bag or zippered pouch. Add interfacing for stiffness and durability, and finish with lining for a professional look.
5. Table Runners and Placemats
Sew multiple blocks in a row to make a stunning table runner. Or use individual blocks as placemats, finishing them with quilt batting and binding.
6. Gifts and Keepsakes
Handmade blocks make thoughtful gifts. Add embroidered initials, special dates, or use fabrics that hold sentimental value—like baby clothes or heirloom pieces.
Final Thoughts on the Impeccable and Very Easy Patchwork Block
The impeccable and very easy patchwork block offers everything a quilter could want: simplicity, versatility, and style. Whether you’re new to quilting or experienced and just looking for a quick finish, this project fits the bill perfectly. With minimal fabric and tools, you can create beautiful blocks that turn into stunning finished pieces.
This quilt pattern is a gateway into more complex designs, allowing you to build foundational skills like accurate cutting, seam pressing, and consistent piecing. As you repeat the pattern and gain confidence, you’ll find yourself inspired to create new layouts and color combinations.
Start with one block today and see where your creativity leads. Whether you make one or many, your patchwork block will be a beautiful expression of your craftsmanship and imagination. Happy quilting!


