
Jacob’s Ladder Quilt Block – Tutorial is a classic quilting guide that helps makers understand one of the most recognizable and timeless patchwork designs. The Jacob’s Ladder Quilt Block – Tutorial approach focuses on precision cutting, consistent seam allowances, and smart layout planning so the final block creates that beautiful woven, interlocking effect. Quilters love this block because it looks complex but is actually built from simple units.
In this Jacob’s Ladder Quilt Block – Tutorial, you will learn how the block is constructed, what fabric choices work best, how to cut and assemble each component, and how to avoid the most common mistakes. The block is beginner-friendly but still interesting enough for experienced quilters who want strong visual impact. With the right preparation, results are clean and repeatable.
This complete Jacob’s Ladder Quilt Block – Tutorial is written in a clear, step-by-step style and optimized with best SEO practices, while keeping a natural, human tone. You will also find practical tips, layout advice, and a detailed FAQ at the end. By following the guidance below, you can confidently create accurate, beautiful quilt blocks for many types of projects.
Materials and Fabric Planning for Jacob’s Ladder Quilt Block – Tutorial
Choosing fabrics carefully is the first success factor in any Jacob’s Ladder Quilt Block – Tutorial. High contrast between light and dark fabrics helps the ladder effect stand out clearly. Without contrast, the woven look can get visually lost.
Cotton quilting fabric is the most reliable choice for a Jacob’s Ladder Quilt Block – Tutorial. It presses well, cuts cleanly, and keeps its shape through repeated stitching. Pre-washing is optional but helps prevent later shrinkage differences.
You will typically need two main fabrics for a Jacob’s Ladder Quilt Block – Tutorial: a background fabric and a feature fabric. Some quilters add a third accent color for more visual movement. Keep value contrast stronger than color contrast.
Accurate cutting tools matter. A rotary cutter, acrylic ruler, and cutting mat improve precision in your Jacob’s Ladder Quilt Block – Tutorial pieces. Small cutting errors multiply across the block if not corrected early.
Thread choice should match your lighter fabric or be neutral. In a Jacob’s Ladder Quilt Block – Tutorial, visible seams can distract from the geometric effect, so subtle thread color is preferred.
Pressing tools are just as important as sewing tools. A hot iron and flat pressing surface help every unit in your Jacob’s Ladder Quilt Block – Tutorial stay square and aligned.
Understanding the Block Structure in Jacob’s Ladder Quilt Block – Tutorial
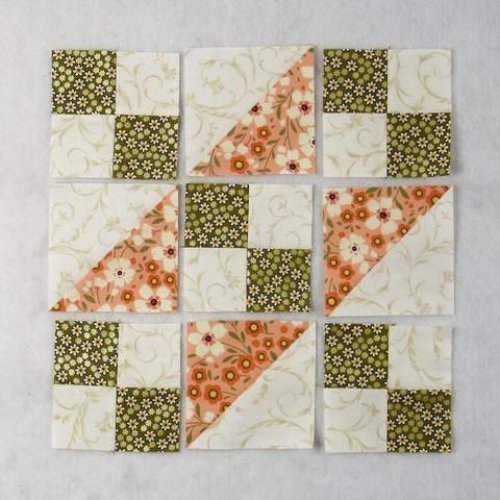
The Jacob’s Ladder Quilt Block – Tutorial block is built from half-square triangles and four-patch units. These simple components combine to create the illusion of interlocking bars. Understanding this structure makes assembly much easier.
Most Jacob’s Ladder Quilt Block – Tutorial layouts use a 3×3 grid of units. Some positions are half-square triangle squares, while others are four-patch squares. Placement is what creates the ladder motion.
Half-square triangles form the diagonal movement. In a Jacob’s Ladder Quilt Block – Tutorial, their direction must be consistent or the visual flow breaks. Always check orientation before sewing rows together.
Four-patch units create the solid stepping stones. Each Jacob’s Ladder Quilt Block – Tutorial depends on balanced four-patch contrast to keep the pattern readable from a distance.
Symmetry is key to the design. A well-made Jacob’s Ladder Quilt Block – Tutorial block should look balanced when rotated. If it looks uneven, a triangle unit may be flipped.
Before stitching full rows, lay everything out. A preview layout step in your Jacob’s Ladder Quilt Block – Tutorial prevents orientation mistakes and saves time on seam ripping.
Cutting and Piecing Steps in Jacob’s Ladder Quilt Block – Tutorial
Start your Jacob’s Ladder Quilt Block – Tutorial by cutting squares for both four-patch units and half-square triangles. Labeling cut piles helps prevent mix-ups during assembly. Organization speeds up accuracy.
To make half-square triangles for your Jacob’s Ladder Quilt Block – Tutorial, pair one light and one dark square. Mark a diagonal line, sew on both sides, then cut between the seams. This yields two matching units.
Press triangle units carefully. In a Jacob’s Ladder Quilt Block – Tutorial, pressing toward the darker fabric reduces shadowing and keeps seam lines crisp. Avoid over-stretching the bias edge.
Create four-patch units by sewing small squares into pairs, then joining the pairs. Chain piecing works well for a Jacob’s Ladder Quilt Block – Tutorial and keeps unit sizes consistent.
Trim units to exact size after sewing. Squaring up is a critical quality step in any Jacob’s Ladder Quilt Block – Tutorial because uneven units cause block distortion.
Join units into rows next. A careful row assembly phase in your Jacob’s Ladder Quilt Block – Tutorial ensures seams nest properly and intersections stay sharp.
Assembly and Layout Tips for Jacob’s Ladder Quilt Block – Tutorial
Row order matters in the Jacob’s Ladder Quilt Block – Tutorial. Follow your layout preview and sew rows in sequence. Keep units oriented exactly as planned while feeding them into the machine.
Nest seams whenever possible. In a Jacob’s Ladder Quilt Block – Tutorial, nested seams lock intersections together and produce crisp corners. This is especially helpful where four-patches meet triangle units.
Press rows in alternating directions. Good pressing strategy in your Jacob’s Ladder Quilt Block – Tutorial reduces bulk and makes final row joining easier and flatter.
Pin at key intersections. Strategic pinning improves alignment across your Jacob’s Ladder Quilt Block – Tutorial and prevents shifting while stitching long seams.
Check block size at the end. A finished Jacob’s Ladder Quilt Block – Tutorial block should match the target measurement. If it is off, review seam allowance consistency.
Experiment with block rotation in full quilt layouts. Rotating each Jacob’s Ladder Quilt Block – Tutorial block changes the overall quilt motion dramatically and creates secondary patterns.
Common Mistakes to Avoid in Jacob’s Ladder Quilt Block – Tutorial
Inconsistent seam allowance is the top problem in a Jacob’s Ladder Quilt Block – Tutorial. Even small deviations make units incompatible. Test your seam width before starting.
Stretching triangle edges causes warping. Because half-square triangles are bias-cut, your Jacob’s Ladder Quilt Block – Tutorial requires gentle handling during pressing and sewing.
Low contrast fabric choices weaken the design. A Jacob’s Ladder Quilt Block – Tutorial depends on value contrast to show the ladder effect clearly.
Skipping trimming steps leads to size drift. Each unit in a Jacob’s Ladder Quilt Block – Tutorial should be squared before final assembly.
Rushing layout causes orientation errors. Always double-check placement in your Jacob’s Ladder Quilt Block – Tutorial before stitching rows.
Poor pressing technique creates bulk. Flat, controlled pressing improves the final appearance of every Jacob’s Ladder Quilt Block – Tutorial block.
FAQ About Jacob’s Ladder Quilt Block – Tutorial
Is Jacob’s Ladder Quilt Block – Tutorial good for beginners
Yes, it uses basic units and is very suitable for confident beginners.
What size is a standard Jacob’s Ladder Quilt Block – Tutorial block
Common sizes range from 9 to 12 inches finished, depending on cut measurements.
How many fabrics should I use in Jacob’s Ladder Quilt Block – Tutorial
Two high-contrast fabrics are enough, but three can add extra depth.
Do I have to use half-square triangles in Jacob’s Ladder Quilt Block – Tutorial
Yes, they are essential to create the diagonal ladder effect.
Why does my Jacob’s Ladder Quilt Block – Tutorial look crooked
Usually due to inconsistent seam allowance or untrimmed units.
Can I resize Jacob’s Ladder Quilt Block – Tutorial easily
Yes, scale all cut pieces proportionally to change the finished block size.
Conclusion
This Jacob’s Ladder Quilt Block – Tutorial showed you how to plan fabrics, understand block structure, cut and piece units, assemble rows, and avoid the most common accuracy problems. Even though the design looks intricate, it is built from simple elements arranged with intention. With careful cutting, consistent seams, and thoughtful pressing, your results can look sharp and professional.

