
Kitty Potholder Quilt Pattern is a charming and practical quilting project that blends cute design with everyday usefulness. A well-designed Kitty Potholder Quilt Pattern allows you to create heat-resistant kitchen accessories while showcasing creative patchwork or appliqué cat motifs. These small quilted items are perfect for gifts, craft fairs, and home décor, and they are especially popular among cat lovers and handmade enthusiasts.
Working with a Kitty Potholder Quilt Pattern is also an excellent way to practice quilting skills on a small scale. Because potholders are compact, they require less fabric and less time than full quilts, yet still teach important techniques like layering, quilting lines, binding, and shape construction. This makes them ideal for beginners who want fast wins and for experienced quilters who enjoy quick decorative projects.
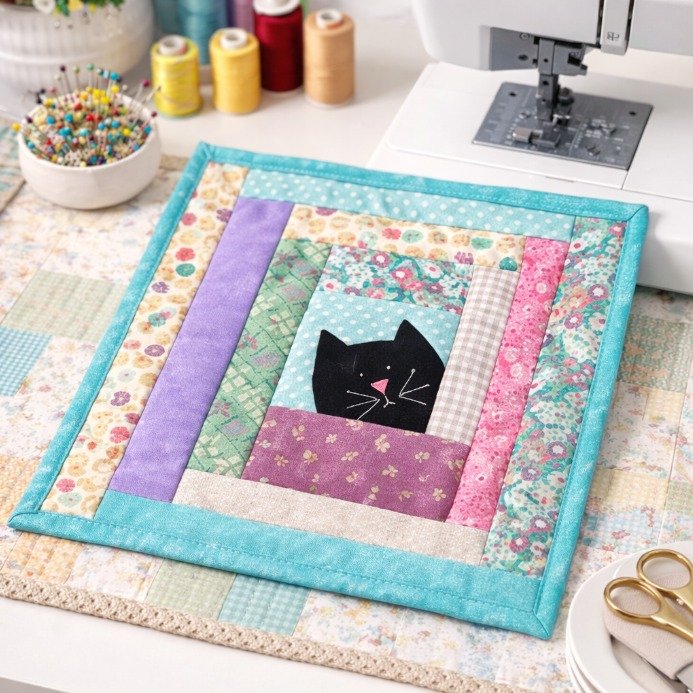
Another benefit of choosing a Kitty Potholder Quilt Pattern is creative flexibility. You can design realistic cats, playful cartoon kitties, modern silhouettes, or geometric cat faces depending on your style. In this complete guide, you will learn how to choose materials, plan your block design, construct the quilted layers, assemble the potholder, and finish it professionally — all with SEO-optimized structure and clear, humanized explanations.
Choosing the Best Materials for Kitty Potholder Quilt Pattern
Material selection is essential for a safe and durable Kitty Potholder Quilt Pattern project. Because potholders are used with heat, your fabric and batting choices must be functional as well as decorative. The most recommended outer fabric is quilting cotton due to its stability and predictable behavior.
For any Kitty Potholder Quilt Pattern, 100% cotton fabric is preferred over synthetic blends. Cotton tolerates heat better and is safer for kitchen use. It also presses well, which improves piecing accuracy and final appearance.
Batting choice is even more important. Use insulated batting or heat-resistant batting specifically made for potholders. A quality Kitty Potholder Quilt Pattern should include at least one thermal layer plus one cotton batting layer for both insulation and structure.
Thread should also be cotton or high-quality polyester with good heat tolerance. Strong thread ensures that quilting stitches in your Kitty Potholder Quilt Pattern remain secure after repeated washing and use.
Avoid stretchy or slippery fabrics when making a Kitty Potholder Quilt Pattern. Stable woven cotton keeps shapes accurate and makes binding easier to control around corners or curves.
Prewashing fabrics is recommended. Kitchen items are washed frequently, and prewashing reduces shrinkage and color bleeding risks in your finished Kitty Potholder Quilt Pattern.
Design Options for Kitty Potholder Quilt Pattern Blocks
There are many creative directions you can take with a Kitty Potholder Quilt Pattern. The most common styles include cat face blocks, full-body cat silhouettes, and playful paw or tail motifs. The smaller project size encourages bold, simple shapes.
Appliqué is one of the easiest approaches for a Kitty Potholder Quilt Pattern. A cat silhouette or face can be fused onto a background square and stitched down. This method handles curves well and keeps construction straightforward.
Pieced designs are another option. A geometric Kitty Potholder Quilt Pattern might use triangles and squares to form a stylized cat face. This style works well for modern kitchens and scrap-friendly layouts.
Foundation paper piecing can be used for detailed cat faces with precise angles. While more technical, it produces very sharp results in a Kitty Potholder Quilt Pattern when you want strong graphic detail.
Scale matters in potholder design. A successful Kitty Potholder Quilt Pattern keeps the cat image large and readable. Tiny details can disappear or become bulky when layered with batting.
Negative space helps highlight the motif. Leaving background space around the cat shape ensures the Kitty Potholder Quilt Pattern remains visually clear even after quilting stitches are added.
Constructing the Layers of a Kitty Potholder Quilt Pattern
Every Kitty Potholder Quilt Pattern is built from a quilt sandwich structure: top, insulation layers, and backing. Proper layering ensures both safety and durability. Start by completing your quilted cat block top first.
Once the top is finished, cut your batting and insulated layer slightly larger than the top. Layer backing fabric right side down, then insulation, then batting, then the Kitty Potholder Quilt Pattern top right side up.
Basting is important even for small items. Pin or clip the layers so nothing shifts while quilting. Smooth layers produce better stitch quality in your Kitty Potholder Quilt Pattern.
Quilting stitches secure the layers together. Straight-line quilting is beginner-friendly and effective. Many Kitty Potholder Quilt Pattern designs use grid or diagonal lines for strength and even heat distribution.
You can also quilt around the cat shape. Outline quilting emphasizes the motif and adds dimension to your Kitty Potholder Quilt Pattern while keeping the background firmly secured.
Keep quilting lines moderately close together. Dense quilting improves durability and prevents internal shifting after repeated washing and heating cycles in your Kitty Potholder Quilt Pattern.
After quilting, trim the layered piece to its final shape — usually square, rectangle, or rounded square — before binding.
Binding and Finishing Your Kitty Potholder Quilt Pattern
Binding is the final structural step in a Kitty Potholder Quilt Pattern and plays both a functional and decorative role. Cotton binding is recommended because it handles heat and washing well.
Double-fold binding is the most durable choice for a Kitty Potholder Quilt Pattern. It protects edges from wear and gives a clean, framed look. Cut binding strips on the straight grain for squares or on the bias for curved edges.
Add a hanging loop if desired. Many Kitty Potholder Quilt Pattern projects include a small fabric loop sewn into one corner so the potholder can hang on a hook. This is both decorative and practical.
Mitered corners give a polished finish on square potholders. Careful folding and stitching at corners elevate the overall look of your Kitty Potholder Quilt Pattern.
Thread color for binding stitches can blend in or contrast. A contrast stitch can outline the shape and add character to your Kitty Potholder Quilt Pattern.
Final pressing after binding helps set the shape. A flat, square finish makes your Kitty Potholder Quilt Pattern look more professional and gift-ready.
Always test heat resistance before regular use. Safely test your finished Kitty Potholder Quilt Pattern with warm — not extremely hot — items first to confirm insulation performance.
FAQ About Kitty Potholder Quilt Pattern
Is a Kitty Potholder Quilt Pattern good for beginners
Yes. A Kitty Potholder Quilt Pattern is an excellent beginner project because it is small, fast, and teaches core quilting skills.
What batting should I use for Kitty Potholder Quilt Pattern
Use insulated or thermal batting plus a cotton batting layer for best heat protection and structure.
Is appliqué or piecing better for Kitty Potholder Quilt Pattern
Appliqué is easier for curves and beginners. Piecing works well for geometric cat designs.
What size is typical for Kitty Potholder Quilt Pattern projects
Most finished potholders range from 7 to 9 inches square, depending on design and intended use.
Can I use scrap fabric for Kitty Potholder Quilt Pattern
Yes. Scrap cotton fabrics are perfect and make each potholder unique.
How dense should quilting be in Kitty Potholder Quilt Pattern
Moderately dense quilting is recommended to secure layers and improve durability with repeated use.
Conclusion
A well-made Kitty Potholder Quilt Pattern combines creativity, safety, and practicality in a compact quilting project. You learned how to choose proper heat-safe materials, select effective cat-themed designs, build stable quilted layers, and finish with durable binding and professional details. These small projects are perfect for skill building, gift giving, and adding personality to your kitchen.

