
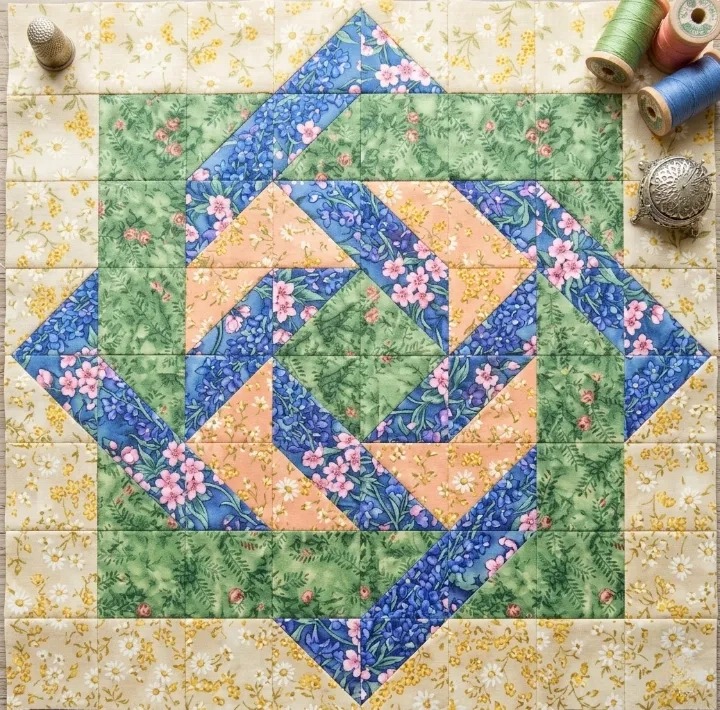
Labyrinth Quilt – Pattern is a fascinating patchwork project that uses geometric shapes, contrasting fabrics, and carefully arranged strips to create the illusion of a pathway twisting toward the center of the block. Inspired by the quilt shown in the reference image, this design combines soft green, floral blue, peach, and creamy yellow fabrics to produce a beautiful labyrinth quilt block with a fresh garden-inspired appearance. Although the finished block looks intricate, its visual complexity comes mainly from the placement and orientation of relatively simple patchwork units.
The most captivating feature of this Labyrinth Quilt – Pattern is the sense of movement. The blue floral sections form a strong pathway that appears to travel around the center, while peach triangles introduce warmth and help define the turns. Green fabric provides a calm background inside the main composition, and the pale floral outer border frames the entire block. When all of these elements are positioned correctly, the eye naturally follows the pathway around the design and toward the central green diamond. This creates the dimensional, almost puzzle-like quality associated with a labyrinth quilt pattern.
Despite its sophisticated appearance, this project can be constructed systematically. Instead of thinking about the entire labyrinth at once, divide the design into individual units consisting primarily of squares, rectangles, triangles, and half-square triangle units. These components are assembled into sections and then joined around the center. Careful fabric placement is more important than advanced sewing techniques. The following tutorial explains how to select fabrics, prepare the geometric units, construct the central labyrinth, add the surrounding sections, and finish the project as a quilt block, wall hanging, table topper, or part of a larger quilt.
Choosing Fabrics and Preparing the Labyrinth Quilt Pieces
Begin the Labyrinth Quilt – Pattern by choosing fabrics with enough contrast to make the pathway easy to recognize. The reference project uses four main color families: a medium green floral print, a strong blue floral print, a warm peach floral print, and a pale cream fabric with delicate yellow flowers. Each fabric performs a different visual role in the finished block.
The blue floral fabric should be one of the strongest fabrics in the composition because it forms much of the visible labyrinth pathway. A medium-to-dark print works particularly well here. The blue fabric in the reference design contains lighter floral elements, adding interest without preventing the pathway from remaining clearly visible.
Choose a medium-value green for the background surrounding the labyrinth. The green should contrast sufficiently with both the blue and peach sections. In the pictured project, the green print also appears in the center diamond, helping visually connect the center of the block with the larger background area.
The peach fabric becomes an important accent within the central section. It appears in triangular shapes that interact with the blue pathway, producing the rotating effect around the center. Choose a fabric that is clearly different from the green and blue but still belongs to the same overall palette.
For the outer frame, use a lighter fabric. Cream, ivory, pale yellow, or another low-volume quilting fabric works beautifully because it provides visual breathing room around the more colorful center. A subtle floral print similar to the reference project can reinforce the soft garden-inspired appearance without competing with the labyrinth.
Before cutting, press all fabrics carefully. Decide on your desired finished block size and calculate the individual pieces while including your preferred quarter-inch seam allowance. Cut squares and rectangles accurately with a rotary cutter, acrylic ruler, and cutting mat. Labeling groups of pieces can be extremely helpful because many components may look similar before assembly.
Making the Geometric Units and Central Labyrinth
The center of the Labyrinth Quilt – Pattern begins with a square positioned on point so that it visually resembles a diamond. In the reference design, this central piece is green. Surrounding it are blue and peach geometric units that establish the first rotation of the labyrinth.
One of the most useful components for this design is the half-square triangle, often abbreviated as HST. To create two HST units, place two contrasting fabric squares right sides together. Draw a diagonal guideline on the wrong side of the lighter square, sew an equal distance on either side of that line, and then cut along the marked diagonal.
Open the units and press the seams carefully. Trim each half-square triangle unit to the required unfinished size. Accurate trimming is particularly important for this pattern because the diagonal lines need to align with neighboring sections. Even small inconsistencies can interrupt the continuous appearance of the labyrinth.
Arrange blue and peach HST units around the central green square before sewing them together. Rotate each unit carefully. The blue sections should begin forming a pathway that travels around the center rather than appearing as unrelated triangles. Use the reference design as a visual guide for the direction of each turn.
Continue adding blue floral rectangles and additional triangle units around this central arrangement. Think of the blue fabric as one continuous ribbon. Every time you position a new blue piece, ask whether it visually continues the pathway established by the previous section. This simple approach makes the labyrinth quilt construction much easier to understand.
Sew the central units into manageable rows or sections rather than attempting to join everything simultaneously. Use a consistent quarter-inch seam and press after each seam is completed. Once the center is assembled, place it on a flat surface and verify that the green diamond remains centered and the surrounding blue-and-peach pathway rotates evenly.
Building the Outer Pathway and Assembling the Quilt Block
After completing the center, begin constructing the larger green sections surrounding it. These areas provide negative space and allow the blue labyrinth path to remain visually dominant. Cut green squares and rectangles according to your chosen block dimensions and arrange them around the central unit before sewing.
The blue pathway should continue beyond the inner peach-and-blue section. In the reference project, larger blue floral pieces travel diagonally through the surrounding green area, creating another level of movement. Several blue sections extend toward the outer edges and terminate in pointed shapes that emphasize the rotating geometry.
Create these points using additional triangle patchwork units. Carefully check their orientation before stitching. It is surprisingly easy to rotate one triangle incorrectly, and a misplaced piece can disrupt the pathway. Laying out the complete section and taking a quick reference photograph before sewing can prevent mistakes.
Join the green background and blue pathway components into larger rectangular sections. Then attach these sections around the central labyrinth. Match seam intersections carefully and pin where necessary. Avoid pulling one piece to make it fit another because stretching bias edges can distort the finished block.
Once the colorful interior is assembled, measure it in several directions. The block should lie reasonably flat and the opposite edges should be similar in length. Minor differences can often be corrected during careful squaring, but significant discrepancies usually indicate an inaccurate seam or stretched unit that should be corrected before adding the border.
Finish the main Labyrinth Quilt Block with the pale floral frame. The reference design uses light-colored squares and rectangular sections around the perimeter, producing a tiled appearance rather than one uninterrupted strip. You can reproduce this style or simplify the construction with continuous border strips. Either method creates a calm frame around the intricate center.
Quilting, Finishing, and Customizing the Labyrinth Quilt
Once the Labyrinth Quilt – Pattern top is complete, decide how you want to use it. A single large block can become a beautiful wall hanging, table topper, cushion front, or centerpiece. Repeating the block several times can create a larger throw or bed quilt with an impressive network of geometric pathways.
If making a finished quilt, prepare batting and backing slightly larger than the quilt top. Layer the backing, batting, and patchwork top, smoothing each carefully. Baste the three layers using your preferred method so they remain stable while quilting.
For the quilting itself, straight-line quilting is an excellent option because it complements the strong geometry. You can stitch parallel to the labyrinth pathway, quilt in the ditch along important seams, or create a simple grid. Gentle free-motion quilting can also be used in the larger green and cream areas if you want additional texture.
Thread color can either blend with the fabrics or provide another decorative element. A neutral cream or light gray thread can travel across several colors without becoming dominant. Alternatively, coordinating green or blue thread can emphasize specific sections of the geometric quilt design.
After quilting, trim the batting and backing and square the outer edges. Prepare binding strips in a coordinating fabric. Blue binding can echo the labyrinth pathway, green can connect with the background, and cream can create a softer edge. Attach the quilt binding evenly around all four sides and finish the corners neatly.
The pattern is easy to personalize through color. Instead of the garden-inspired blue, green, peach, and cream palette, try black, gray, and white for a dramatic modern labyrinth. Navy, light blue, and beige can create a coastal feeling, while burgundy, rose, sage, and ivory can produce a warm traditional version.
FAQ About the Labyrinth Quilt – Pattern
Is the Labyrinth Quilt – Pattern suitable for beginners?
The Labyrinth Quilt – Pattern is most comfortable for an adventurous beginner or intermediate quilter. The sewing itself mainly involves straight seams and common geometric units, but accurate cutting and careful orientation are essential for maintaining the continuous labyrinth effect.
What is a Labyrinth Quilt?
A labyrinth quilt is a geometric patchwork design in which contrasting fabric sections create the appearance of pathways moving around or toward a central point. The illusion is produced through strategic placement rather than actual overlapping fabric.
What fabrics work best for this pattern?
Choose fabrics with clearly distinguishable values. You need a strong pathway fabric, a contrasting background, an accent color, and preferably a lighter outer frame. Prints can work beautifully as long as their colors do not blend together excessively.
How do I make accurate half-square triangles?
Start with accurately cut squares, sew consistently on both sides of the diagonal guideline, press without stretching, and trim each completed HST. A ruler with a diagonal marking is especially helpful for this step.
Why does my labyrinth pathway look interrupted?
The most common reason is an incorrectly rotated triangle or rectangular unit. Before sewing each section, arrange the entire group on a flat surface and visually trace the pathway from one piece into the next.
Can I make the Labyrinth Quilt with fabric scraps?
Yes, although maintaining the illusion is easier if scraps are grouped by color or value. For example, several different dark blues could form the pathway while multiple coordinating greens create the background.
Can I enlarge the quilt block?
Yes. You can enlarge every component proportionally or repeat multiple finished blocks. Repeating blocks is often the simpler method because it preserves the proportions of the original geometric design.
Do I need to use floral fabrics?
No. Solids, batiks, geometric prints, tone-on-tone fabrics, and small-scale prints can all work. The floral fabrics simply give the reference design its soft spring-inspired personality.
What quilting design is best for a Labyrinth Quilt?
Straight lines, echo quilting, stitching in the ditch, and geometric grids are excellent choices. A simple quilting design often works best because it allows the pieced labyrinth to remain the primary visual feature.
How can I keep the finished block square?
Maintain an accurate quarter-inch seam allowance, trim HST units before assembly, press carefully, and measure the block after completing each major section. Correcting small problems early is much easier than attempting to square a heavily distorted finished block.
Conclusion
The Labyrinth Quilt – Pattern demonstrates how ordinary patchwork pieces can create an extraordinary sense of movement. By combining a green center and background with a strong blue floral pathway, warm peach accents, and a light cream border, the design develops into a beautiful geometric puzzle that appears to rotate around its center.
Throughout this tutorial, you learned how to select fabrics according to color value and contrast, create accurate half-square triangles, arrange the central diamond, build the blue labyrinth pathway, incorporate green background sections, assemble the outer points, and complete the block with a light floral frame. You also learned how careful pressing and consistent quarter-inch seams help preserve the precise geometry of the pattern.

