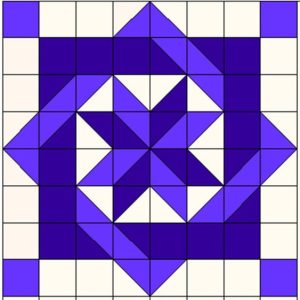
Creating a Labyrinth Star quilt block is a rewarding experience for quilters who appreciate intricate designs and geometric patterns.
This block showcases a beautiful combination of angles and symmetry, resulting in a captivating star shape.
In this tutorial, you’ll learn how to make the Labyrinth Star quilt block with detailed instructions and fabric measurements.

Materials and Fabric Preparation
To begin your Labyrinth Star quilt block, you’ll need the right materials. Choose fabrics that contrast well with each other to make the star design pop. You’ll need four different fabric colors, which will be referred to as Fabric A, Fabric B, Fabric C, and Fabric D.
Start by cutting the following fabric pieces:
- Fabric A (Background): Cut (4) 6.5-inch squares and (8) 3.5-inch squares.
- Fabric B (Star Points): Cut (4) 6.5-inch squares.
- Fabric C (Center Star): Cut (4) 3.5-inch squares.
- Fabric D (Outer Star): Cut (4) 4-inch squares and (4) 3.5-inch squares.
Accurate cutting is essential for a quilt block that comes together smoothly. Use a rotary cutter and a quilting ruler for precise cuts, ensuring all pieces match the measurements provided.
Assembling the Half-Square Triangles
The Labyrinth Star quilt block features several half-square triangles (HSTs), which are a fundamental element of the design. To make the HSTs, take the 6.5-inch squares from Fabric A and Fabric B.
Pair one Fabric A square with one Fabric B square, placing them right sides together. Draw a diagonal line from one corner to the opposite corner on the back of the Fabric A square. Sew a seam 1/4 inch on either side of the drawn line, then cut along the line to create two HST units. Repeat this process with the remaining Fabric A and Fabric B squares to yield a total of eight HSTs.
Press the seams open or to one side, depending on your preference. These half-square triangles will form the star points of your Labyrinth Star quilt block, contributing to the intricate, interlocking pattern.

Constructing the Star Center
The center of the Labyrinth Star quilt block consists of four smaller units that will be joined together. Begin by taking the 3.5-inch squares from Fabrics C and D. You will create a simple 4-patch unit using these squares.
Pair one Fabric C square with one Fabric D square, right sides together. Sew along one side using a 1/4-inch seam allowance, then press the seam open. Repeat this process with the remaining squares. Next, join the pairs together to form a 4-patch unit, which will serve as the focal point of your quilt block.
This 4-patch center adds an extra layer of visual interest, helping the Labyrinth Star design stand out against the surrounding pieces. Precision in piecing is key, so take your time aligning the squares to ensure sharp corners.
Adding the Outer Star Components
The outer star points in the Labyrinth Star quilt block are created using the 4-inch squares from Fabric D and the remaining 3.5-inch squares from Fabric A. These components will complete the star pattern by framing the block’s center.
To make the outer star points, take one 4-inch square from Fabric D and pair it with one 3.5-inch square from Fabric A. Similar to the half-square triangle method, draw a diagonal line across the back of the Fabric A square and sew 1/4 inch on either side of the line. Cut along the line to create two triangle units.
After sewing and pressing all of the pieces, you will arrange them around the central 4-patch to create the completed Labyrinth Star quilt block. The symmetry of the design will emerge as you place each piece in its correct position.

Assembling the Labyrinth Star Quilt Block
Now that all the components are ready, it’s time to assemble the entire Labyrinth Star quilt block. Begin by laying out all the pieces on your workspace. Arrange the HSTs, 4-patch center, and outer star components in the correct positions.
First, sew the units in rows, starting from the top. Make sure to use a consistent 1/4-inch seam allowance throughout the assembly process. Once the rows are sewn, press the seams open or to one side. After that, sew the rows together to complete the full quilt block.
Pay close attention to the alignment of the seams, as this will help ensure that your Labyrinth Star looks crisp and balanced. Once everything is sewn together, give your block a final press, and admire the stunning design you’ve created.
Join our VIP list and receive exclusive free patterns. You’ll have daily access to the best designs, delivered straight to your device. Don’t miss this chance to get inspired and improve your projects with new and amazing patterns!
Final Thoughts and Quilt Layout Ideas
The Labyrinth Star quilt block is a versatile pattern that can be used in a variety of quilt layouts. Whether you choose to make a single block as a statement piece or create an entire quilt with multiple blocks, the intricate design will draw attention.
Consider experimenting with different color schemes to see how the block changes with each variation. You can also adjust the block size by scaling up or down the measurements provided in this tutorial. This flexibility makes the Labyrinth Star a favorite among quilters who enjoy customizing their projects.


