
The Lattice Baby Quilt – Tutorial is a wonderful project for anyone looking to create a handmade quilt filled with warmth, comfort, and creativity. Baby quilts have long been cherished as both practical items and sentimental keepsakes, and the lattice design offers a fresh and timeless look.
This tutorial is designed to guide you through the steps in a clear and accessible way so that even beginner quilters can enjoy the process and create something beautiful.
Working with the Lattice Baby Quilt – Tutorial gives you the chance to combine precision piecing with playful fabric choices. The lattice design, with its crisscrossing strips, creates a clean geometric effect that frames each fabric square beautifully.
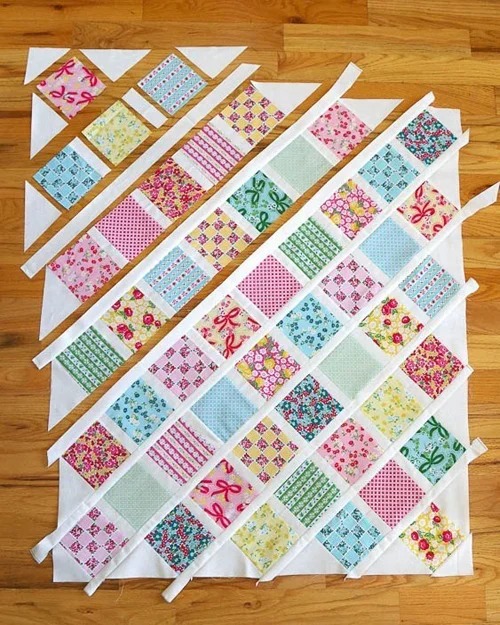
This structure is ideal for showcasing different colors, prints, and textures, making every quilt unique. Whether you use soft pastel shades, bold modern prints, or classic nursery themes, the lattice design makes them all shine.
Another reason to love the Lattice Baby Quilt – Tutorial is its versatility. While it is sized perfectly for babies and toddlers, the design can easily be scaled up to create larger quilts. It also works well as a thoughtful gift for baby showers, christenings, or birthdays.
Handmade quilts carry emotional value that store-bought items simply cannot match, and the lattice pattern gives your project a professional finish that will be admired for years.
Materials and Preparation for the Lattice Baby Quilt – Tutorial
To begin the Lattice Baby Quilt – Tutorial, you’ll first need to gather the right materials. Cotton fabric is the most popular choice because it is soft, durable, and easy to work with. Choose a combination of light and dark fabrics to create contrast and highlight the lattice effect. Pre-washed fabrics are best to prevent shrinkage later.
Batting is the next essential material. Cotton batting provides a lightweight feel, while polyester batting adds more loft. For baby quilts, many prefer thinner batting that makes the quilt easy to wrap without being too heavy. Always select high-quality batting to ensure comfort and longevity.
Backing fabric should be chosen with care since it will form the underside of the quilt. A soft flannel or brushed cotton works wonderfully for baby quilts because it feels cozy and gentle against the skin. You can match it to the quilt top or choose a complementary color.
Thread plays a surprisingly important role in quilting. Use strong cotton or polyester thread that matches or blends with your fabrics. A high-quality thread ensures that your stitches will hold up well, especially when the quilt is washed frequently.
Tools such as a rotary cutter, quilting ruler, and self-healing mat are essential for accurate cutting. Accuracy is particularly important in a lattice quilt since the strips must align properly to create a neat design. Scissors, pins, and safety clips will also make the process easier.
Lastly, prepare your sewing machine with a quilting needle suitable for multiple fabric layers. If you prefer a traditional approach, you can also complete the quilt by hand stitching, but using a machine will save time while still allowing for a handcrafted finish.
Step-by-Step Instructions for the Lattice Baby Quilt – Tutorial
The first step in making the Lattice Baby Quilt – Tutorial is cutting your fabric. You’ll need to cut squares for the quilt blocks as well as strips for the lattice. Precision matters here since uneven pieces will affect the symmetry of the design. Using a rotary cutter and ruler ensures clean, straight lines.
Once your pieces are cut, begin by sewing the lattice strips to the sides of the fabric squares. This creates the distinctive framed effect of the pattern. Sew slowly and carefully to keep your seams straight. Press each seam flat as you go for a crisp look.
After the strips are sewn, arrange the blocks into rows. This stage allows you to experiment with the layout. Play with different color placements to see what looks best before committing to the final design. Once you’re satisfied, sew the rows together, again pressing each seam.
Next, join the rows into the full quilt top. At this point, the lattice design will be clearly visible, and you’ll see how beautifully the crisscrossing lines frame each fabric square. Double-check that your seams align for a neat and professional finish.
Prepare the quilt sandwich by layering the quilt top, batting, and backing fabric. Smooth out any wrinkles and secure the layers using safety pins or clips. This step prevents shifting during quilting and keeps the layers aligned.
Finally, quilt the layers together. You can use straight-line stitching along the lattice strips to emphasize the structure or try free-motion quilting for a more decorative effect. Finish the edges with binding to complete your Lattice Baby Quilt – Tutorial project.
Creative Design Ideas for the Lattice Baby Quilt – Tutorial
One of the joys of following the Lattice Baby Quilt – Tutorial is customizing your design. Start by choosing fabrics that reflect the baby’s personality or the nursery theme. Pastel shades are classic choices, but bright modern prints or even monochrome palettes can be equally striking.
Another creative idea is to use novelty fabrics. Prints featuring animals, stars, flowers, or cartoon characters make the quilt fun and engaging for little ones. The lattice strips help separate the prints so that each design can be appreciated.
You can also personalize the quilt by adding embroidered initials or a small message in one of the blocks. This detail transforms the quilt into a keepsake that the family will treasure for years.
Experimenting with different lattice colors can create exciting effects. For example, using dark strips on light fabrics creates strong contrast, while using tonal strips produces a softer look. This flexibility allows you to adapt the quilt for different occasions.
Seasonal variations of the lattice quilt are also popular. Soft spring colors, autumnal tones, or festive holiday prints can make your quilt feel timely and unique. This ensures that the quilt not only serves a practical purpose but also reflects the season it was created in.
Finally, don’t be afraid to mix textures. Combining cotton fabrics with flannel or linen can add depth and tactile variety to your Lattice Baby Quilt – Tutorial, making it even more special.
Tips and Tricks for Success with the Lattice Baby Quilt – Tutorial
One of the best tips for working on the Lattice Baby Quilt – Tutorial is to take your time with measurements and cutting. Accurate pieces lead to a neat lattice design, and small mistakes can accumulate quickly. Always double-check before cutting.
Pressing your seams as you go is another essential practice. A well-pressed quilt not only looks more professional but also makes it easier to assemble and quilt. Ironing helps the fabric lay flat and ensures sharp, clean lines.
If you’re a beginner, consider starting with larger squares and wider lattice strips. This makes piecing easier and reduces the risk of misalignment. As you gain confidence, you can try smaller pieces for more intricate designs.
When quilting, use a walking foot attachment on your sewing machine. This tool helps feed multiple layers evenly and prevents shifting, resulting in smoother quilting lines. It’s especially useful for straight-line quilting along the lattice strips.
Keep your workspace organized. Lay out all your blocks before sewing the final quilt together. This way, you can adjust colors or patterns and avoid unbalanced sections in the design.
Lastly, remember that quilting should be enjoyable. The Lattice Baby Quilt – Tutorial is a chance to create something with love and care. Don’t stress over minor imperfections; they add character and make your quilt uniquely yours.
FAQ About the Lattice Baby Quilt – Tutorial
Q1: Is the Lattice Baby Quilt suitable for beginners?
Yes, this quilt is beginner-friendly, especially with larger squares and strips. It provides practice in cutting, piecing, and quilting without being overly complex.
Q2: How big should a baby quilt be?
A typical baby quilt measures around 36″ x 52″, but the size can vary. The lattice design can be adjusted to create quilts of different dimensions.
Q3: What type of fabric works best for this quilt?
Cotton fabrics are the best choice because they are soft, durable, and easy to work with. Flannel backing adds extra comfort for babies.
Q4: Can I hand quilt the Lattice Baby Quilt?
Absolutely. Hand quilting adds a personal touch and gives the quilt a traditional look, though it takes more time than machine quilting.
Q5: How long does it take to finish a quilt using this tutorial?
The time varies depending on experience, but most quilters can complete a baby quilt within a few days to a week of casual sewing.
Q6: Can I scale up this quilt pattern for larger projects?
Yes, the lattice design is versatile and can be easily scaled up for lap quilts, twin-sized quilts, or even larger bed covers.
Conclusion
The Lattice Baby Quilt – Tutorial offers a wonderful balance of simplicity and creativity, making it ideal for both beginners and experienced quilters. From choosing fabrics to piecing blocks and adding personal touches, every step provides opportunities to express your style and care. The lattice design is timeless, versatile, and perfect for creating heartfelt gifts.
We hope this guide has inspired you to try your own project. Please share your honest opinion about this article and leave suggestions for future quilting topics. Your feedback helps keep the quilting community creative, supportive, and full of fresh ideas.

