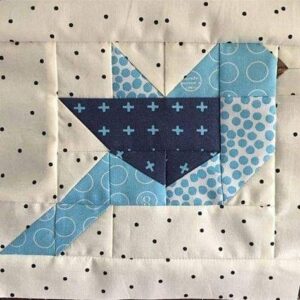
Creating a Little Slow Stitch Bird using a quilt block pattern – Step by Step Tutorial is a charming and relaxing project that combines the beauty of quilting with the art of slow stitching. This project is perfect for crafters who enjoy taking their time with hand sewing while creating something decorative and meaningful. A slow stitch bird can be used as a wall decoration, a pincushion, or even as a heartfelt handmade gift.
This tutorial is designed for both beginners and experienced quilters who want to explore a more meditative approach to stitching. By using fabric scraps and a simple quilt block pattern, you can create a unique bird design that highlights your creativity and love for traditional crafts. The slow stitching technique emphasizes mindfulness, making the process as enjoyable as the final result.
Throughout this Little Slow Stitch Bird using a quilt block pattern – Step by Step Tutorial, we will explain the materials needed, cutting instructions, assembly steps, and creative ways to customize your bird. We will also include a detailed FAQ section to answer common questions and a conclusion that encourages you to share your experiences and ideas.
Materials and Preparation
To begin the Little Slow Stitch Bird using a quilt block pattern – Step by Step Tutorial, gather a variety of fabric scraps in coordinating colors. Cotton fabrics are ideal for quilting because they are easy to cut, sew, and press. Choose prints that add personality to your bird, such as florals, polka dots, or solid colors.
You will also need basic sewing tools: fabric scissors or a rotary cutter, a cutting mat, hand sewing needles, quilting thread, and pins or clips. A fabric marker or chalk pencil will help trace the bird shape and quilt block sections.
The quilt block pattern can be as simple as half-square triangles or squares sewn together. Cut your fabric pieces according to the block size you want for your bird. For example, 2-inch squares or triangles work well for small projects.
Stuffing is essential to give your bird shape and dimension. Use polyester fiberfill or cotton stuffing. Optional materials include embroidery floss for adding details like eyes or wings and small buttons or beads for embellishment.
Before starting, print or draw a simple bird template to use as a guide for cutting the bird shape after piecing the quilt block. Having a clear template ensures uniformity and neat results.
Finally, organize your fabric pieces by color and shape to make the sewing process smooth and enjoyable. Being well-prepared is key to a relaxing slow stitching experience.
Step-by-Step Sewing Instructions
Start the Little Slow Stitch Bird using a quilt block pattern – Step by Step Tutorial by arranging your cut fabric pieces into the desired quilt block layout. Play with color placement until you are satisfied with the look.
Hand sew the pieces together using small, neat running stitches. Take your time to ensure even seams, which is essential for a well-constructed block. Press the seams flat as you go for a polished finish.
Once the quilt block is completed, place the bird template over it and trace the shape. Cut out the bird shape, leaving a ¼-inch seam allowance all around.
Cut a matching backing piece from a solid or coordinating fabric. Place both pieces right sides together and pin or clip them in place.
Hand sew around the edges using a backstitch or running stitch, leaving a small opening at the bottom for turning and stuffing. Turn the bird right side out carefully, using a pointed tool to push out corners.
Stuff the bird evenly and hand sew the opening closed using a ladder stitch. Add optional details such as embroidered eyes, wings, or decorative stitches to give your bird personality.
Creative Customization Ideas
One of the most enjoyable parts of the Little Slow Stitch Bird using a quilt block pattern – Step by Step Tutorial is personalizing your project. Try mixing fabrics with different patterns and textures to give your bird a unique look.
You can add hand embroidery details to the wings or body, using colorful threads to create patterns, flowers, or simple decorative stitches.
For a more rustic feel, use visible basting stitches in contrasting thread colors around the edges to emphasize the hand-stitched look.
If you want to hang the bird as an ornament, sew a small ribbon loop at the top before closing the seam. This makes it perfect for holiday decorations or nursery mobiles.
Consider making a small collection of birds in different sizes and colors to create a charming display. Each bird can represent a different season or mood.
You can also use beads, buttons, or small fabric appliqués to add texture and character to your bird. Customizing makes each project special and meaningful.
Uses and Gift Ideas
The Little Slow Stitch Bird using a quilt block pattern – Step by Step Tutorial results in a versatile and delightful handmade piece. It can be used as a decorative item for your home, adding a cozy, handmade touch to any space.
These birds make thoughtful gifts for friends and family. Because each one is handmade, they carry a personal touch that store-bought items lack.
You can use them as pincushions for your sewing table, combining practicality with beauty.
For baby showers or children’s rooms, create soft and colorful birds to decorate shelves or cribs.
At craft fairs, handmade slow stitch birds are unique items that showcase traditional skills and appeal to those who love artisanal products.
Making a set of birds in seasonal colors can also become a fun tradition, creating a collection to display throughout the year.
FAQ – Little Slow Stitch Bird Using a Quilt Block Pattern
1. Is this project suitable for beginners?
Yes! This tutorial is beginner-friendly, and slow stitching allows you to learn at your own pace.
2. What fabrics are best for this project?
Cotton quilting fabrics are ideal, but you can also use linen or fabric scraps you already have.
3. Can I use a sewing machine instead of hand stitching?
Yes, but the purpose of this project is to enjoy slow stitching. However, you can machine sew the quilt block if you prefer.
4. How can I adjust the size of the bird?
Simply enlarge or reduce the bird template and adjust your quilt block size accordingly.
5. What kind of stuffing works best?
Polyester fiberfill is easy to use, but cotton stuffing or fabric scraps can also work well.
6. Can I sell birds made from this tutorial?
Yes, handmade birds are great for craft fairs or as unique gifts.
Conclusion
The Little Slow Stitch Bird using a quilt block pattern – Step by Step Tutorial is a beautiful way to combine quilting and hand stitching into one relaxing project. By following the steps outlined in this guide, you can create a charming, personalized bird that can be used as décor, a gift, or a practical item.
We explored materials, sewing instructions, customization options, and creative uses for your finished bird. The FAQ section addressed common concerns to make the process easier for you.
We hope you enjoyed this tutorial! Share your thoughts in the comments, let us know how your bird turned out, and feel free to leave suggestions for future tutorials.


