Creating a Log Cabin Quilt is a rewarding and creative endeavor that quilters of all levels can enjoy.
This traditional quilt pattern is known for its versatility and timeless appeal. In this detailed tutorial, we will guide you through each step of making a Log Cabin Quilt, from selecting fabric to finishing your quilt with a perfect binding.
By following these instructions, you will master the art of quilting and create a beautiful quilt that showcases the classic Log Cabin design.

Introduction to Log Cabin Quilt Patterns
Log Cabin quilt patterns are among the most beloved and enduring designs in the quilting world. These patterns are characterized by their unique construction, where strips of fabric are pieced around a central square, creating a striking, geometric appearance. The traditional Log Cabin quilt design symbolizes home, hearth, and comfort, making it a popular choice for many quilters.
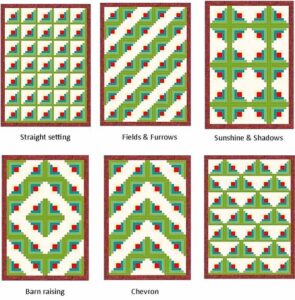
Log Cabin quilts are highly versatile, allowing for numerous variations and color schemes. By changing the arrangement of the fabric strips, you can create different effects, such as Barn Raising, Straight Furrows, and Chevron patterns. This adaptability makes the Log Cabin quilt a fantastic project for quilters who love experimenting with design.
The history of the Log Cabin quilt is rich and fascinating. Originating in the early 19th century, this pattern has been a staple in American quilting heritage. The design’s simplicity and symbolic meaning have ensured its lasting popularity, making it a cherished choice for both beginner and experienced quilters.
Choosing Fabrics for Your Log Cabin Quilt
Selecting the right fabrics is crucial to the success of your Log Cabin quilt. To achieve the traditional look, you will need a variety of light and dark fabrics. The contrast between these fabrics will highlight the geometric design and enhance the overall visual appeal of the quilt. Choose high-quality cotton fabrics for their durability and ease of use.

When selecting fabrics, consider the color palette and theme of your quilt. You might opt for a classic combination of red and white for a traditional look, or choose modern, vibrant colors for a contemporary twist. Pay attention to the fabric’s patterns as well; small-scale prints, solids, and tone-on-tone fabrics work well in Log Cabin quilts.
Before you start cutting your fabric, prewash and press each piece. This step ensures that the fabrics are clean and will not shrink after the quilt is completed. It also helps to remove any chemicals used in the fabric’s production process, making it easier to sew and handle.
Cutting the Fabric Strips
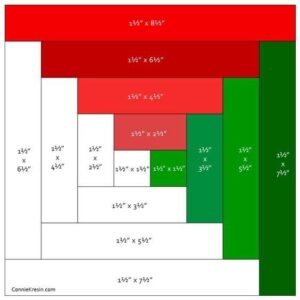
Accurate cutting is essential for a successful Log Cabin quilt. To begin, cut your central squares, which are typically 2 1/2 inches by 2 1/2 inches. These squares will form the center of each block and set the foundation for the surrounding strips.

Next, cut your fabric strips. For a standard Log Cabin block, you will need strips that are 1 1/2 inches wide. The length of each strip will vary depending on its position in the block. It’s a good idea to cut a variety of lengths ahead of time to streamline the assembly process. Keep your light and dark strips organized separately to maintain the visual contrast in your design.
To ensure precision, use a rotary cutter, cutting mat, and acrylic ruler. Measure carefully and cut slowly to avoid mistakes. Consistent strip width and length are crucial for the blocks to fit together properly and create a uniform quilt top.
Assembling the Log Cabin Blocks
Begin by sewing the central square to the first strip of fabric. Place the square and the strip right sides together, aligning one edge. Sew with a 1/4-inch seam allowance, then press the seam towards the strip. Continue adding strips in a clockwise or counterclockwise direction, alternating between light and dark fabrics.

Each new strip should be sewn to the previously assembled section of the block. Trim any excess fabric after sewing each strip to maintain a clean edge. As you add more strips, the block will grow in size. Ensure that your seams are consistently pressed to one side to keep the block flat and neat.
Repeat this process until your block reaches the desired size. Standard Log Cabin blocks are typically 12 1/2 inches by 12 1/2 inches, including seam allowances. Once all the blocks are assembled, lay them out to determine the final arrangement of your quilt top. Experiment with different layouts to find the most visually appealing design.
Sewing the Quilt Top
Once you have arranged your blocks, it’s time to sew them together to form the quilt top. Begin by sewing the blocks into rows, matching the seams carefully. Use pins to hold the blocks in place and ensure that the seams align correctly. Sew with a 1/4-inch seam allowance, removing the pins as you sew.
After sewing the rows, press the seams between the blocks open to reduce bulk. Then, sew the rows together to complete the quilt top. Again, take care to match the seams and use pins to keep everything aligned. Press the final seams open or to one side, depending on your preference.

At this stage, you can add borders to your quilt top if desired. Borders can enhance the overall design and provide a finished look. Measure the quilt top and cut border strips to the appropriate length and width. Sew the borders to the quilt top, pressing the seams towards the borders.
Preparing the Quilt Sandwich
To prepare the quilt sandwich, you will need the quilt top, batting, and backing fabric. Lay the backing fabric right side down on a large, flat surface. Smooth out any wrinkles and tape the edges to keep it taut. Place the batting on top of the backing fabric, ensuring it is centered and smooth.
Join our VIP list and receive exclusive free patterns. You’ll have daily access to the best designs, delivered straight to your device. Don’t miss this chance to get inspired and improve your projects with new and amazing patterns!
Finally, lay the quilt top right side up on the batting, aligning it carefully. Smooth out any wrinkles and ensure that all layers are flat and even. Use safety pins or basting spray to secure the layers together, starting from the center and working your way outwards.
Basting the quilt sandwich is a crucial step to prevent the layers from shifting during quilting. Take your time to ensure that the quilt sandwich is smooth and secure. Proper basting will make the quilting process much easier and help achieve a professional finish.

Quilting Your Log Cabin Quilt
Quilting is the process of stitching through all three layers of the quilt sandwich to hold them together. There are many quilting designs to choose from, including straight-line quilting, free-motion quilting, and hand quilting. Choose a design that complements your Log Cabin pattern and enhances its visual appeal.
Set up your sewing machine with a walking foot or free-motion quilting foot, depending on your chosen design. Start quilting from the center of the quilt and work your way outwards to prevent puckering. Take your time and sew slowly, ensuring that your stitches are even and consistent.
If you are new to quilting, consider practicing on a small sample quilt sandwich before working on your Log Cabin quilt. This practice will help you get comfortable with the quilting process and improve your technique. Remember, quilting is an art form, and each stitch adds to the beauty and uniqueness of your quilt.
Binding and Finishing the Quilt
The final step in completing your Log Cabin quilt is to add the binding. Binding is the fabric strip that covers the raw edges of the quilt and gives it a finished look. Cut binding strips 2 1/2 inches wide and long enough to go around the entire quilt, plus a few extra inches for joining the ends.
Join the binding strips end-to-end with diagonal seams to create one long strip. Press the seams open and fold the binding in half lengthwise, wrong sides together. Align the raw edges of the binding with the edge of the quilt top and sew with a 1/4-inch seam allowance, mitering the corners for a neat finish.
After sewing the binding to the front of the quilt, fold it over to the back and hand-stitch it in place. Use a blind stitch or whip stitch for an invisible finish. Take your time and make small, even stitches to ensure the binding is secure and looks professional.

Caring for Your Log Cabin Quilt
Proper care will ensure that your Log Cabin quilt remains beautiful and durable for years to come. Wash your quilt in cold water with a gentle detergent, and avoid using bleach or fabric softeners. Use a gentle cycle and air dry or tumble dry on low heat to prevent shrinkage.
Store your quilt in a cool, dry place away from direct sunlight. Avoid folding it along the same lines repeatedly to prevent permanent creases. If possible, store your quilt flat or rolled to maintain its shape and prevent damage to the fibers.
Regular use and washing can cause quilts to wear over time. Repair any small tears or loose seams promptly to prevent further damage. With proper care and maintenance, your Log Cabin quilt will become a cherished heirloom, providing warmth and comfort for generations.
THE BEST QUILT PATTERNS
Creating a Log Cabin quilt is a fulfilling and creative project that results in a beautiful, timeless piece of art. By following this comprehensive tutorial, you will master the steps of selecting fabrics, cutting strips, assembling blocks, and finishing your quilt with precision.

Whether you are a beginner or an experienced quilter, the Log Cabin quilt pattern offers endless possibilities for creativity and expression. Enjoy the process and take pride in your handcrafted quilt, a testament to your skill and artistry.


