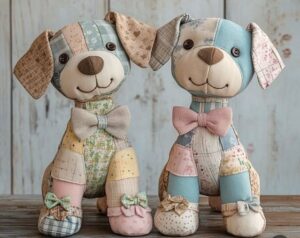
Creating your own Patchwork Dog Pattern – Free Tutorial project is a heartwarming and creative way to combine your love of sewing with classic quilt techniques. Whether you’re an experienced quilter or a crafty beginner, this soft and cuddly fabric dog is a fun way to use up leftover scraps from your favorite quilt patterns. It’s also a charming gift idea for children, pet lovers, or anyone who appreciates handmade creations.
Unlike flat quilts, this project brings your sewing to life in three dimensions, transforming your quilting skills into a stuffed animal full of personality. It blends the artistic texture of patchwork quilting with the soft, plush feel of a toy, making it both decorative and functional. Plus, the playful design allows you to personalize each dog with unique fabric choices and features.
In this detailed tutorial, you’ll learn how to create a patchwork dog from scratch using accurate measurements, smart sewing techniques, and essential quilting knowledge. You’ll also discover how to plan fabric selections, assemble the body, and add finishing touches for a polished result. So grab your fabric stash and let’s start crafting this adorable quilted patchwork dog!
Fabric Selection and Cutting Measurements
Choosing the right fabrics for your patchwork dog pattern is one of the most enjoyable parts of the process. This project is perfect for using up scraps, charm squares, or leftover fabric from past quilt patterns. You’ll want a mix of colorful prints and a few solids for contrast and definition.
Start by selecting a total of 10–12 different fabrics in coordinating colors. Cotton works best for piecing the patchwork body due to its stability. You’ll also need some felt or fleece for the ears, tail, and nose, which adds a soft texture.
Here are the cuts you’ll need for the patchwork body:
-
(24) 2.5” x 2.5” squares in assorted prints
-
(2) 4” x 6” pieces for side panels
-
(1) 6” x 4” rectangle for the bottom panel
-
(1) 6” x 6” square for the head panel
-
(1) 4” x 4” square for the top panel
For the accents and limbs:
-
(2) 5” x 3” pieces for ears (felt or fleece)
-
(2) 4” x 2” pieces for the tail
-
(4) 4” x 3” rectangles for legs (quilt cotton or fleece)
Don’t forget the inner materials:
-
Lightweight batting (optional, for structure)
-
Stuffing (polyfill or natural fiber)
-
Embroidery floss or safety eyes
Having everything pre-cut and labeled will make the sewing process much easier. Keep your pieces organized by section—body, limbs, head—so that when it’s time to sew, you won’t need to stop and search.
Piecing the Patchwork Dog Body
The main body of your patchwork dog is built just like a mini quilt—you’ll create a patchwork panel using your 2.5” squares. Arrange your squares in a 4×6 layout (4 rows of 6 blocks), balancing colors and prints for a visually pleasing effect.
Once you’re happy with the layout, sew each row using a 1/4” seam allowance. Press seams to one side, alternating directions with each row to reduce bulk and make nesting easier. Then, join the rows together to form your main patchwork panel.
Now take your side and bottom panels and stitch them to the patchwork body. The two 4” x 6” pieces will go on the sides, while the 6” x 4” rectangle becomes the bottom of the body. This forms the dog’s torso, which you will later stuff.
Use batting on the inside if you want a more structured plush. Simply place batting behind the patchwork panel before assembling the box shape. This is optional but gives your quilted dog more definition.
For the head, use the 6” x 6” square. You can embroider or appliqué the face at this point, adding eyes, a nose, and even a little smile. If using safety eyes, insert them now before the panel is sewn to the body.
Finish the body by stitching the 4” x 4” top square to close the cube. Make sure you leave a 3” opening at the back or bottom for turning and stuffing later.
Assembling Ears, Tail, and Legs
The limbs and ears give your patchwork dog its character and floppy charm. These are easy to sew and attach, using either coordinating or contrasting fabrics to match your chosen quilt patterns.
To make the ears, place two 5” x 3” fleece pieces right sides together, sew around the curved edge, and leave the straight edge open. Turn them right side out and topstitch if desired for a finished look.
For the tail, do the same with the two 4” x 2” pieces. You can make the tail straight or curve it slightly before stitching. A bit of stuffing gives it a dimensional shape, or leave it flat for a softer look.
The legs are made from four 4” x 3” rectangles. Fold each piece in half lengthwise, stitch around the sides to form a tube, turn right side out, and stuff lightly. These will later be hand-stitched to the corners of the dog’s body.
Position the ears on either side of the head and pin in place. Stitch them down by hand or machine, tucking in the raw edges. The tail is attached to the back panel, ideally at the bottom of the seam line.
Attach the legs by sewing them securely to the bottom corners of the body. Use strong stitches to ensure they hold up to play or handling.
Don’t forget to add the little details—embroidered paws, extra quilting lines on the ears, or a fabric bow. Personalization is where your creativity can truly shine!
Stuffing and Finishing the Patchwork Dog
Now it’s time to bring your patchwork dog pattern to life. Start by carefully turning the body right side out through the opening you left earlier. Smooth out the corners and seams to make the shape nice and even.
Begin stuffing with small handfuls of polyfill or cotton stuffing, pushing it into the corners first. Work your way toward the opening, adding stuffing gradually to maintain an even, huggable shape.
Once stuffed, use a ladder stitch or invisible seam to close the opening. Take your time here—a neat closing seam makes the plush look polished and professional.
If you want to quilt the body slightly more for added texture, you can do hand-quilting stitches over the patchwork panels even after stuffing. This gives your plush a beautiful handmade appearance.
Now step back and admire your finished quilted patchwork dog! It’s a fun, soft, and creative use of your quilting fabric stash, and it’s sure to bring smiles wherever it goes.
Consider making several in different sizes or fabrics—perhaps even themed dogs using quilt fabrics for holidays, seasons, or favorite color palettes.
Conclusion
This Patchwork Dog Pattern – Free Tutorial is a delightful way to explore your love for sewing, quilting, and soft toy design in one fulfilling project. Using basic quilt patterns, leftover fabric, and just a few hours of crafting time, you can create a cuddly keepsake that captures the heart.
Not only is this project beginner-friendly, but it also offers a perfect introduction to 3D quilting techniques. It’s great for kids, perfect for gifts, and even more special because it’s entirely handmade.
With step-by-step instructions, accurate fabric cuts, and ideas for personal touches, this tutorial ensures success whether you’re crafting your first plush or adding to a growing handmade collection.
Remember, part of what makes quilting magical is its versatility. The same techniques used for flat quilt blocks can become stuffed animals, décor items, or even fashion accessories when you think creatively.
So, dig into your stash, pick your favorite quilt patterns, and bring your patchwork dog to life. This handmade friend is ready to wag its tail and brighten someone’s day!


