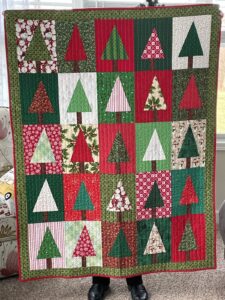
The Patchwork Forest Tree Quilt Block – Step by Step Tutorial is a wonderful project for quilters who enjoy combining traditional techniques with a nature-inspired design. This quilt block is perfect for seasonal quilts, especially for winter or holiday-themed projects, but it can also be used in year-round home décor. With its tree-shaped patchwork design, it brings a rustic and cozy feeling to any quilt.
This tutorial is ideal for both beginners and experienced quilters because it uses simple shapes and straightforward piecing methods. The block can be made in various sizes, colors, and patterns, allowing you to personalize each tree for a unique forest look. You can create a quilt entirely of these tree blocks or mix them with other blocks for a more dynamic design.
In this Patchwork Forest Tree Quilt Block – Step by Step Tutorial, we will go through the materials you need, the fabric cutting measurements, the step-by-step assembly, and tips for customizing your quilt block. By the end, you will have all the knowledge to create your own stunning quilt blocks and use them in larger quilt projects.
Materials and Fabric Preparation
To begin the Patchwork Forest Tree Quilt Block – Step by Step Tutorial, gather all necessary materials. You will need cotton quilting fabric in various colors for the tree sections and the background. Solid colors or small prints work well for the tree, while lighter tones make great background fabrics.
Essential tools include a rotary cutter, quilting ruler, self-healing cutting mat, sewing machine, thread, and iron. Accurate cutting and pressing are crucial for achieving a clean, professional-looking block.
Decide on the size of your quilt block before cutting your fabric. For a standard 12-inch finished block, you can cut the tree triangle at 6½ inches wide and 7 inches tall, with side rectangles at 3½ by 7 inches. The trunk can be cut at 2 inches wide and 3 inches tall, with background rectangles to fill the space around it.
Organize your fabric pieces by color and size. This will make the sewing process smoother and prevent mistakes. If you want a scrappy look, mix different green prints for the tree sections and brown shades for the trunk.
Pre-washing your fabrics can help prevent shrinkage or color bleeding after the quilt is finished.
Once your fabrics are cut and ready, set up your sewing machine with a ¼-inch seam allowance, which is the standard for quilt blocks.
Assembling the Tree Sections
The first step in the Patchwork Forest Tree Quilt Block – Step by Step Tutorial is assembling the tree shape. The tree consists of a large triangle for the foliage and two side rectangles to create a square block.
Place the triangle in the center and sew one background rectangle to each side using a ¼-inch seam allowance. Press seams toward the background fabric for a clean finish.
Check that your edges align properly before moving to the next step. Trimming the block as you go helps ensure accuracy.
Next, prepare the trunk section. Sew the small trunk rectangle between two background rectangles. The total width should match the width of the tree section.
Once both parts are ready, sew the trunk section to the bottom of the tree section. Press seams open or to one side as preferred.
At this stage, your block should look like a simple tree. Measure it to confirm it matches your desired size.
Adding Details and Variations
One of the best parts of the Patchwork Forest Tree Quilt Block – Step by Step Tutorial is the ability to customize each tree. You can create trees in different shades of green, add patterned fabrics, or even use holiday-themed prints.
For a forest look, make several blocks with varying heights and widths. Slight differences in size add character and a natural appearance.
If you want a snowy look, choose white or light blue fabric for the background. This will create a winter forest feel.
You can also add a decorative border to each block, using strips of fabric in complementary colors to frame the tree.
Another variation is to piece the triangle from multiple small strips, giving the tree a patchwork texture. This method is great for using fabric scraps.
The flexibility of this quilt block makes it perfect for different projects, including wall hangings, table runners, or full-sized quilts.
Final Assembly and Finishing
Once you have completed several blocks using this Patchwork Forest Tree Quilt Block – Step by Step Tutorial, you can join them together to form a larger quilt. Arrange them in rows or in a staggered forest pattern.
Sew the blocks together, taking care to match seams where necessary. Press seams after each row for a flat, neat quilt top.
After assembling the quilt top, add batting and backing fabric. Baste the layers together using safety pins or basting spray.
Quilt as desired, either by hand or machine. Simple straight-line quilting works beautifully with this design, while free-motion quilting can add extra texture.
Finally, add binding around the edges of your quilt. Choose a fabric that complements the trees and background for a polished finish.
Your patchwork forest quilt is now complete and ready to use, display, or gift.
FAQ – Patchwork Forest Tree Quilt Block
1. What is the best size for a Patchwork Forest Tree Quilt Block?
A 12-inch finished block is a common size, but you can adjust the measurements to make smaller or larger trees.
2. Can I make the tree from fabric scraps?
Yes, this block is perfect for using up scraps, especially for the tree triangle or trunk sections.
3. What fabrics work best for this quilt block?
100% cotton quilting fabrics are recommended for easy cutting, sewing, and durability.
4. Do I need a sewing machine for this block?
While it can be sewn by hand, using a sewing machine will give more precise results and save time.
5. How can I make the block look more festive?
Use holiday-themed prints, metallic fabrics, or add embellishments like embroidery or appliqué details.
6. Can beginners make this block?
Absolutely! The block uses basic shapes and straight seams, making it beginner-friendly.
Conclusion
The Patchwork Forest Tree Quilt Block – Step by Step Tutorial is a versatile and enjoyable project for quilters of all levels. It allows for endless customization, from fabric choices to block sizes, making it perfect for creating unique quilts.
In this tutorial, we covered everything from material preparation to assembling the block, adding variations, and finishing a quilt.
We hope this guide inspires you to try making your own forest quilt blocks. Share your thoughts in the comments, tell us about your experience, and feel free to leave suggestions for future tutorials!


