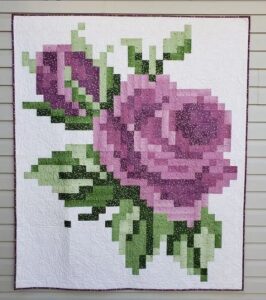
The Pixelated Rose Quilt Pattern is a breathtaking and modern approach to traditional floral quilt patterns. By using simple fabric squares to create a rose image reminiscent of pixel art, this quilt brings a unique blend of digital design and classic sewing into the world of quilting. Whether you’re new to quilting or a seasoned maker, the Pixelated Rose design is a rewarding and visually stunning project to take on.
Much like building a mosaic, the magic of this pattern lies in how individual squares of fabric come together to form an intricate floral design. It’s perfect for quilters who enjoy working with colors and patterns, and want a structured but creative project. Even though this quilt involves small pieces and careful layout, it doesn’t require advanced techniques — just patience, planning, and a love for color coordination.
In this post, we’ll walk you through the full process of making your own Pixelated Rose Quilt Pattern, including material selection, fabric cutting, layout preparation, and sewing instructions. If you’ve been looking for an eye-catching and meaningful addition to your collection of quilt patterns, this rose design might be exactly what you need to spark your next project.
Choosing Fabrics and Planning Your Pixelated Rose Quilt
When working with the Pixelated Rose Quilt Pattern, the first and most important step is selecting the right fabrics. The pixelated effect depends on clean contrasts and a good balance between shades of pinks, greens, and background tones, so fabric choice makes a big difference in the final appearance of the quilt.
Start by choosing three to five shades of pink or red for the rose itself. You’ll also need two to four shades of green for the leaves and stems. For the background, a neutral color such as white, gray, or black works best to make the rose stand out. Using solid fabrics is highly recommended because it enhances the pixelated aesthetic.
Once your colors are chosen, sketch your design on graph paper or use digital quilt software to simulate the pixel layout. Each square on the grid represents a 2.5″ x 2.5″ fabric square (2″ finished size after seams). A 60″ x 60″ quilt will require 30 rows and 30 columns — a total of 900 squares.
Next, determine how many squares you’ll need in each color. Create a fabric chart with color codes (A, B, C, etc.) to match your layout diagram. This organization step ensures that you keep track of your fabric choices throughout the process and avoid confusion during cutting and sewing.
Buy your fabric accordingly. If you’re using fat quarters or yardage, make sure to calculate how many squares each piece will yield. For example, one fat quarter (18″ x 22″) can typically yield around 56 squares of 2.5″. It’s best to purchase a bit more than you need to allow for mistakes or future matching.
Once your design and fabrics are finalized, prepare storage solutions like zip bags or containers for each color group. Staying organized from the start will make sewing much more enjoyable and efficient.
Cutting Your Fabric Squares and Organizing by Color
Accurate cutting is crucial in creating a clean and professional-looking quilt, especially with a pixel-based design like the Pixelated Rose. Small misalignments can shift the entire image, so taking your time here pays off in the long run.
Begin by pressing all your fabrics to remove creases and ensure a smooth cutting process. Use a rotary cutter, self-healing mat, and quilting ruler to cut your fabric into 2.5″ x 2.5″ squares. Keep your blade sharp to avoid fraying and uneven edges.
Sort your squares by color into clearly labeled containers. This is where your color chart comes in handy. Consider labeling each section with the corresponding code (A, B, C, etc.) and the number of squares needed to complete the layout.
If you have scraps from previous quilt patterns, they may come in handy here. The Pixelated Rose Quilt is great for scrap-busting, especially if your scraps are solid colors that match your planned palette.
To help keep track, mark your squares with removable fabric pens or post-it notes as you lay out your rows. You could also use numbered design boards, trays, or even a design wall to visualize your progress before you begin sewing.
Cut all the required squares before starting to sew. This gives you a better sense of how the colors will interact, and lets you rearrange pieces easily if something feels off. Seeing the full rose come to life in small squares is one of the most exciting parts of this quilt project.
Piecing the Pixelated Rose Quilt Top
Now that you have your fabric squares cut and sorted, it’s time to assemble the quilt top. Just like constructing a puzzle, you’ll sew your squares together row by row, then combine the rows to build your image.
Start by working with one row at a time. Lay out the squares in order according to your design chart, double-checking the sequence before sewing. Use a 1/4″ seam allowance and press each seam to one side — alternating seam directions for each row helps the pieces nest together better.
As you complete each row, lay them out on a flat surface or design wall. This helps you keep track of your progress and identify any misplaced colors early. If you catch mistakes now, they’re much easier to fix before full assembly.
Once you’ve completed a few rows, begin sewing them together. Pin at each seam intersection to ensure accuracy. Take your time aligning the squares — the cleaner the joins, the sharper the finished rose will appear.
Continue this process until the entire quilt top is assembled. Press the full top well, paying attention to all seams. A well-pressed top lies flat and is easier to quilt later on.
If desired, add borders to your pixelated rose design. A solid border frames the piece nicely and can help you reach your desired finished quilt size. Border fabric can also reflect colors used in the flower or background for a polished look.
Quilting, Binding, and Finishing the Pixelated Rose Quilt
Once the quilt top is ready, it’s time to finish the quilt with backing, batting, quilting, and binding. This step turns your fabric art into a cozy, functional piece that’s perfect for use or display.
First, cut your backing and batting at least 2″ larger than the top on all sides. For a 60″ x 60″ quilt, make your backing and batting at least 64″ x 64″. This gives you room for adjustments while quilting and prevents shifting.
Baste your quilt sandwich using pins or basting spray. Smooth out any wrinkles and check that all layers are aligned. Then, choose your quilting style — stitching in the ditch is a great option to preserve the pixelated design, or you can opt for grid quilting or free-motion florals for added flair.
Quilt slowly and carefully to maintain your design’s alignment. If needed, work in sections and rotate your quilt as you go. Once quilting is complete, trim the excess batting and backing.
Prepare your binding strips by cutting fabric into 2.5″ x WOF (width of fabric) strips. Sew them end to end, press in half lengthwise, and attach them to the quilt front using a 1/4″ seam. Fold over and hand-stitch to the back for a clean finish.
Don’t forget to label your quilt! Add a small patch with your name, the date, and even the project title. You can also add hanging sleeves if you plan to display it as wall art.
Celebrate your finished Pixelated Rose Quilt Pattern — a floral masterpiece crafted from precision, creativity, and love. It’s not just a quilt; it’s a work of art.
Final Thoughts: A Stunning Floral Quilt for Your Collection
The Pixelated Rose Quilt Pattern is a perfect project for quilters who love modern, artistic designs with a touch of tradition. It offers the best of both worlds: the structure and satisfaction of block piecing, and the beauty of floral quilt patterns that never go out of style.
Whether you’re quilting for yourself or creating a meaningful handmade gift, this pattern brings elegance and charm to any occasion. The step-by-step process is easy to follow, making it accessible to beginners and still enjoyable for experienced quilters.
Though it doesn’t involve yarn or hooks, the precise and modular nature of this quilt shares a kinship with the craft of crochet — especially with pixel-based crochet patterns like C2C designs. If you enjoy crochet as well as sewing, you’ll love how this quilt brings those grid-based principles to fabric.
As with all quilts, personalization is key. You can adjust the scale, change the color scheme, or even combine it with other floral motifs. The Pixelated Rose is endlessly adaptable, which makes it a standout in any quilt collection.
Now that you know how to make a Pixelated Rose Quilt Pattern from start to finish, it’s time to gather your materials and start cutting those squares. Let your creativity bloom one pixel at a time!


