The pumpkin patchwork quilt block – step by step tutorial is a wonderful project for quilters who love seasonal designs and want to add a cozy autumn touch to their creations. This quilt block is versatile and can be used for table runners, wall hangings, or even full quilts for the fall season. The pumpkin design is charming, simple, and beginner-friendly while still allowing experienced quilters to explore their creativity with different fabric choices.
Creating a pumpkin patchwork quilt block is not only fun but also a great way to use up fabric scraps in warm, autumn colors. With some basic tools and materials, you can make this block quickly and combine several blocks to create larger projects. The tutorial includes all the cutting measurements and step-by-step sewing instructions to help you achieve a perfect result.
Quilting is an art form that brings together creativity, precision, and patience. By following this step by step tutorial, you will learn how to piece together squares and rectangles to form a beautiful pumpkin design. This project is ideal for those who want to practice basic patchwork techniques while making something festive and practical.
Materials and Fabric Cutting
To make the pumpkin patchwork quilt block, you will need a selection of fabrics in orange, green, and background colors. Cotton fabrics are ideal for quilting because they are easy to sew, press well, and last long.
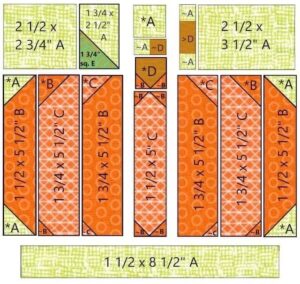
For each block, cut the following pieces:
– Four 2.5” x 2.5” orange squares
– Two 4.5” x 2.5” orange rectangles
– One 4.5” x 4.5” orange square
– Two 2.5” x 2.5” background squares (white or cream)
– Two 1.5” x 2.5” green rectangles for the stem
– Two 1.5” x 1.5” background squares
Having precise cuts is essential for the block to fit together neatly. Using a rotary cutter and quilting ruler will help ensure accuracy.
Arrange all the cut pieces on your workspace before sewing. This makes the process smoother and reduces mistakes. You can experiment with different shades of orange or even patterned fabrics to give your pumpkins a unique look.
Once all pieces are cut, press them with an iron to remove any wrinkles. This will make the sewing process much easier and give you clean seams.
Now you are ready to start assembling the block following the next steps in the tutorial.
Sewing the Pumpkin Body
Begin the pumpkin patchwork quilt block – step by step tutorial by assembling the main pumpkin body. Lay out the orange squares and rectangles according to the block layout.
Sew the four 2.5” x 2.5” orange squares together in two rows of two. Press the seams open to reduce bulk.
Next, sew the two 4.5” x 2.5” rectangles to each side of the 4.5” x 4.5” square. Press the seams open again.
Join the two square rows to the top and bottom of the rectangle section. This forms the main pumpkin body.
Press all seams carefully so that the block lies flat. Accurate pressing will ensure that the block is easy to piece with other blocks later.
Check the measurements to confirm the block is square. If necessary, trim slightly to make the edges straight.
At this point, the pumpkin shape is already visible, and you are ready to add the stem and background pieces.
Adding the Stem and Background
To create the stem of the pumpkin patchwork quilt block, take the two 1.5” x 2.5” green rectangles and the two 1.5” x 1.5” background squares.
Sew one background square to the top of each green rectangle. Press the seams open. These will form the two sides of the stem section.
Sew the two pieces together to create a single strip with a green center. This will be the pumpkin stem.
Attach this stem strip to the top of the pumpkin body. Make sure the stem is centered before sewing.
Press the seam carefully to avoid distortion. A well-pressed block will always look more professional and lie flat in the final quilt.
Now your block is complete with a stem and can be joined with background fabric pieces if you want to create a larger design or quilt top.
Finishing and Creative Tips
Once the pumpkin patchwork quilt block is finished, you can repeat the process to create several blocks for a table runner, wall hanging, or quilt.
Experiment with different fabric patterns and shades of orange for a more dynamic and realistic look. Using textured fabrics can also give your pumpkins more character.
Consider adding embroidered details such as vines or leaves for a more decorative touch. These small additions make your project stand out.
If you want to make a larger pumpkin, simply increase the size of each square and rectangle proportionally. This makes the block adaptable for different quilt sizes.
Always square up each block after finishing to ensure all pieces fit together perfectly when assembling your final project.
Making seasonal quilt blocks like this one is a fun way to celebrate holidays and decorate your home with handmade items.
FAQ – Pumpkin Patchwork Quilt Block
1. Is the pumpkin patchwork quilt block beginner-friendly?
Yes, this block uses basic squares and rectangles, making it perfect for beginners who want to practice patchwork techniques.
2. What type of fabric is best for quilting?
100% cotton fabric is the best choice because it is easy to sew, press, and lasts longer.
3. Can I make the block bigger or smaller?
Yes, you can adjust the measurements proportionally to make larger or smaller pumpkins.
4. How do I keep my blocks from warping?
Pressing seams carefully and using accurate cutting techniques will help prevent distortion.
5. What projects can I make with this block?
You can use it for table runners, placemats, wall hangings, or combine multiple blocks for a full quilt.
6. Can I add more details to the block?
Absolutely! You can embroider vines, leaves, or add appliqué details for a more decorative look.
Conclusion
The pumpkin patchwork quilt block – step by step tutorial is a delightful and simple project that brings seasonal charm to your quilting. It is perfect for beginners while still allowing experienced quilters to explore creative fabric choices and designs.
Throughout this tutorial, you learned how to cut fabrics, assemble the pumpkin body, add a stem, and finish the block neatly. You also found helpful tips and answers to common questions about this quilt block.
We hope you enjoyed this tutorial and feel inspired to create your own pumpkin quilt blocks. Share your thoughts in the comments, let us know how your project turned out, and feel free to leave suggestions for future tutorials!


