
Quilt Coin Purse Pattern is a practical and creative sewing project that combines quilting techniques with small accessory construction. A Quilt Coin Purse Pattern is ideal for using fabric scraps, practicing precision stitching, and creating handmade gifts that are both beautiful and functional.
Working with a Quilt Coin Purse Pattern also helps improve core quilting skills such as layering, pressing, accurate seam allowance, and edge finishing. Even beginners can achieve excellent results when the process is broken down into structured steps.
This complete Quilt Coin Purse Pattern guide is written in a human, easy-to-follow style while being strongly structured for SEO and clarity. You will learn materials, cutting strategy, quilting preparation, assembly methods, closure options, finishing techniques, and customization ideas.
Materials and Fabric Choices for Quilt Coin Purse Pattern
Selecting the right materials is the foundation of a successful Quilt Coin Purse Pattern. Because the purse is small and handled often, durability matters as much as appearance. Cotton quilting fabric is the most reliable choice due to its stability and ease of pressing.
A typical Quilt Coin Purse Pattern uses three fabric layers: outer fabric, batting, and lining. The batting gives body and softness, while the lining protects seams and hides construction details. Thin cotton or polyester batting works best to avoid bulk.
Scrap-friendly design is one advantage of a Quilt Coin Purse Pattern. Small leftover pieces can be combined through patchwork, strips, or mini blocks. This makes the project economical and visually unique.
Interfacing is often added for structure. In many Quilt Coin Purse Pattern variations, a lightweight fusible interfacing is applied to the outer layer to help the purse keep its shape after repeated use.
Thread selection should balance strength and subtlety. A neutral polyester thread suits most Quilt Coin Purse Pattern projects and resists wear from frequent opening and closing.
Closures must be chosen early. A Quilt Coin Purse Pattern can use a zipper, snap, metal frame, or button loop, and each option slightly changes the cutting and assembly steps.
Cutting and Preparation in Quilt Coin Purse Pattern
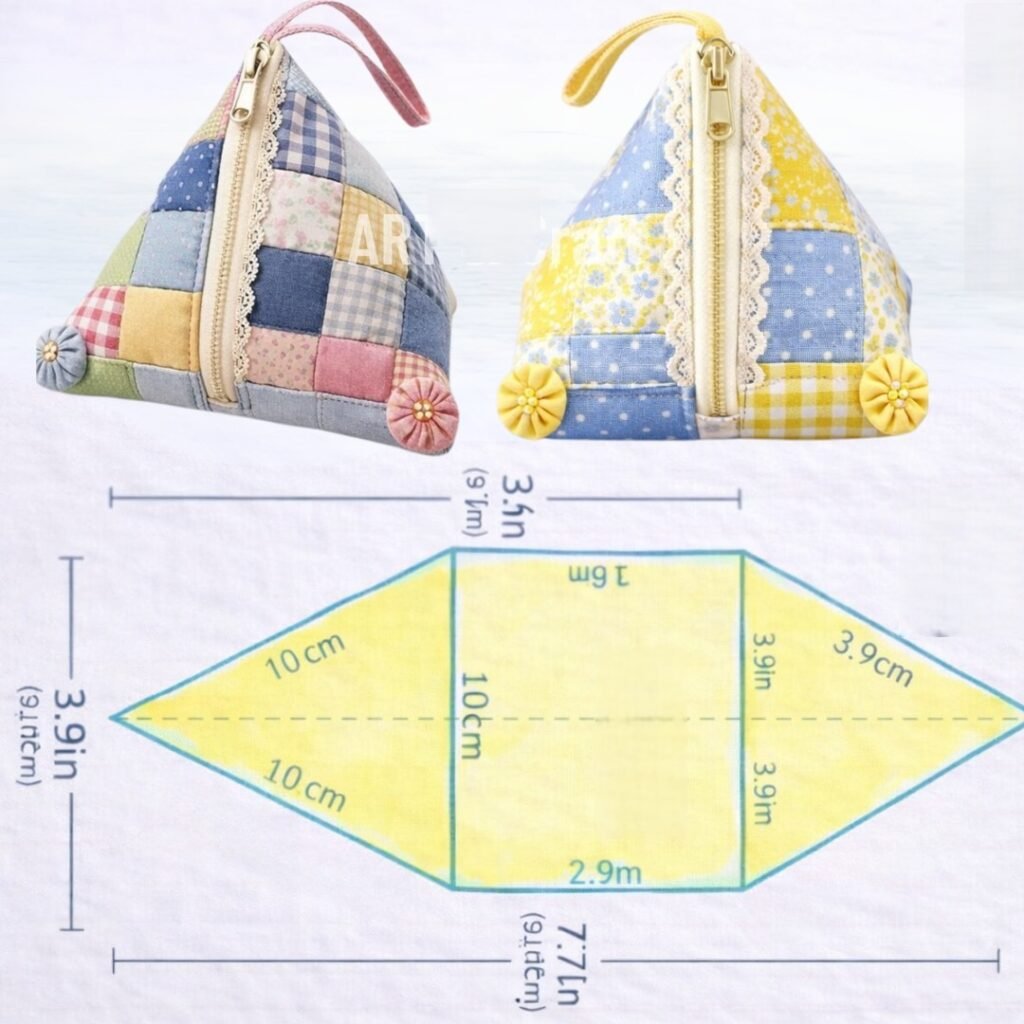
Accurate cutting is critical in any Quilt Coin Purse Pattern because small size magnifies small errors. Use a rotary cutter and ruler for straight edges and consistent dimensions across layers.
Cut outer fabric, batting, and lining separately. A structured Quilt Coin Purse Pattern keeps each layer clearly labeled to prevent mix-ups during stacking and quilting.
If you are piecing the outer panel, complete patchwork first. Many makers build a decorative panel before continuing the Quilt Coin Purse Pattern construction process.
Add seam allowance during cutting. Every Quilt Coin Purse Pattern measurement should include seam margins so the finished purse reaches the intended size.
Mark placement lines for closures early. In a zipper-style Quilt Coin Purse Pattern, center marks help align the zipper evenly and prevent twisting.
Test layout before stitching. Dry fitting pieces in your Quilt Coin Purse Pattern workflow reduces mistakes and saves time later.
Quilting the Fabric Sandwich for Quilt Coin Purse Pattern
Quilting gives texture and stability to a Quilt Coin Purse Pattern. Create a fabric sandwich with outer fabric on top, batting in the middle, and backing or temporary support underneath.
Basting prevents shifting. Pins or light spray basting help hold layers together in your Quilt Coin Purse Pattern before quilting stitches begin.
Simple quilting lines work well. Straight lines, grids, or gentle diagonals enhance a Quilt Coin Purse Pattern without adding stiffness or distortion.
Stitch length should be slightly longer than piecing stitches. This adjustment in a Quilt Coin Purse Pattern improves appearance and reduces fabric drag.
Quilt from the center outward. Balanced stitching order keeps the Quilt Coin Purse Pattern panel flat and avoids puckers.
Trim the quilted panel after stitching. Squaring the piece is an essential accuracy step in a Quilt Coin Purse Pattern before assembly.
Assembly Steps in Quilt Coin Purse Pattern
Assembly transforms flat panels into a functional Quilt Coin Purse Pattern project. Start by attaching the chosen closure method, since it usually connects to the top edge first.
For zipper versions of a Quilt Coin Purse Pattern, sew the zipper to the outer panel and lining separately, then join. Careful alignment ensures smooth opening and closing.
Place outer pieces right sides together. A classic Quilt Coin Purse Pattern assembly step is stitching around the perimeter while leaving a small turning gap in the lining.
Clip corners before turning. This finishing technique improves edge sharpness in your Quilt Coin Purse Pattern and reduces bulk inside corners.
Turn the purse through the lining gap. Gentle turning preserves seam integrity in a Quilt Coin Purse Pattern and keeps quilting stitches intact.
Close the lining opening with a neat stitch. Final closure completes the structural phase of the Quilt Coin Purse Pattern.
Closure Options in Quilt Coin Purse Pattern
Zippers are the most popular closure for a Quilt Coin Purse Pattern. They provide security and a clean finish suitable for daily use.
Metal frame closures create a vintage style. A framed Quilt Coin Purse Pattern has a structured mouth and often requires glue or hand stitching into the frame.
Snap buttons are simple and beginner friendly. Some Quilt Coin Purse Pattern designs use magnetic snaps hidden between layers.
Button and loop closures add charm. This Quilt Coin Purse Pattern variation works especially well for rustic or decorative purses.
Hook-and-loop tape is quick but bulkier. It can be used in a Quilt Coin Purse Pattern meant for children or quick-access storage.
Choose closure based on purpose. The best Quilt Coin Purse Pattern closure balances ease, durability, and style.
Customization Ideas for Quilt Coin Purse Pattern
Color blocking adds modern style to a Quilt Coin Purse Pattern. Bold contrast panels make the small surface visually striking.
Mini quilt blocks can be featured. A star, log cabin, or patch grid turns a Quilt Coin Purse Pattern into a showcase piece.
Decorative stitching enhances texture. Free-motion details elevate a Quilt Coin Purse Pattern beyond basic utility.
Appliqué motifs personalize the purse. Names, shapes, or seasonal icons can be added to a Quilt Coin Purse Pattern outer panel.
Edge binding gives a framed look. Some makers finish a Quilt Coin Purse Pattern with visible binding instead of turned seams.
Add tabs or wrist loops. Functional add-ons increase usability in a Quilt Coin Purse Pattern for travel or markets.
FAQ About Quilt Coin Purse Pattern
Is a Quilt Coin Purse Pattern beginner friendly
Yes, most versions are small and straightforward, making them great for beginners.
What batting is best for Quilt Coin Purse Pattern
Thin cotton or low-loft polyester batting works best to reduce bulk.
How long does a Quilt Coin Purse Pattern take to sew
Usually one to two hours depending on quilting detail and closure type.
Can I make Quilt Coin Purse Pattern from scraps
Yes, it is one of the best scrap-using quilting projects.
Do I need a zipper for Quilt Coin Purse Pattern
No, you can use snaps, frames, or buttons as alternatives.
Why is my Quilt Coin Purse Pattern bulky at the corners
Corners likely were not clipped or graded before turning.
Conclusion
This Quilt Coin Purse Pattern guide walked you through fabric selection, cutting accuracy, quilting preparation, assembly order, closure choices, and creative customization. You learned how layered construction, careful pressing, and structured steps turn small fabric pieces into a durable and attractive quilted purse. The project is compact but teaches valuable quilting and sewing fundamentals that transfer to larger makes.

