
Rectangular Necessary with Precise Technical Layout is a practical and elegant sewing project that combines organization, precision, and creativity. A well-designed rectangular necessary bag, often used as a toiletry pouch or cosmetic organizer, is one of the most useful accessories you can make with sewing skills. The beauty of this project lies in its clean geometry and the efficiency of a precise technical layout, which ensures every seam, corner, and measurement works together perfectly.
When following a Rectangular Necessary with Precise Technical Layout, the goal is not only to create a beautiful pouch but also to maintain professional construction standards. Careful measurements, structured fabric layers, and well-aligned seams allow the finished piece to hold its shape and function effectively. This method helps both beginners and experienced sewists achieve a polished result.
This complete Rectangular Necessary with Precise Technical Layout guide will walk you through the essential materials, preparation techniques, sewing structure, and finishing methods needed to produce a durable and stylish rectangular pouch. By understanding each technical step, you will gain confidence in sewing structured accessories while improving your overall craftsmanship.
Materials and Preparation for a Rectangular Necessary
Before beginning the Rectangular Necessary with Precise Technical Layout, gathering the correct materials is essential. Choosing quality fabrics and reliable tools will significantly influence the durability and appearance of your finished pouch. Cotton canvas, quilting cotton, or lightweight upholstery fabric are excellent choices for the exterior because they provide structure without being difficult to sew.
For the lining, a softer cotton fabric works well. The lining helps protect the contents of the pouch while giving the interior a clean, professional look. Some sewists also prefer waterproof or coated lining fabric when creating a rectangular necessary pouch designed for toiletries or cosmetics.
Interfacing is another important element in a precise technical layout. Fusible interfacing adds stability and helps the pouch maintain its rectangular shape. Medium-weight interfacing is usually ideal because it balances firmness and flexibility.
You will also need a zipper that matches the width of the pouch opening. A standard nylon zipper is easy to sew and durable enough for daily use. Select a zipper color that complements your fabric design to enhance the visual harmony of the project.
Basic sewing tools are also required. Prepare fabric scissors, pins or sewing clips, a sewing machine, matching thread, measuring ruler, and tailor’s chalk or fabric marker. Accurate marking tools are particularly important because this Rectangular Necessary with Precise Technical Layout depends on precise measurements.
Finally, prewash and press all fabrics before cutting. This prevents shrinkage later and ensures the pieces lie flat when assembled. Proper preparation is a key step in achieving professional results with this sewing tutorial.
Creating the Precise Technical Layout
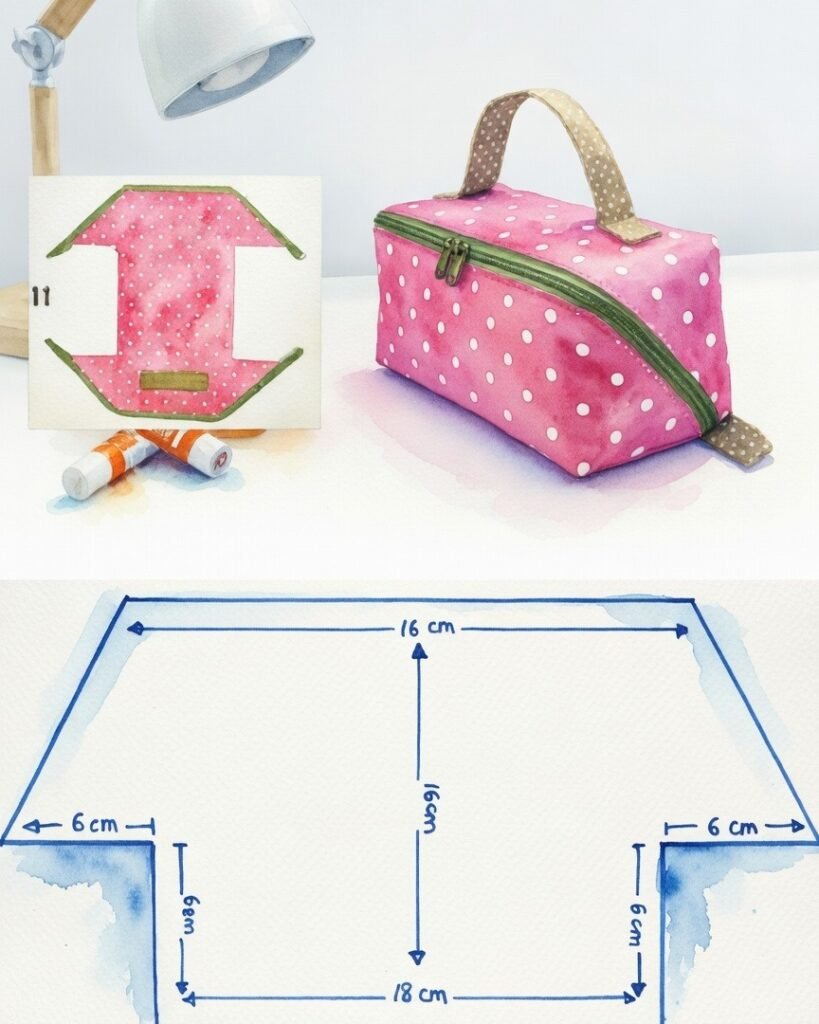
The defining feature of a Rectangular Necessary with Precise Technical Layout is accurate pattern planning. Start by deciding the final dimensions of the pouch. A common size is approximately 10 inches wide, 5 inches high, and 3 inches deep, but these measurements can be adjusted according to your needs.
Once the final size is determined, calculate the pattern pieces. Typically, you will cut two exterior panels, two lining panels, and two interfacing pieces. The width should match the zipper length, while the height includes seam allowances.
For depth, box corners are commonly used. To create these corners, small squares are cut or sewn into the bottom edges of the pouch. This technique allows the flat fabric panels to expand into a structured rectangular base.
Mark all sewing lines carefully using a ruler and fabric marker. Precision in marking is what makes this precise technical layout successful. Even small inaccuracies can affect the symmetry of the finished pouch.
Attach interfacing to the wrong side of the outer fabric pieces using heat from an iron. Press firmly and allow the fabric to cool so the adhesive bonds correctly. This step strengthens the exterior and prepares it for assembly.
Carefully align all pattern pieces before sewing. Consistency in cutting and marking ensures that the zipper placement, seams, and corners align correctly. Attention to these technical details distinguishes a professional rectangular necessary pouch from a simple handmade bag.
Sewing the Rectangular Necessary Step by Step
Begin the sewing process by attaching the zipper to the top edge of one outer fabric piece and one lining piece. Place the zipper between the layers with right sides facing and stitch along the zipper tape. Using a zipper foot on your sewing machine will help you sew close to the zipper teeth.
Repeat this process for the opposite side of the zipper with the remaining outer and lining pieces. Once completed, the zipper will connect the two sides of the pouch while the lining and exterior remain separated.
Press the seams gently away from the zipper. Topstitching along the zipper edge improves durability and keeps the fabric from catching when the pouch is opened or closed. This step also contributes to the clean appearance expected from a Rectangular Necessary with Precise Technical Layout.
Next, open the zipper halfway before sewing the side seams. This allows you to turn the pouch right side out later. Align the exterior pieces together and the lining pieces together, then sew around the edges while leaving a small opening in the lining.
To create the box corners, pinch each bottom corner so the side seam aligns with the bottom seam. Measure the desired depth and sew across the corner to form a flat base. Trim excess fabric if needed.
After sewing the corners, turn the pouch through the lining opening. Push out the corners carefully and press the pouch with an iron. Finally, close the lining opening with a neat seam. Your Rectangular Necessary with Precise Technical Layout is now fully assembled.
Finishing Techniques and Professional Tips
A beautifully finished Rectangular Necessary with Precise Technical Layout often depends on small details that elevate the overall look. One important finishing technique is careful pressing. Pressing each seam as you sew helps maintain crisp edges and accurate alignment.
Consider adding decorative topstitching along the edges of the pouch. This not only reinforces the seams but also creates a visually appealing outline that enhances the rectangular structure.
Label tags are another optional detail. A small handmade label sewn into the side seam adds a professional touch and makes the pouch feel more personalized, especially if you plan to give it as a gift.
You can also experiment with exterior pockets. Adding a small patch pocket or slip pocket increases the pouch’s functionality and allows users to organize smaller items more efficiently.
For additional structure, some sewists insert foam interfacing or quilt the exterior fabric before assembling the pouch. Quilting can add texture while improving durability and softness.
Lastly, always test the zipper after finishing the pouch. Smooth zipper movement is essential for daily use. Taking a moment to ensure everything operates correctly guarantees that your rectangular necessary pouch will remain practical and long-lasting.
FAQ About Rectangular Necessary with Precise Technical Layout
What is a rectangular necessary pouch used for?
A rectangular necessary pouch is commonly used to store cosmetics, toiletries, sewing tools, or small accessories in an organized way.
Why is a precise technical layout important in sewing this pouch?
A precise technical layout ensures correct alignment, balanced proportions, and professional construction, resulting in a more durable and visually appealing pouch.
Can beginners sew a rectangular necessary pouch?
Yes, beginners can successfully complete this project by carefully following measurements and sewing steps. It is an excellent project for improving accuracy and zipper sewing skills.
What type of zipper works best for this project?
Standard nylon coil zippers are ideal because they are flexible, durable, and easy to sew with most sewing machines.
How can I make the pouch more structured?
Using fusible interfacing, foam stabilizer, or quilting the outer fabric helps create a stronger and more structured rectangular shape.
Can I customize the size of the pouch?
Yes, the dimensions can be easily adjusted. Simply modify the width, height, and box corner measurements according to your desired size.
Conclusion
In this detailed Rectangular Necessary with Precise Technical Layout tutorial, you learned how to select appropriate materials, prepare fabrics, plan accurate measurements, sew structured seams, and apply professional finishing techniques. The combination of careful planning and precise sewing creates a functional pouch that is both stylish and durable.
By following a precise technical layout, you ensure that every part of the pouch fits together correctly, resulting in clean lines, balanced proportions, and reliable structure. This approach not only improves the quality of your sewing projects but also helps you develop stronger technical skills.

