Creating a quilt inspired by a rooster can be a beautiful way to bring rustic charm and bold colors into your home decor.
This Rooster Quilt – Free Pattern tutorial will guide you through the steps of making this unique quilt from fabric selection to the final stitch.
Whether you’re a seasoned quilter or new to the craft, this step-by-step guide will help you create a striking rooster quilt that you can proudly display.
Materials and Fabric Selection
Choosing the right materials is essential for creating a stunning rooster quilt. You will need the following:
- Fabric for the background, rooster, and borders
- Batting
- Backing fabric
- Thread in coordinating colors
- Cutting tools: rotary cutter, ruler, and mat
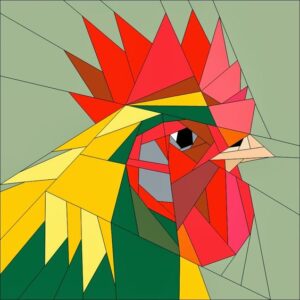
When selecting fabric, think about the vibrant colors typically associated with roosters. Bold reds, bright oranges, deep blues, and earthy browns can make your rooster pop against a contrasting background. Opt for high-quality cotton fabric as it’s durable and easy to work with. Don’t be afraid to mix and match patterns like florals or geometrics, which will give your quilt extra dimension.
The backing and binding fabrics can be solid or printed, depending on your preference. For beginners, working with solid colors might be easier, but experienced quilters can experiment with more complex designs. Make sure to prewash your fabrics to avoid shrinking later on.
Cutting the Fabric Pieces
Now that you’ve chosen your fabrics, it’s time to start cutting. Here are the fabric cuts you’ll need for a standard-sized rooster quilt:
- Background fabric: 40 squares, each measuring 6.5″ x 6.5″
- Rooster pieces:
- Body: 10.5″ x 8″
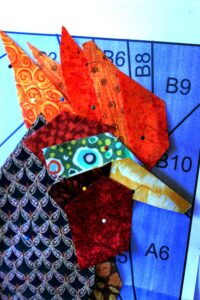
- Comb: 3.5″ x 2″
- Beak: 1.5″ x 2″
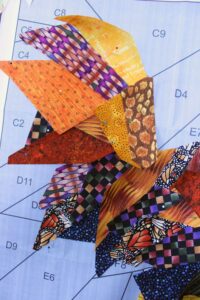
- Feathers: Assorted pieces in varying sizes between 2″ x 3″ to 3″ x 6″
- Border fabric: Four strips measuring 4.5″ x the length of your quilt
- Binding fabric: 2.5″ strips totaling the perimeter of your quilt
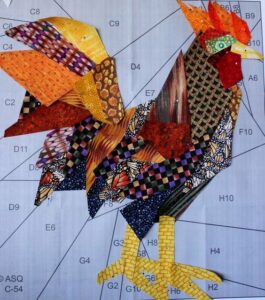
Start by cutting the background squares and setting them aside. For the rooster, cut each piece from your selected fabrics and arrange them in a pattern that highlights the rooster’s feathers and distinct features. Using sharp rotary cutters will ensure clean cuts, and rulers will help you achieve precision.
The borders can be cut once you’ve assembled the center of your quilt. The binding fabric should be cut into strips wide enough to cover the edges neatly. The accuracy of your cutting will directly impact the ease of sewing later on, so take your time with this step.
Assembling the Rooster Design
With all your pieces cut, it’s time to assemble the rooster. Start by laying out the background squares in a grid. This will act as the canvas for your rooster. Once you’re happy with the layout, begin to arrange the rooster’s body and feathers on top of the background squares.
To ensure proper placement, pin the rooster pieces to the background fabric before sewing. Begin by sewing the smaller pieces like the comb and beak, followed by the larger pieces like the body and feathers. If you’re using appliqué, stitch around each piece with a zigzag stitch to secure it in place. For those who prefer traditional piecing, sew the rooster pieces together before attaching them to the background.
Keep checking your pattern to ensure the rooster’s proportions and positioning are accurate. Once everything is attached, step back and admire your work before moving to the next step.
Sewing the Quilt Top
Now that your rooster is in place, it’s time to sew the quilt top. Begin by sewing the background squares together in rows. Use a quarter-inch seam allowance for clean edges. Once the rows are complete, sew them together to create the full quilt top.
After assembling the main quilt top, it’s time to attach the borders. Sew the border strips to the edges of your quilt top, making sure the corners align properly. Iron the seams as you go along to create a crisp, professional finish. This will also help the quilt lie flat as you continue to work on it.
Once the quilt top is assembled, you’ll need to prepare the quilt sandwich, which consists of the quilt top, batting, and backing. Smooth out each layer and pin them together to prevent shifting during quilting. This process ensures the quilt is evenly layered and easy to quilt.
Quilting the Rooster Quilt
Quilting is where you can get creative with textures and patterns. You can opt for straight-line quilting, echoing the lines of your rooster, or go for free-motion quilting to add a more intricate design.
Start quilting from the center of the quilt and work your way outward to avoid puckering. Use thread colors that complement the rooster and background fabrics. For example, if your rooster is predominantly red, you might choose a deep red or orange thread for quilting over the rooster. Use neutral tones like white or gray for the background sections.
If you are quilting by hand, use small, even stitches to enhance the quilt’s durability. Machine quilting is faster but requires a steady hand to guide the fabric under the needle. Take your time with this step, as it is key to ensuring that your quilt looks polished and professional.
Adding the Binding
Once you’ve finished quilting, the next step is adding the binding. The binding fabric strips should be folded in half lengthwise and pressed with an iron. Start attaching the binding to the front of the quilt, sewing along the edge with a quarter-inch seam allowance.
When you reach the corners, fold the binding at a 45-degree angle to create neat mitered corners. Continue sewing until you’ve attached the binding to all sides of the quilt. Once attached, fold the binding over to the back of the quilt and hand-stitch it in place using a blind stitch for a clean finish.
This step may take some time, but it’s worth the effort. A well-executed binding not only enhances the look of your quilt but also protects the edges from wear and tear over time.
Finishing Touches
With the binding in place, your rooster quilt is nearly complete! Take a moment to inspect your quilt for any loose threads or areas that might need extra stitching. Give the quilt a final press to smooth out any wrinkles, and you’re done.
This quilt makes a wonderful addition to your home or a thoughtful gift for a loved one. Its vibrant colors and charming rooster design will bring a touch of the countryside to any room. You can even experiment with different color schemes to match the decor of your home.
Celebrate your achievement by displaying your quilt in a prominent place. Quilts are both functional and decorative, and this rooster quilt is sure to draw compliments from everyone who sees it.
Creating a Rooster Quilt using a free pattern is a fulfilling project that combines creativity with craftsmanship. By following this step-by-step guide, you’ll be able to craft a stunning quilt that showcases the bold colors and unique shape of a rooster. From fabric selection to the final binding, this quilt is perfect for quilters of all skill levels. So, gather your materials, follow the steps, and soon you’ll have a quilt that you’ll treasure for years to come.
Don’t forget to experiment with different quilting patterns and fabrics as you create your own version of this classic design!


