The Sawtooth Star Quilt Block Pattern is a classic in the world of quilting. Known for its clean lines and symmetrical beauty, this star block is a staple in both traditional and modern quilt patterns. Whether you’re creating a large bedspread or a small wall hanging, the sawtooth star adds elegance and visual interest to your quilt.
This pattern dates back to the 1800s and remains popular today due to its versatility and timeless appeal. It’s a great way to explore your creativity while sticking to a structured design. Plus, it’s a wonderful project for beginner and intermediate quilters alike. With just a few precise fabric cuts and some careful stitching, you can create a standout quilt block that fits into countless larger quilt designs.
In this article, we’ll guide you through a step-by-step process to make your own Sawtooth Star Quilt Block Pattern. From choosing fabric to assembling the final block, every stage will be covered in detail. We’ll also include exact measurements for fabric cutting and tips to ensure your project is a success. Let’s dive into this essential piece of quilt history and bring your next project to life.
Fabric Selection and Preparation
Choosing the right fabric and prepping it properly lays the foundation for a beautiful quilt block. The right colors, textures, and quality materials make all the difference.
- Main Fabric Choices: You’ll need three types of fabric: one for the star points, one for the center square, and one for the background. High-quality quilting cotton is recommended.
- Color Coordination: Pick a contrasting fabric for the star points so they stand out. The center square can be a print or solid, and the background fabric should complement both.
- Fabric Measurements:
- Center Square: (1) 4.5″ x 4.5″
- Star Points: (4) 2.5″ x 2.5″ squares (print), (4) 2.5″ x 4.5″ rectangles (background)
- Corner Squares: (4) 2.5″ x 2.5″ (background)
- Pre-washing and Pressing: Pre-wash your fabrics to prevent shrinking and press them flat to ensure accuracy when cutting and sewing.
- Cutting Tools: Use a rotary cutter, self-healing mat, and quilting ruler for precision. Accurate cutting ensures your quilt blocks fit together perfectly.
- Labeling Your Cuts: Keep fabric pieces organized by labeling them to avoid confusion during assembly.
Piecing the Flying Geese Units
The sawtooth star’s iconic points are made with flying geese units. Getting these right is key to a successful Sawtooth Star Quilt Block Pattern.
- Flying Geese Basics: Each flying geese unit is composed of one rectangle and two squares. These form the star’s point triangles.
- Making One Unit: Place a small square on one end of the rectangle, right sides together. Draw a diagonal line on the square and sew along it. Trim and press.
- Repeat on Other Side: Add the second square to the opposite end of the rectangle, again using the stitch-and-flip method. Press well.
- Trimming: Trim each unit to measure 2.5″ x 4.5″. Accuracy here ensures your star will have sharp, clean points.
- Make Four Units: You’ll need four flying geese units for one sawtooth star block.
- Pressing Matters: Press seams toward the triangle to reduce bulk and give a crisp finish.
Assembling the Sawtooth Star Block
Once your flying geese units are ready, it’s time to bring the Sawtooth Star Quilt Block Pattern together.
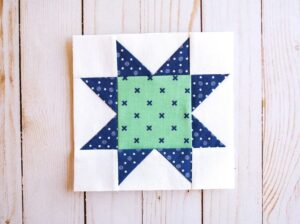
- Lay Out the Block: Arrange your center square in the middle, flying geese units on each side, and background squares in the corners.
- Sew the Rows: Begin by sewing the top, middle, and bottom rows. Each row should have three pieces.
- Joining Rows: Sew the rows together, aligning the seams carefully to maintain the star’s symmetry.
- Final Measurements: Your finished block should measure 8.5″ x 8.5″ (before seam allowances).
- Press the Block: Press the seams flat. A well-pressed block is easier to join into a full quilt.
- Double-Check Alignment: Make sure all points match and the block lies flat without puckering.
Variations and Tips for Quilt Projects
The Sawtooth Star Quilt Block Pattern is highly adaptable. Try different arrangements and fabric styles to make it your own.
- Size Variations: You can scale the block up or down by adjusting the initial cuts. Just keep the proportions consistent.
- Scrappy Star: Use scraps for the star points for a colorful, scrappy look that adds character to your quilt.
- Sashing and Borders: Add sashing strips between blocks or frame your star with borders to give your quilt pattern more structure.
- Creative Centers: Replace the center square with a fussy-cut image or embroidered piece to make each block unique.
- Color Play: Experiment with gradients or monochromatic schemes to add depth and dimension to your project.
- Full Quilt Layouts: Combine multiple sawtooth stars in rows, alternate them with plain blocks, or create diagonal layouts for more visual impact.
- PATTERN HERE
Creating a Sawtooth Star Quilt Block Pattern is a fulfilling way to practice your quilting skills and produce a visually striking block. Whether you include it in a large quilt or use it as a stand-alone feature, this pattern is a versatile and timeless option. With careful attention to detail and thoughtful fabric choices, your sawtooth star is sure to shine!


