If you’re looking for a fun and creative way to use up fabric scraps, the Scrap Bag Star quilt is an ideal project.
This pattern is not only visually appealing but also a great opportunity to experiment with different fabric combinations.
In this guide, we’ll take you step by step through the process of making a Scrap Bag Star quilt, including fabric cuts and measurements.
Materials and Preparation
Before starting your Scrap Bag Star quilt, gather all the essential materials. Using fabric scraps adds a unique touch to this quilt pattern, but if you don’t have enough scraps, feel free to incorporate fresh cuts from your fabric stash.
- Fabric Scraps: You’ll need a variety of fabric scraps in different colors and patterns to create the stars.
- Background Fabric: Choose a solid or neutral fabric for the background of your stars. You’ll need approximately 1½ yards.
- Batting: A 45” x 60” piece of batting for a throw-sized quilt.
- Backing Fabric: 1½ yards of fabric for the backing.
- Thread: Choose thread that complements your fabric choices.
- Basic Sewing Supplies: Scissors, rotary cutter, cutting mat, ruler, pins, and a sewing machine.
Before you start cutting, make sure to press your fabric scraps to ensure they lay flat. This step is particularly important when working with small pieces, as it helps achieve accurate cuts and reduces the chance of warping.
Cutting Your Fabric
The key to a successful Scrap Bag Star quilt lies in precise cutting. Since we’re working with a star design, we’ll focus on squares and triangles to form the star shapes.
- Star Fabrics: For each star, you’ll need five 5″ squares from your fabric scraps. Cut four of these squares into half-square triangles. You’ll have one remaining square for the center of the star.
- Background Fabric: Cut the background fabric into the following pieces:
- Four 5″ squares (to pair with the star’s triangles).
- Four 4½” x 8½” rectangles (for the outer edges).
- Border Fabric (optional): If you want to add a border around your quilt, cut strips measuring 2½” wide by the length of the quilt’s perimeter.
Having all your pieces cut in advance will save time during the piecing process. Organize your pieces by star for easy assembly.
Piecing the Scrap Bag Star
With your fabric cuts prepared, it’s time to piece together the stars. This is where your quilt starts to take shape. You’ll be creating a series of half-square triangles (HSTs) and assembling them into stars.
- Half-Square Triangles (HSTs): To form the HSTs, pair one star triangle with one background triangle. Place them right sides together and sew along the diagonal. Trim the excess and press the seams open. Repeat this for all four star points.
- Star Assembly: Lay out your pieces for one star block. Place the center square in the middle, and arrange the HSTs around it to form the star points. Add the four background squares to the outer corners. Sew the pieces together row by row, pressing seams as you go.
- Repeat for Each Star: Make as many star blocks as desired for your quilt, depending on the size you’re aiming for. A standard throw size quilt would typically need 12 to 16 blocks.
The beauty of the Scrap Bag Star quilt is in its diversity. Each star can be completely unique, making this quilt pattern a great opportunity to showcase different fabrics.

Assembling the Quilt Top
Once your stars are completed, it’s time to assemble the quilt top. This step involves joining the star blocks and arranging them in a layout that pleases you.
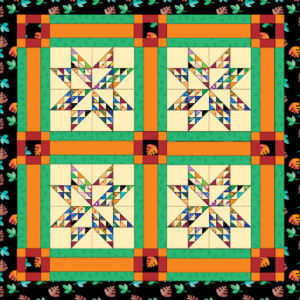
- Block Layout: Arrange your star blocks in rows and columns on a design wall or floor. Experiment with different layouts until you find one that you love. The stars can be aligned symmetrically, or you can stagger them for a more dynamic look.
- Sewing the Rows: Once you’re happy with the layout, sew the blocks together in rows. Take care to match the seams between each block, as this will ensure your stars align perfectly.
- Adding Borders: If you’ve chosen to add a border, now is the time to sew the border strips to the edges of your quilt top. This will frame the quilt nicely and add a finished look.
After assembling your quilt top, give it a final press to ensure everything lies flat and smooth before moving on to the quilting process.
Quilting and Finishing
The quilting stage is where you get to bring your quilt to life. Whether you opt for simple straight-line quilting or more intricate free-motion quilting, this step will enhance the overall design of your Scrap Bag Star quilt.
- Layering the Quilt: Create a quilt sandwich by layering your quilt top, batting, and backing fabric. Smooth out each layer and secure with basting pins or spray adhesive to prevent shifting during quilting.
- Quilting Design: Decide on your quilting design. A simple crosshatch pattern works well with the geometric shapes of the stars. You can quilt in the ditch along the seams, or experiment with custom designs within the star shapes for added texture.
- Binding the Quilt: After quilting, trim any excess batting and backing fabric. Bind the edges of the quilt using 2½” wide strips of fabric. Sew the binding to the front of the quilt, then fold it over to the back and secure it with hand stitching or machine stitching.
This final step completes your quilt, transforming it from fabric scraps into a beautiful and functional quilt.
Tips for Success
Making a Scrap Bag Star quilt is a rewarding project, but there are a few tips that can help ensure success, especially when working with scrap fabrics.
- Color Coordination: When working with fabric scraps, it’s important to consider color coordination. While the stars are meant to be playful and varied, choosing fabrics that complement each other will result in a more cohesive look. Consider a color scheme, such as cool tones or warm tones, to guide your fabric selection.
- Precision Matters: Accurate cutting and sewing are key to achieving sharp points in your stars. Take your time to measure carefully, and press your seams as you go to keep everything neat and tidy.
- Customizing Your Quilt Size: The size of your quilt can be easily customized by adjusting the number of star blocks. If you want a larger quilt, simply make more blocks. For a smaller project, like a baby quilt, fewer blocks will do the trick.
By following these tips, you’ll create a stunning Scrap Bag Star quilt that showcases your creativity and quilting skills.
The Scrap Bag Star quilt is a fantastic project for quilters of all skill levels. Whether you’re a beginner looking to practice piecing or an experienced quilter eager to use up fabric scraps, this pattern offers plenty of room for creativity. With clear steps and precise measurements, you’ll be able to craft a beautiful quilt that is as unique as the fabric scraps you choose.
So grab your scraps, start cutting, and enjoy the process of making a Scrap Bag Star quilt. Each star you create will be a reflection of your personal style and a testament to your quilting prowess.


