The Scrappy Bear Paw Block Pattern is a cherished design in the world of quilting, blending traditional aesthetics with modern versatility. This pattern is particularly appealing to quilters who enjoy utilizing fabric scraps, making it both economical and environmentally friendly. Its distinctive “paw” motif adds a dynamic visual element to any quilt, making it a favorite among both novice and experienced quilters.
Incorporating the Scrappy Bear Paw Block Pattern into your quilting projects allows for endless creativity. By selecting various fabric scraps, you can craft a quilt that tells a unique story, with each piece representing a different memory or theme. This approach not only personalizes your quilt but also showcases the beauty of diverse fabric combinations.
This guide provides a step-by-step tutorial on creating the Scrappy Bear Paw Block Pattern, complete with fabric cutting instructions and assembly tips. Whether you’re aiming to make a cozy lap quilt or a decorative wall hanging, this pattern offers the flexibility to suit various project sizes and styles.
Understanding the Scrappy Bear Paw Block
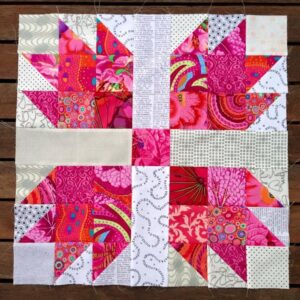
The Scrappy Bear Paw Block Pattern is a variation of the traditional Bear Paw design, characterized by its use of assorted fabric scraps to create the “paw” effect. This approach adds a vibrant, eclectic touch to the quilt, making each block unique.
-
Historical Significance: The Bear Paw pattern has roots in early American quilting traditions, symbolizing strength and a connection to nature. The scrappy version modernizes this classic design, allowing quilters to infuse personal flair into their projects.
-
Design Elements: Each block typically consists of a large square (the “palm”) and smaller squares or triangles (the “claws”), arranged to mimic a bear’s paw. The scrappy version replaces uniform fabrics with a mix of prints and colors, enhancing visual interest.
-
Versatility: The pattern’s modular nature means it can be adapted to various quilt sizes and configurations. Whether you’re creating a full-sized bed quilt or a smaller decorative piece, the Scrappy Bear Paw Block fits seamlessly.
-
Skill Level: This pattern is suitable for quilters of all levels. Beginners will find the block construction straightforward, while experienced quilters can experiment with complex fabric combinations and layouts.
-
Fabric Selection: Utilizing fabric scraps not only reduces waste but also adds depth and character to the quilt. Mixing different textures, colors, and patterns can result in a rich, tapestry-like effect.
-
Community Appeal: The Scrappy Bear Paw Block is a popular choice for quilting bees and community projects, as it allows multiple contributors to add their unique touch to a collective quilt.
Fabric Requirements and Cutting Instructions
Accurate cutting is crucial for the successful assembly of the Scrappy Bear Paw Block Pattern. Below are the recommended fabric requirements and cutting measurements for a single 12-inch finished block.
Fabric Requirements per Block:
-
Main Fabric (for “claws”): Assorted scraps totaling approximately 1/4 yard.
-
Background Fabric: 1/4 yard of a neutral or contrasting fabric.
-
Center Square Fabric: A 4.5-inch square piece, which can be a focal fabric or coordinating print.
Cutting Instructions:
-
From Main Fabric (Scraps):
-
Cut eight 2.5-inch squares.
-
Cut two 5-inch squares for half-square triangles (HSTs).
-
-
From Background Fabric:
-
Cut eight 2.5-inch squares.
-
Cut two 5-inch squares for HSTs.
-
Cut one 2.5-inch by 8.5-inch strip for sashing between paws.
-
-
From Center Square Fabric:
-
Cut one 4.5-inch square.
-
Tips:
-
Precision: Ensure all pieces are cut accurately to maintain block uniformity.
-
Organization: Keep cut pieces organized by block to streamline the assembly process.
-
Pressing: Press fabrics before cutting to ensure accurate measurements and ease of assembly.
Assembling the Scrappy Bear Paw Block
Constructing the Scrappy Bear Paw Block Pattern involves creating half-square triangles (HSTs) and assembling them with squares to form the distinctive paw design.
Step-by-Step Assembly:
-
Create HSTs:
-
Pair each 5-inch main fabric square with a 5-inch background square, right sides together.
-
Draw a diagonal line on the back of one square.
-
Sew 1/4 inch on both sides of the drawn line.
-
Cut along the drawn line to create two HSTs.
-
Press seams open and trim each HST to 4.5 inches square.
-
-
Assemble Claws:
-
Arrange two HSTs and two 2.5-inch squares (one main fabric, one background) in a 2×2 grid to form a “claw” unit.
-
Sew the squares together in rows, then join the rows to complete the unit.
-
Repeat to create four claw units per block.
-
-
Construct the Block:
-
Arrange the four claw units around the 4.5-inch center square, positioning them to resemble a bear’s paw.
-
Use the 2.5-inch by 8.5-inch sashing strip to connect the claw units as needed.
-
Sew the units together, pressing seams as you go to reduce bulk.
-
-
Final Pressing:
-
Press the completed block flat, ensuring seams lie smoothly.
-
Trim the block to 12.5 inches square if necessary.
-
Tips:
-
Consistency: Maintain a consistent seam allowance throughout to ensure block uniformity.
-
Color Balance: Distribute colors evenly across the block to achieve a harmonious look.
-
Chain Piecing: For efficiency, consider chain piecing similar units across multiple blocks.
Designing and Completing Your Quilt
Once you’ve assembled multiple Scrappy Bear Paw Blocks, it’s time to plan your quilt layout and complete the project.
Layout Planning:
-
Arrangement: Decide on the block arrangement—traditional grid, on-point, or a more modern, asymmetrical layout.
-
Sashing and Borders: Incorporate sashing strips and borders to frame the blocks and add visual interest.
-
Color Flow: Arrange blocks to create a pleasing flow of colors and patterns across the quilt top.
Quilt Assembly:
-
Join Blocks:
-
Sew blocks together row by row, pressing seams between each addition.
-
Join rows to complete the quilt top.
-
-
Add Borders:
-
Measure the quilt top and cut border strips accordingly.
-
Attach borders, pressing seams outward.
-
-
Prepare Quilt Sandwich:
-
Layer the quilt top, batting, and backing fabric.
-
Baste layers together using pins, spray adhesive, or hand basting.
-
-
Quilting:
-
Choose a quilting design—straight-line, free-motion, or hand quilting.
-
Quilt through all layers, starting from the center and working outward.
-
-
Binding:
-
Trim excess batting and backing.
-
Prepare binding strips and attach them to the quilt edges.
-
Fold binding over and hand-stitch to the back for a clean finish.
-
Finishing Touches:
-
Labeling: Add a label with your name, date, and any special notes.
-
Washing: Gently wash and dry the quilt to achieve a soft, crinkled texture.
-
Display or Gift: Use your completed quilt to decorate your home or as a heartfelt gift.
Embracing the Scrappy Bear Paw Block Pattern
The Scrappy Bear Paw Block Pattern offers a delightful blend of tradition and creativity, making it a rewarding project for quilters of all skill levels. By repurposing fabric scraps, you not only create a visually engaging quilt but also contribute to sustainable crafting practices.
This pattern’s adaptability allows for endless customization, whether through color schemes, block arrangements, or quilt sizes. Each finished quilt tells a unique story, reflecting the quilter’s personal style and fabric choices.
As you embark on your Scrappy Bear Paw Block Pattern journey, remember that the beauty lies in the diversity of fabrics and the joy of creating something meaningful from remnants. Happy quilting!


