
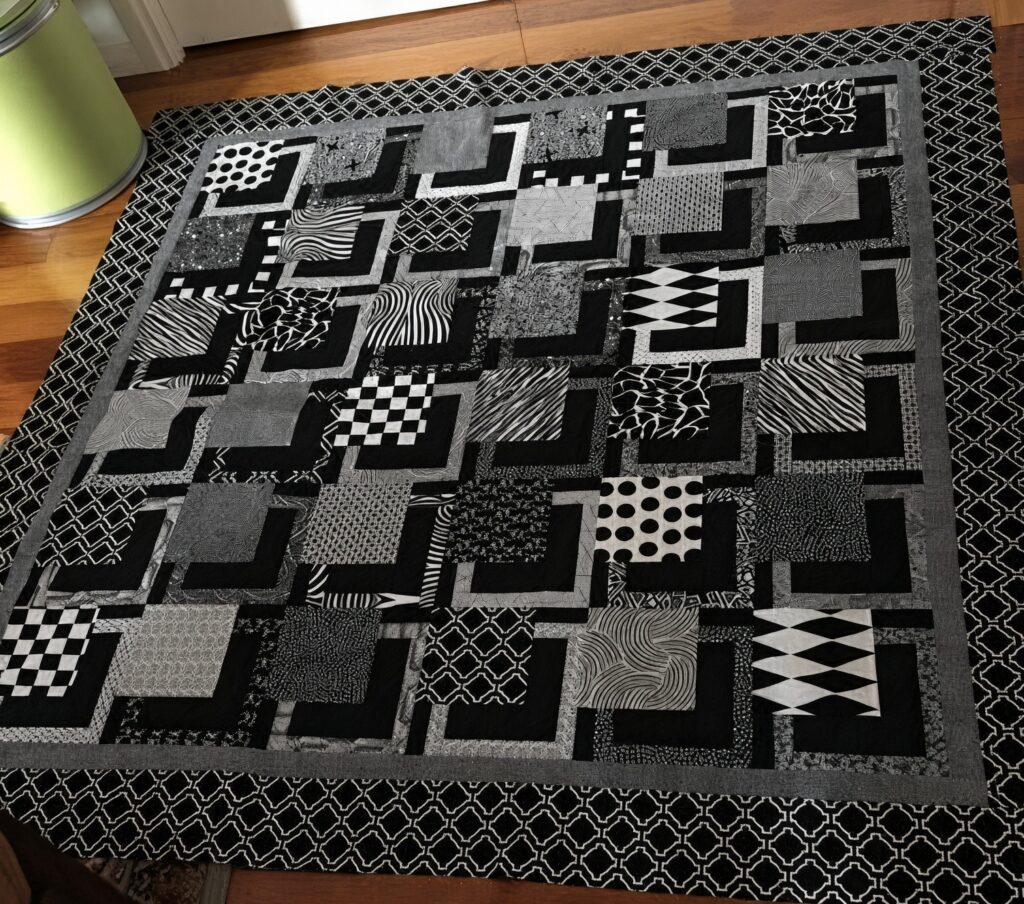
Shadow Box Quilt Pattern is a striking patchwork design that uses carefully positioned light and dark fabrics to create the illusion of depth, overlapping frames, and dimensional boxes. Inspired by the quilt shown in the reference image, this project combines black, gray, white, and patterned fabrics in repeating geometric blocks. The dramatic contrast makes some sections appear to sit in front of others, producing the distinctive shadow box effect. Although the completed quilt looks complex, the visual illusion comes primarily from strategic fabric placement and straightforward rectangular and square pieces.
One of the most appealing features of the Shadow Box Quilt Pattern is the opportunity to showcase many different fabrics without losing a cohesive overall design. In the pictured quilt, geometric prints, dots, checks, stripes, abstract designs, and textured-looking fabrics appear throughout the blocks. Solid or nearly solid black sections provide visual stability, while gray strips create highlights and shadows around the featured fabrics. This combination gives each block its own personality while allowing all of them to work together as one unified quilt.
This shadow box quilt is also an excellent project for using fabric collections or carefully coordinated scraps. The central sections can feature a different print in every block, while repeating black and gray fabrics establish consistency. The key to achieving the dimensional appearance is maintaining strong contrast between the focal fabric, dark frame, and lighter accent strips. In the tutorial below, you will learn how to plan the fabrics, construct the individual framed blocks, arrange them for maximum visual impact, assemble the quilt top, and finish it with borders, quilting, and binding.
Choosing Fabrics and Planning the Shadow Box Quilt
Begin the Shadow Box Quilt Pattern by selecting three main fabric categories: focal prints, dark framing fabric, and medium or light shadow fabric. The quilt in the reference image uses a predominantly monochromatic palette, with black serving as the strongest dark value and several shades of gray and white providing contrast. This limited palette makes the geometric structure especially noticeable.
Your focal fabrics can be much more varied. Consider dots, stripes, checkerboards, abstract prints, geometric designs, florals, novelty fabrics, or tone-on-tone patterns. The photographed quilt demonstrates how successfully many different prints can coexist when they share a limited color family. If you prefer a colorful version, the same concept can work with bright focal squares surrounded by consistent neutral frames.
Black or another very dark fabric is especially useful for creating the deepest part of the shadow. It visually pushes portions of the block backward. A medium gray or lighter fabric can then be placed on adjacent sides to suggest light hitting the edge of the box. Together, these values create the recognizable three-dimensional quilt effect without requiring complicated piecing.
Before cutting, determine the finished size of your blocks. A practical approach is to select a center square dimension first and then decide how wide the surrounding strips should be. For example, you might begin with a generously sized focal square and surround it with narrower rectangular strips. Whatever dimensions you choose, remember to include your quarter-inch seam allowance in every cutting measurement.
Prepare all fabrics by pressing them before cutting. Use a rotary cutter, acrylic quilting ruler, and cutting mat for accuracy. Straight edges are particularly important in a geometric quilt pattern because small cutting errors can become increasingly noticeable as the rectangular frames are assembled.
Before sewing, make one complete test block. This gives you an opportunity to evaluate the proportions and verify that the light and dark strips create the desired illusion. Place the test block at a distance and look at it from several angles. If the shadow effect is difficult to see, increasing the contrast between your framing fabrics may improve the result.
How to Sew the Shadow Box Quilt Blocks
Begin each shadow box quilt block with a focal square or rectangle. This central piece is where you can showcase an interesting print. In the reference quilt, some blocks feature bold checkerboards, dots, stripes, and abstract patterns, while others use quieter textured fabrics. Varying the focal prints keeps the overall composition lively.
Cut narrow strips for the surrounding frame. One side should use the darker fabric and another should use a lighter or medium-value fabric. The exact arrangement must remain consistent from block to block if you want the light source and resulting shadow to appear believable. Think of every box as being illuminated from the same direction.
Sew the first framing strip to one side of the focal square using a consistent quarter-inch seam. Press the seam carefully without stretching the fabric. Add the next strip to an adjacent side, then continue building outward. Depending on your chosen block design, you can use partial frames or multiple strips to create a more pronounced stepped appearance.
The corners are important because they help create the illusion that one frame passes behind another. Study the placement before sewing each section permanently. Dark strips generally create visual recession, while lighter strips appear to move forward. Maintaining this relationship is the foundation of the shadow box quilt illusion.
After completing a block, place it on a flat surface and measure it vertically and horizontally. If necessary, square it carefully with a quilting ruler. Do not automatically trim every block to compensate for significant differences; first identify whether the problem came from cutting or seam allowance so the same issue does not continue throughout the project.
Repeat the process for the remaining blocks, changing the focal fabrics while keeping the shadow placement consistent. Chain piecing can make construction faster when you are producing many similar sections. Keep completed blocks organized so that the orientation of the dark and light frames remains correct.
Arranging and Assembling the Shadow Box Quilt Top
Once you have completed enough Shadow Box Quilt Pattern blocks, arrange them on a design wall, clean floor, or another large surface. Do not immediately sew them together. The arrangement stage is important because the focal prints vary dramatically, and you want the visual weight distributed evenly throughout the quilt.
Begin by separating very bold prints. In the reference design, strong patterns such as checkerboards, diamonds, dots, and high-contrast stripes are scattered across the quilt rather than concentrated in one area. This creates movement and encourages the viewer’s eye to travel throughout the entire patchwork quilt.
Next, examine the distribution of light and dark blocks. Even within a black-and-white palette, some prints appear significantly brighter than others. Step several feet away from the layout or take a photograph. Viewing the arrangement at a smaller scale can make unbalanced areas easier to identify.
When you are satisfied with the placement, begin sewing the blocks into horizontal rows. Match important seams and pin where necessary. Maintain your quarter-inch seam allowance throughout the process. Press the completed rows carefully, alternating seam directions when useful so intersections can nest together.
Join the rows one at a time, checking the alignment as you work. Avoid pulling one row to force it to match another. If two sections differ significantly in length, investigate the cause rather than stretching the fabric, as distortion can make the finished quilt top difficult to square.
After assembling the central section, add borders if desired. The reference quilt uses a strong outer treatment that visually contains the busy interior blocks. A narrower solid or subtle border followed by a wider patterned border can create a similar effect. Measure the quilt through the center before cutting the quilt borders so the edges remain straight.
Quilting, Binding, and Customizing the Finished Quilt
With the shadow box quilt top complete, prepare your backing and batting. Both should extend beyond the quilt top on all sides so you have room for quilting and final trimming. Smooth the three layers carefully and baste them together using your preferred method.
Straight-line quilting is particularly effective for a Shadow Box Quilt Pattern because it reinforces the geometric character of the design. You can quilt parallel to the block edges, follow the frames, or create a simple grid. These approaches add texture without competing excessively with the many prints already present in the quilt.
Another option is free-motion quilting within the focal squares while keeping the framing sections relatively simple. This can make each featured fabric feel like a separate picture inside its own frame. If your quilt contains many busy prints, however, a simpler quilting design may allow the piecing to remain the main attraction.
Once quilting is complete, trim the excess backing and batting and square the outer edges. Prepare quilt binding from coordinating fabric strips. A black binding can create a strong final outline for a monochromatic quilt, while gray or patterned binding can connect visually with the border.
This design can easily be adapted to different color schemes. Instead of black and gray, try navy and pale blue, burgundy and blush, forest green and sage, or dark brown and cream. The essential ingredient is fabric value contrast, not a particular color. As long as the shadow fabric is noticeably darker than the highlight, the dimensional effect can remain visible.
You can also adjust the number of blocks to create different projects. A small arrangement can become a wall hanging, several blocks can make a table runner, and a larger grid can become a throw or bed quilt. Keep detailed notes about your block measurements, strip widths, and fabric placement so your favorite Shadow Box Quilt Pattern can be reproduced later.
FAQ About the Shadow Box Quilt Pattern
What is a Shadow Box Quilt Pattern?
A Shadow Box Quilt Pattern uses contrasting fabrics and carefully positioned strips to make flat patchwork appear dimensional. Dark fabrics typically represent shadows, while lighter fabrics suggest highlighted edges, creating the impression of raised or overlapping boxes.
Is the Shadow Box Quilt Pattern suitable for beginners?
Yes, particularly for confident beginners who understand rotary cutting and straight seams. The visual effect may look complicated, but individual blocks can be constructed primarily from squares and rectangles. Accurate cutting and a consistent seam allowance are more important than advanced sewing techniques.
What fabrics work best for a shadow box quilt?
Focal fabrics with interesting prints work beautifully inside the boxes. Pair them with consistent dark and medium or light fabrics for the frames. Strong contrast between these values makes the dimensional effect easier to see.
Do I have to use black, white, and gray?
No. The monochromatic palette in the reference quilt produces a dramatic modern appearance, but almost any color combination can work. The important factor is having clearly distinguishable light, medium, and dark values.
Can I make a Shadow Box Quilt with scraps?
Absolutely. This is an excellent scrap quilt pattern because every focal box can contain a different fabric. Using the same framing fabrics throughout the project helps unify a large variety of scraps.
How do I make the 3D effect stronger?
Increase the contrast between the highlight and shadow fabrics and keep their positions consistent. If the imagined light source changes direction between blocks, the dimensional illusion becomes less convincing.
Why are my quilt blocks different sizes?
Common causes include inaccurate cutting, inconsistent seam allowances, or stretching during pressing. Check your quarter-inch seam and measure individual units as you work instead of waiting until every block is completed.
Should all Shadow Box Quilt Blocks face the same direction?
For a consistent dimensional effect, keeping the highlights and shadows oriented in the same direction is usually helpful. Intentional rotation can create a more abstract design, but it changes the visual impression.
What quilting design works well with Shadow Box Quilt Blocks?
Straight-line quilting, grids, echo quilting, and simple geometric patterns are excellent choices. They reinforce the angular structure without overwhelming the patchwork.
Can I use this pattern for smaller quilting projects?
Yes. One or several blocks can become a pillow, tote bag panel, wall hanging, placemat, or table runner. The modular construction makes the design easy to scale by changing the number of blocks.
Conclusion
The Shadow Box Quilt Pattern is an impressive example of how simple patchwork shapes can create a powerful visual illusion. By combining interesting focal prints with strategically positioned dark and light framing fabrics, you can make ordinary flat pieces appear to overlap and project forward from the quilt surface.
Throughout this tutorial, you learned how to select fabrics according to color value, prepare focal squares and framing strips, maintain a quarter-inch seam, construct individual shadow box quilt blocks, arrange bold prints throughout the quilt, assemble rows, add borders, and finish the project with quilting and binding.

